Quick Start for MobiusPi Python Development
The InGateway series of Beijing InHand Networks Technology Co., Ltd. (InHand) consists of InGateway902 (referred to as IG902 hereinafter), InGateway502 (referred to as IG502 hereinafter) and InGateway501 (referred to as IG501 hereinafter). MobiusPi is a secondary development platform for the InGateway series. This document describes how to perform Python-based secondary development on MobiusPi.
- 1. Build a MobiusPi development environment
- 2. Compile the MobiusPi App: Hello World
- FAQ
- During SFTP connection building, it prompts “REMOTE HOST IDENTIFICATION HAS CHANGED and Host key verification failed”
- When synchronizing the code to the remote server, it prompts “All configured authentication methods failed”
- How to call the serial port and network port of MobiusPi
- When creating an SFTP connection with MobiusPi, it prompts “SSH error”
1. Build a MobiusPi development environment
Before starting development, ensure that you get the following items ready:
- InGateway
- InGateway501
- Firmware version: V2.0.0.r12351 or later
- SDK version: py2sdk-V1.3.4 or later
- The network is connected and the debugging mode is enabled.
- InGateway502
- Firmware version: V2.0.0.r13771 or later
- SDK version: py3sdk-V1.3.5 or later
- The network is connected and the debugging mode is enabled.
- InGateway902
- Firmware version: V2.0.0.r12537 or later
- SDK version: py3sdk-V1.3.5 or later
- The network is connected and the debugging mode is enabled.
- InGateway501
- PC
- Python 2.7.X/3.7.X interpreter
- Visual Studio Code software
- Python plug-in
- Project Templates plug-in
- SFTP plug-in
- OpenSSH
If your MobiusPi and PC have met all the above items, skip this section. Otherwise, prepare a development environment as follows.
- 1.1 Prepare the hardware and network environment
- 1.2 Prepare the PC environment
- 1.3 Prepare the VS Code development environment
1.1 Prepare the hardware and network environment
- 1.1.1 Connect the power supply and use a network cable to connect the platform to the PC
- 1.1.2 Acess the MobiusPi
- 1.1.3 Connect MobiusPi to the Internet
- 1.1.4 Update the software version
- 1.1.5 Enable the debugging mode for MobiusPi
1.1.1 Connect the power supply and use a network cable to connect the platform to the PC
Prepare the IG501 hardware
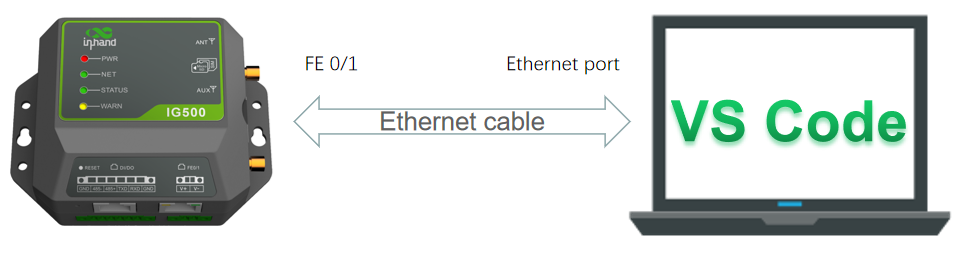
Power on IG501 and connect the PC and IG501 through an Ethernet cable according to the topology.
Prepare the IG502 hardware
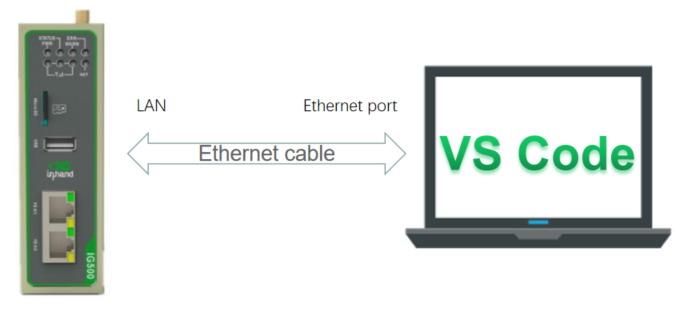
Power on IG502 and connect the PC and IG502 through an Ethernet cable according to the topology.
Prepare the IG902 hardware
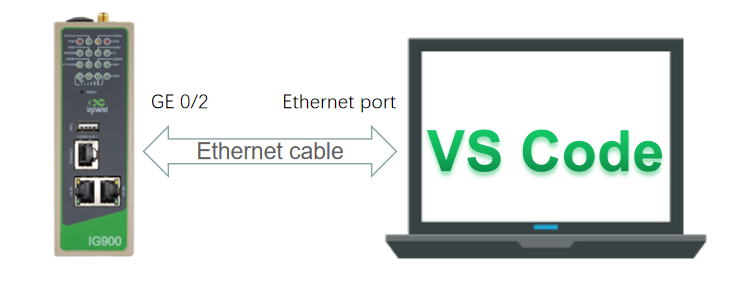
Power on IG902 and connect the PC and IG902 through an Ethernet cable according to the topology.
1.1.2 Acess the MobiusPi
- Acess the IG501 by referring to Access the IG501.
- Acess the IG902 by referring to Access the IG902.
1.1.3 Connect MobiusPi to the Internet
- Connect IG501 to the Internet by referring to Connect IG501 to the Internet.
- Connect IG502 to the Internet by referring to Connect IG502 to the Internet.
- Connect IG902 to the Internet by referring to Connect IG902 to the Internet.
1.1.4 Update the software version
If you want to get the latest MobiusPi and its functional characteristics, please visit the Resource. To update the software version, see the following links:
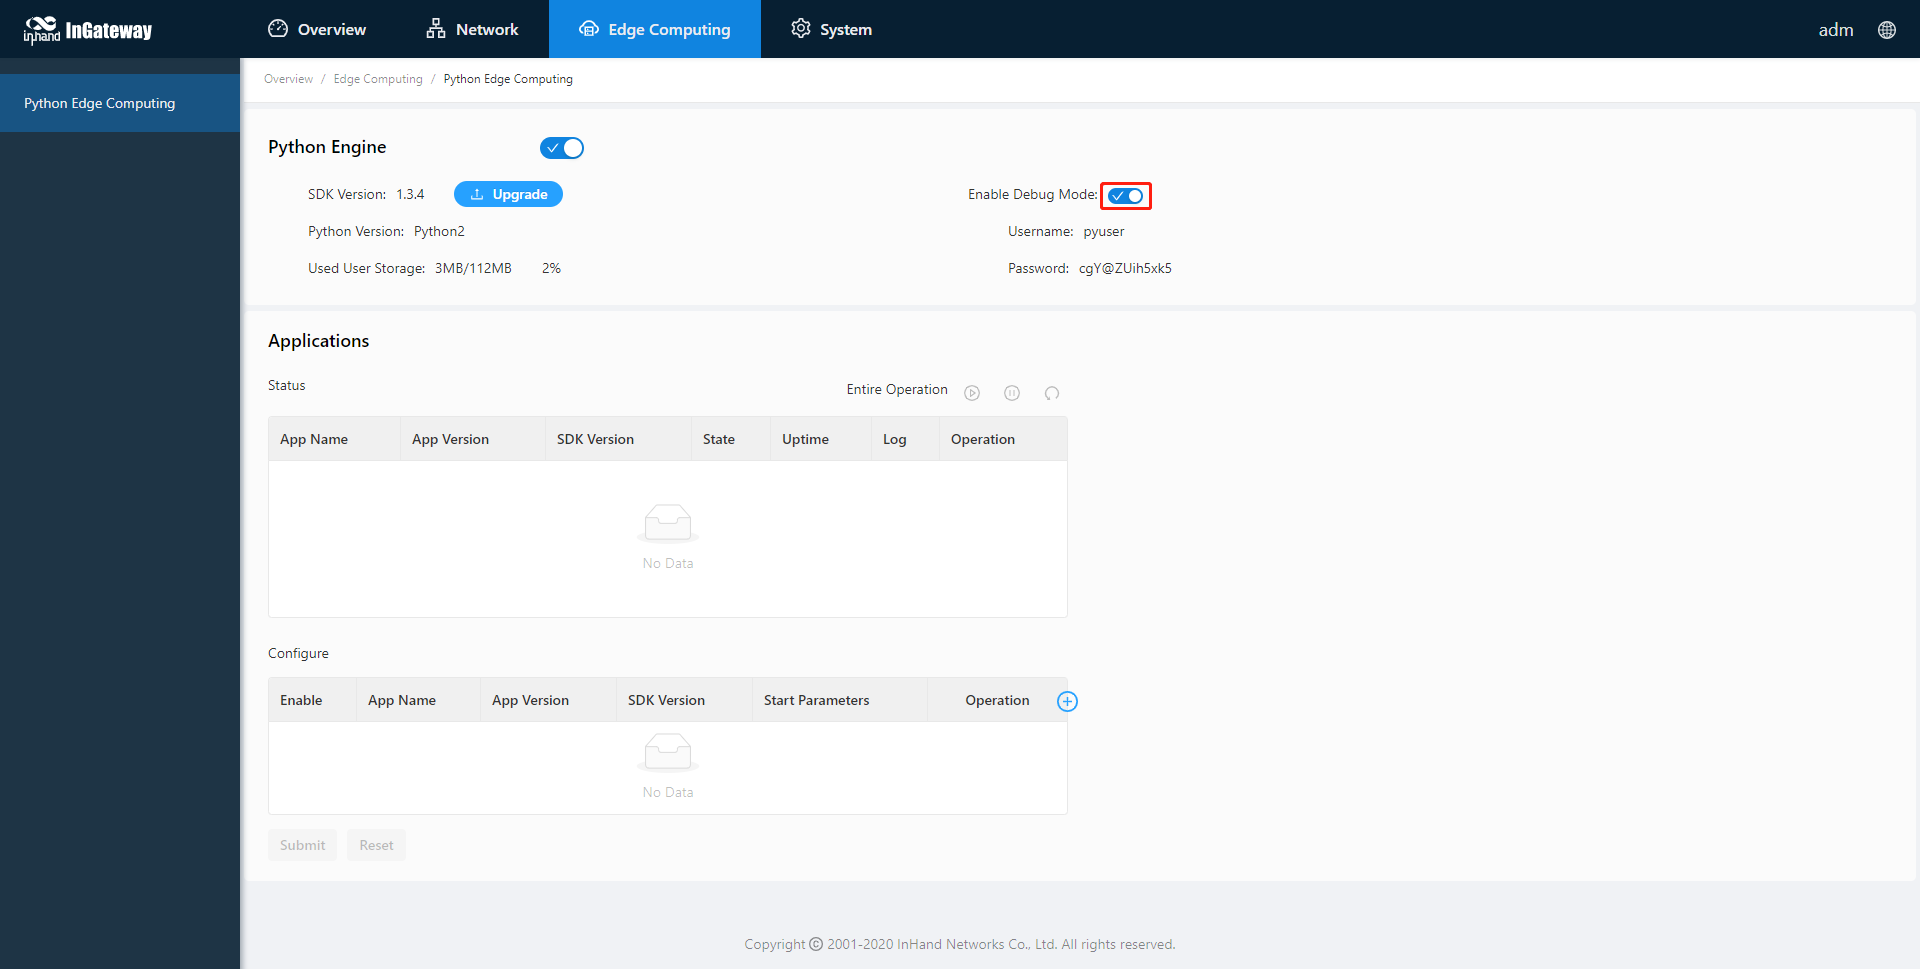
1.1.5 Enable the debugging mode for MobiusPi
To run and debug Python code on MobiusPi during development, you need to enable the debugging mode for MobiusPi.
1.2 Prepare the PC environment
1.2.1 Install the Python interpreter
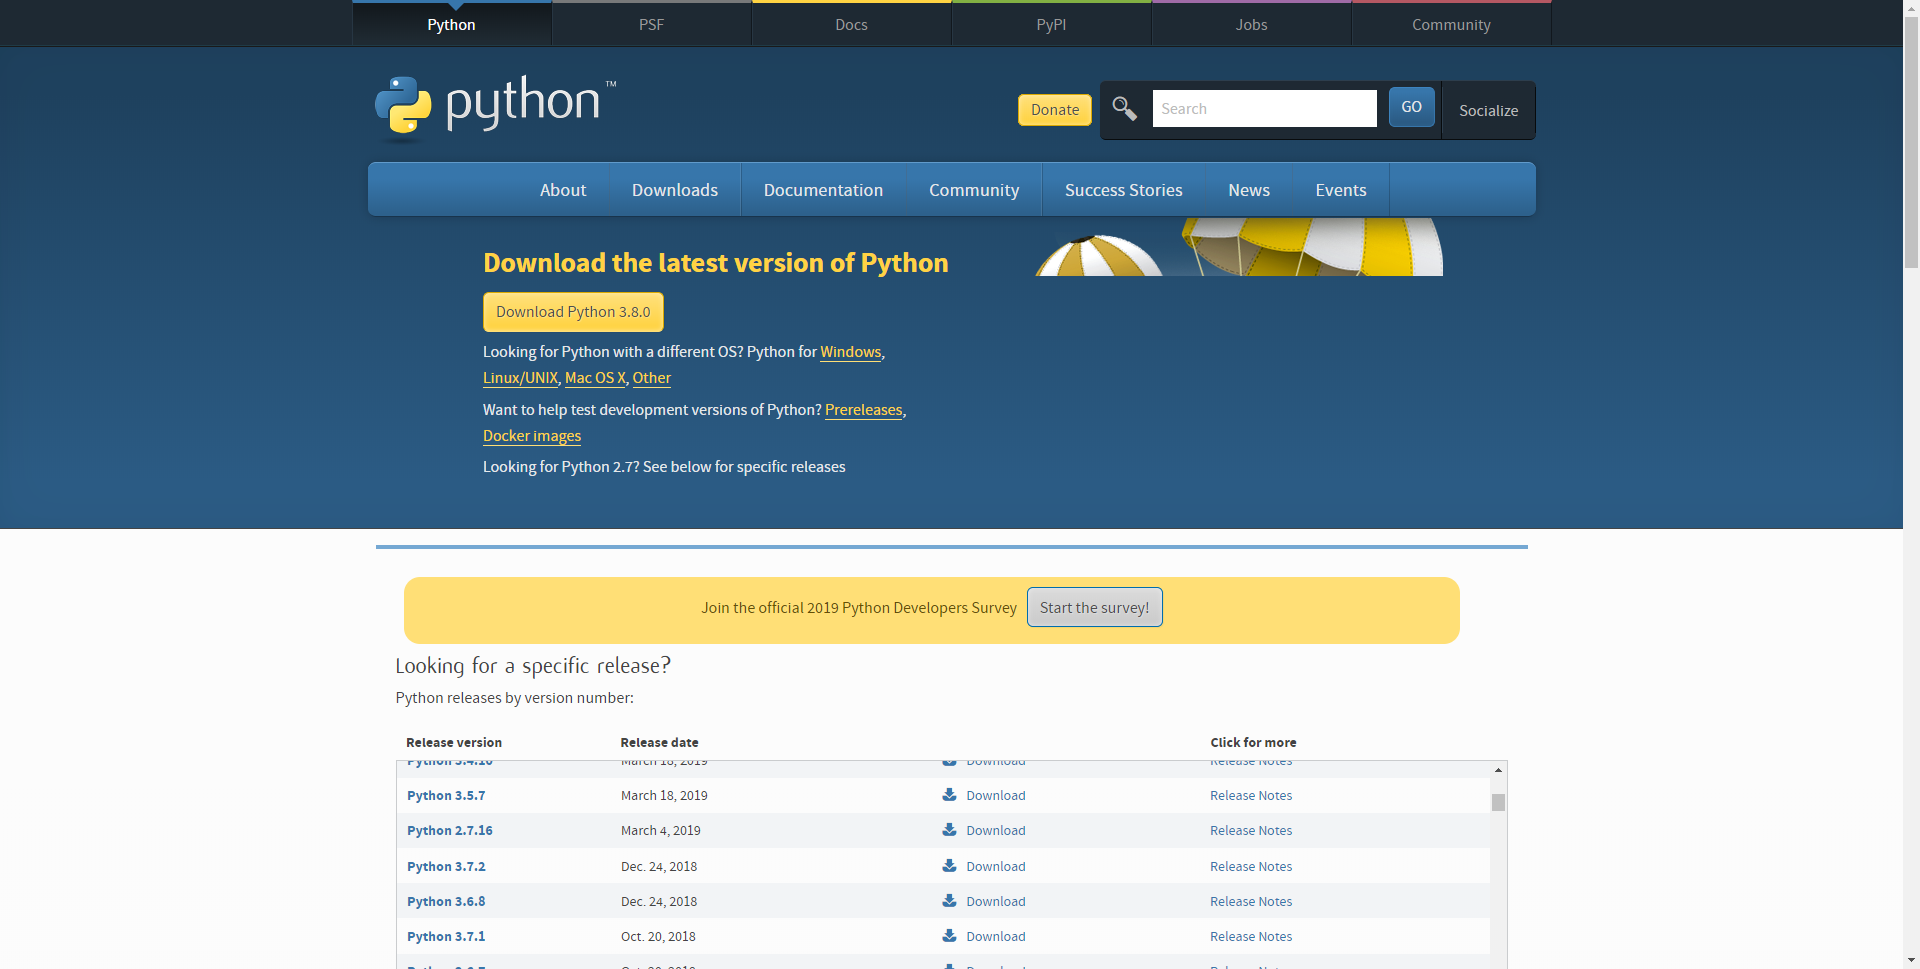
The PC shall be installed with the Python2.7.X or 3.7.X interpreter (the 3.7.X interpreter is recommended). You can download the install package from https://www.python.org/downloads/ and install it to the PC.
1.2.2 Install Visual Studio Code
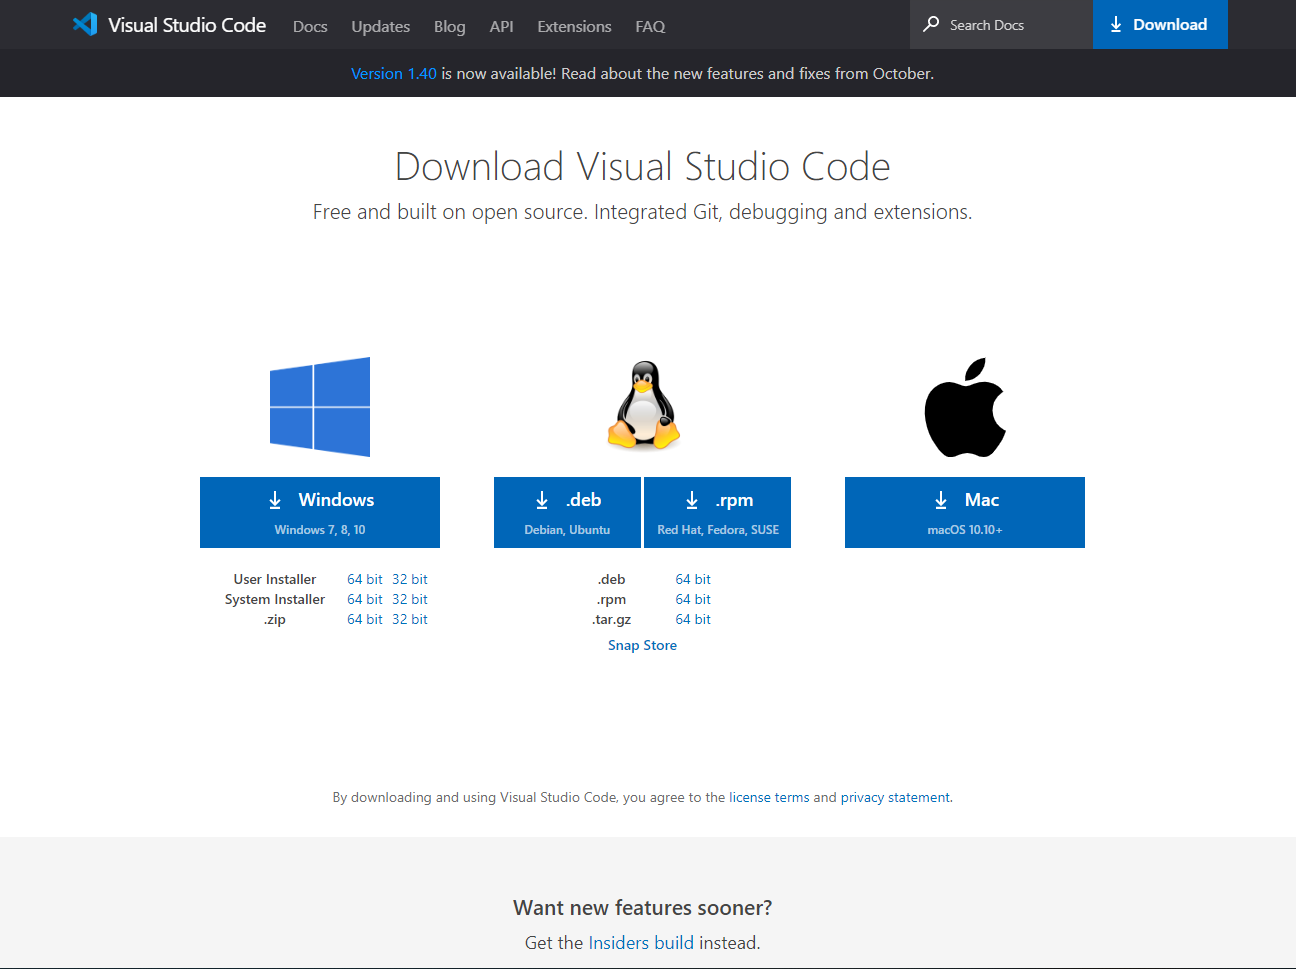
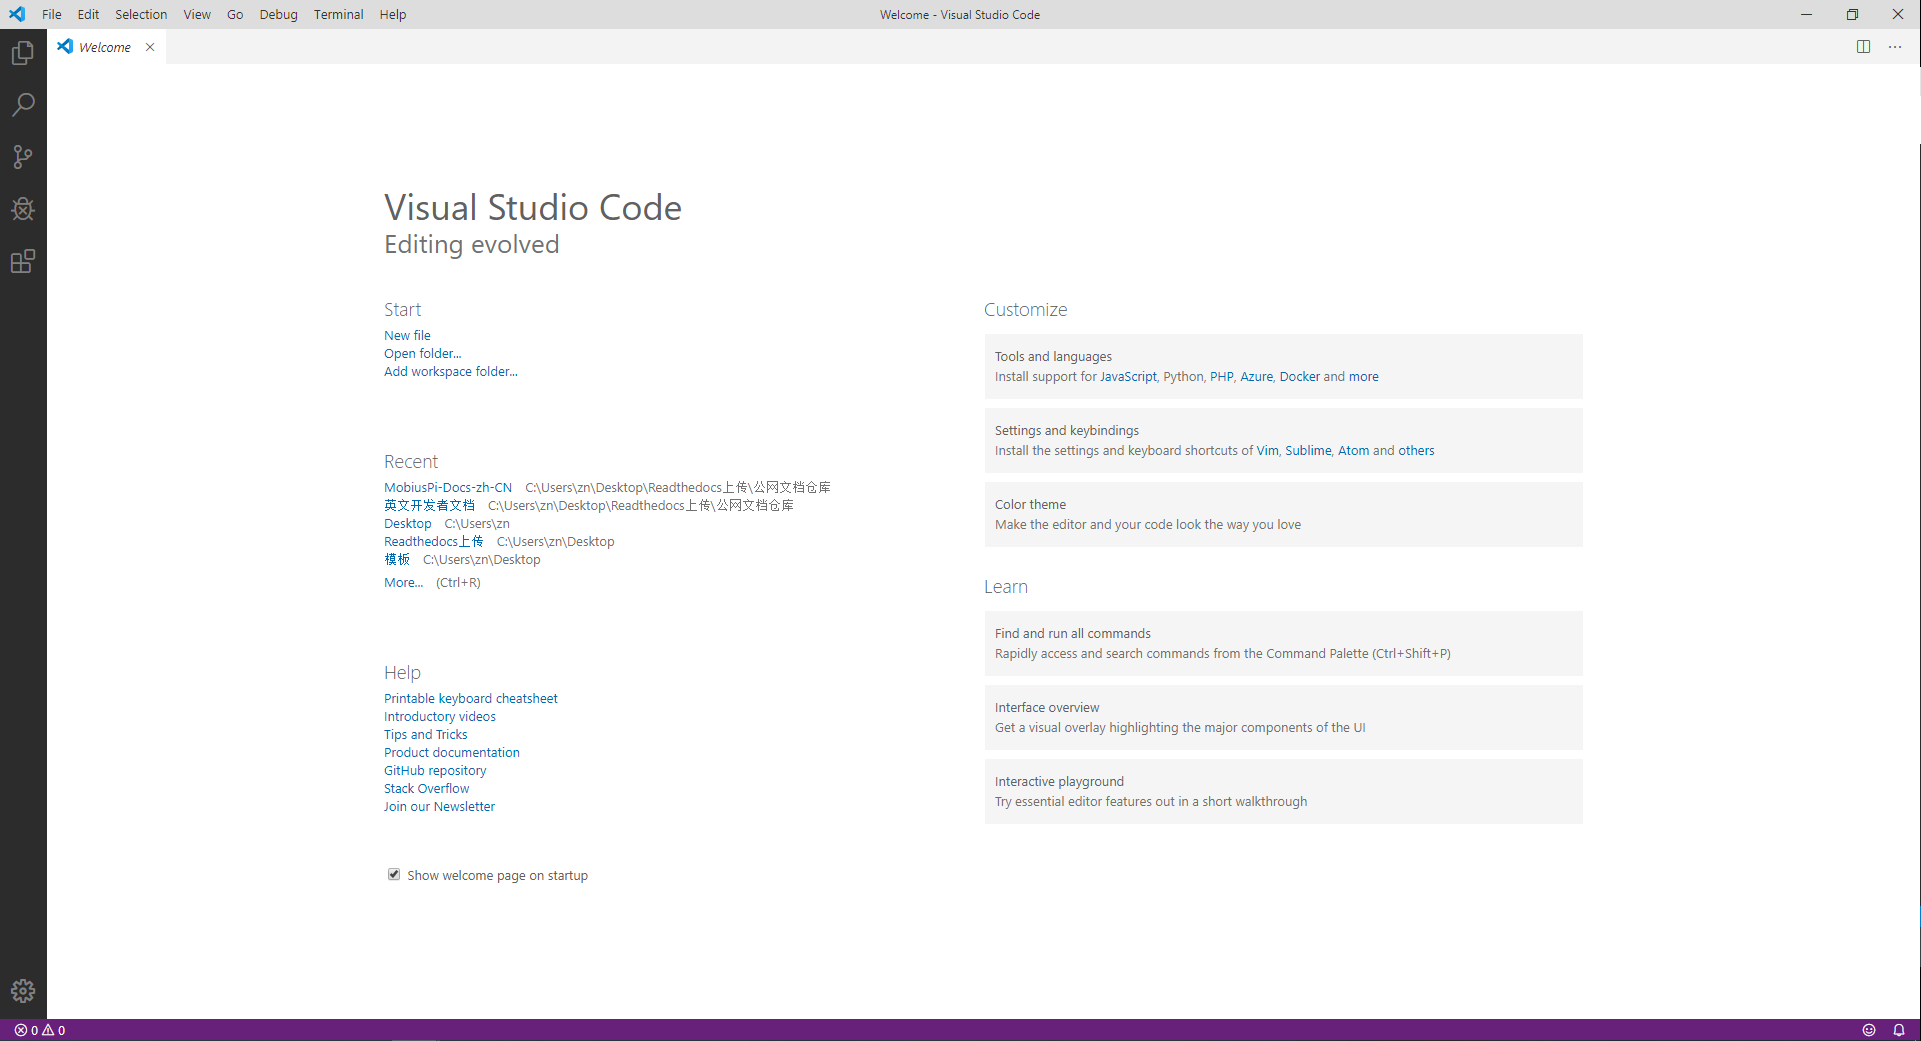
You can download Visual Studio Code (VS Code) from https://code.visualstudio.com/Download.
After VS Code is downloaded and installed, run the software, and its page is as follows.
1.2.3 Install OpenSSH
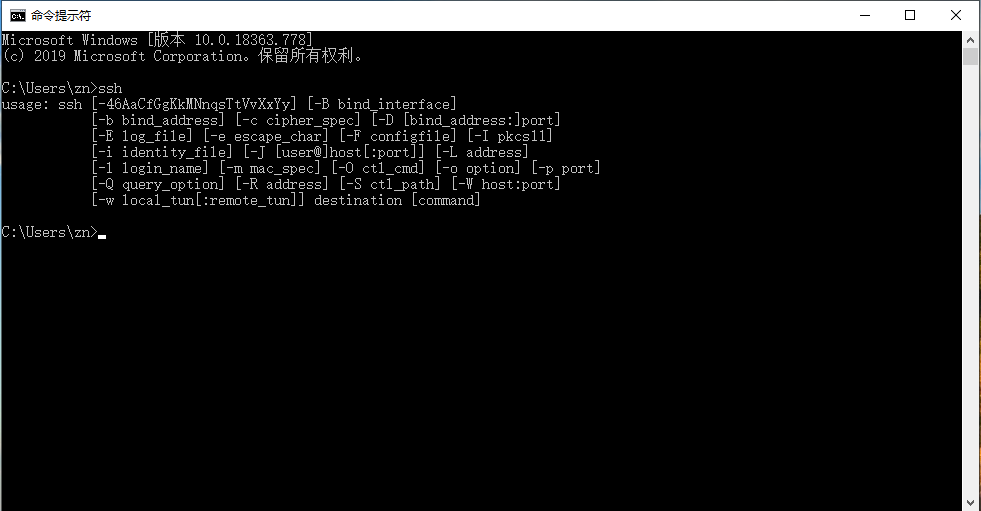
You can enter the ssh command in Command Prompt to check whether the PC supports the SSH protocol. If the PC supports the SSH protocol, the following figure is displayed:
If the PC does not support the SSH protocol, download OpenSSH from https://www.openssh.com and install it to the PC.
1.3 Prepare the VS Code development environment
- 1.3.1 Install the VS Code extension
- 1.3.2 Configure the Python interpreter version
- 1.3.3 Configure the project template
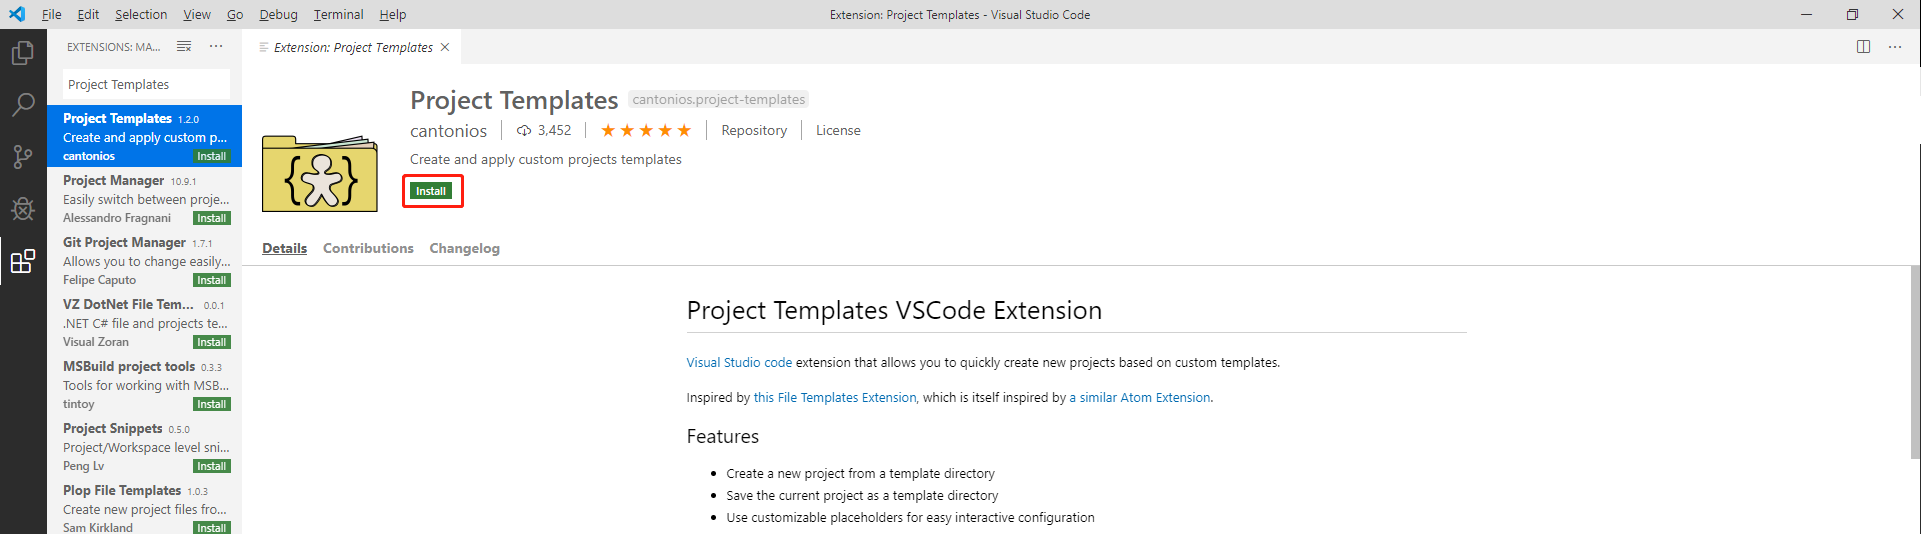
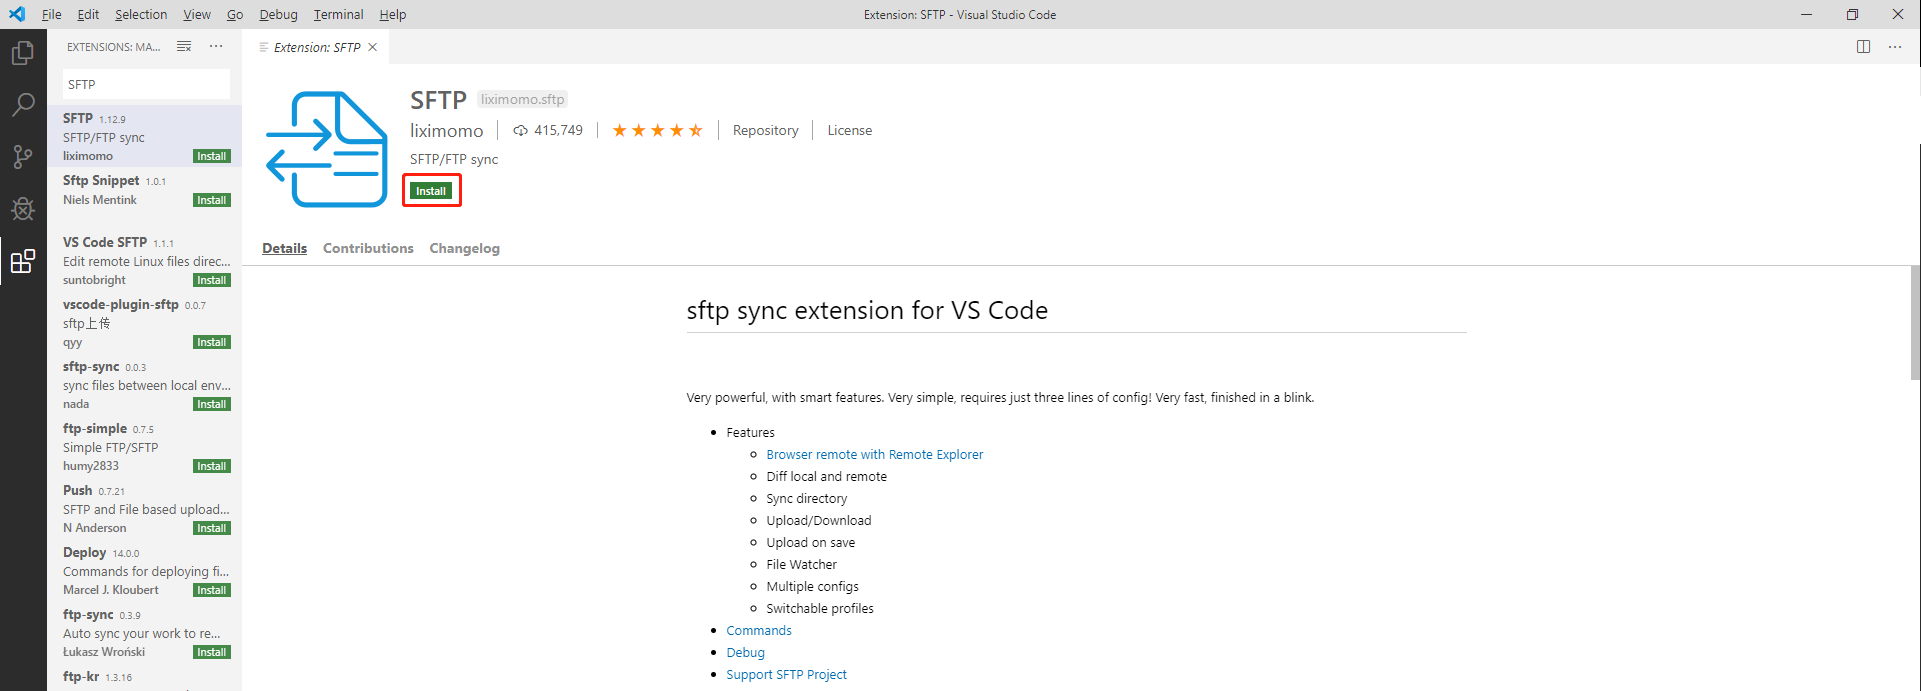
1.3.1 Install the VS Code extension
To develop and debug the Python code on MobiusPi, you must install the following extensions in Extensions of VS Code IDE:
Pythonis a VS Code Python extension. It provides rich features, including IntelliSense, Linting, debugging, code navigation and formatting, support to Jupyter notebook, restructuring, variable resource manager, test resource manager, and code snippets. For more information, see its official website.Project Templatesis a VS Code extension that allows you to quickly create new projects based on a custom template. InHand will release multiple Python App templates. You can use Project Templates to import a template and initialize your project quickly.SFTPallows you to use the SFTP Sync plug-in to upload the code to MobiusPi.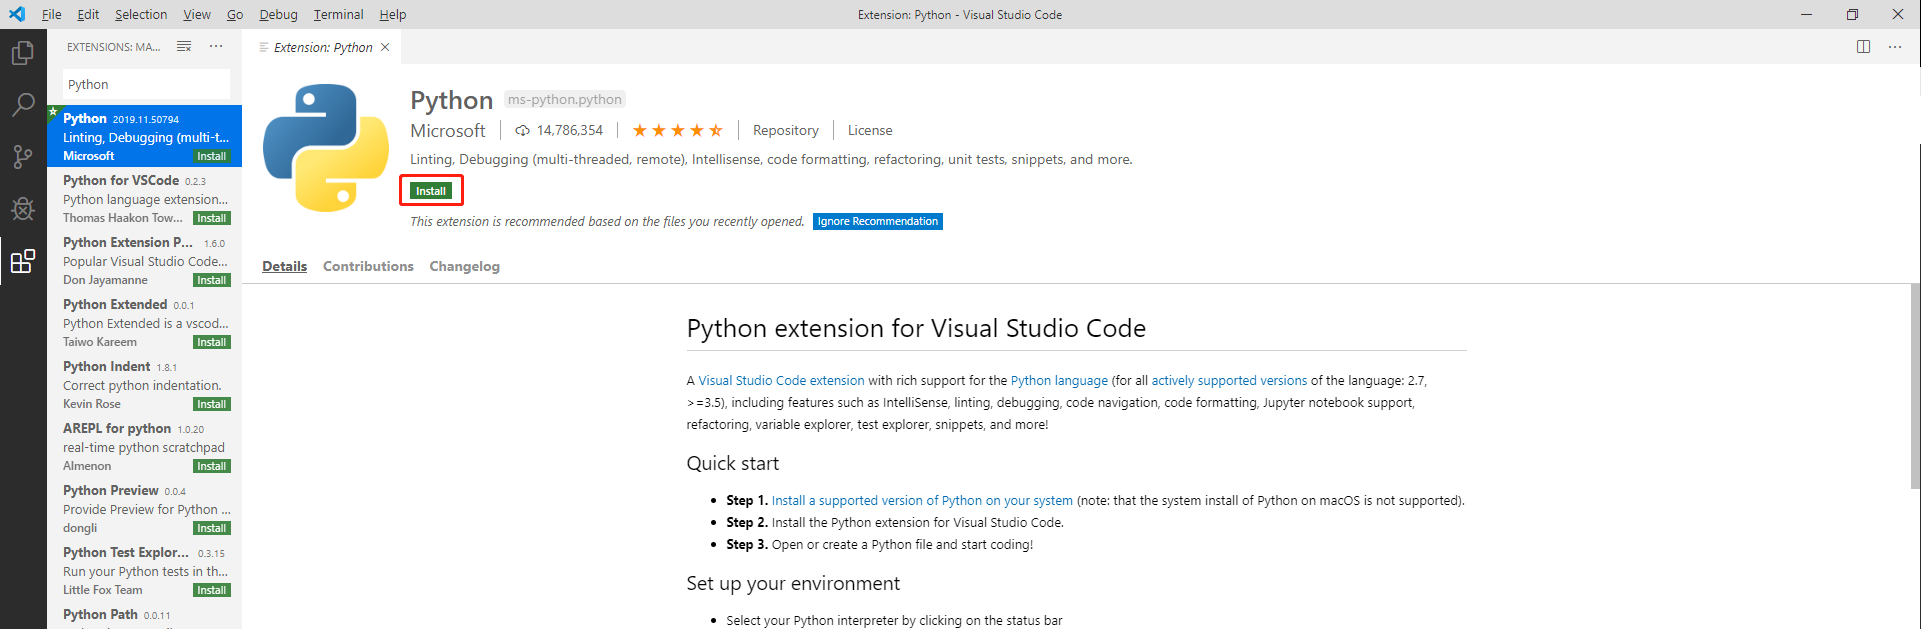
Now, all plug-ins required by MobiusPi have been installed. For more information about VS Code plug-ins, see the Visual Studio Code official website.
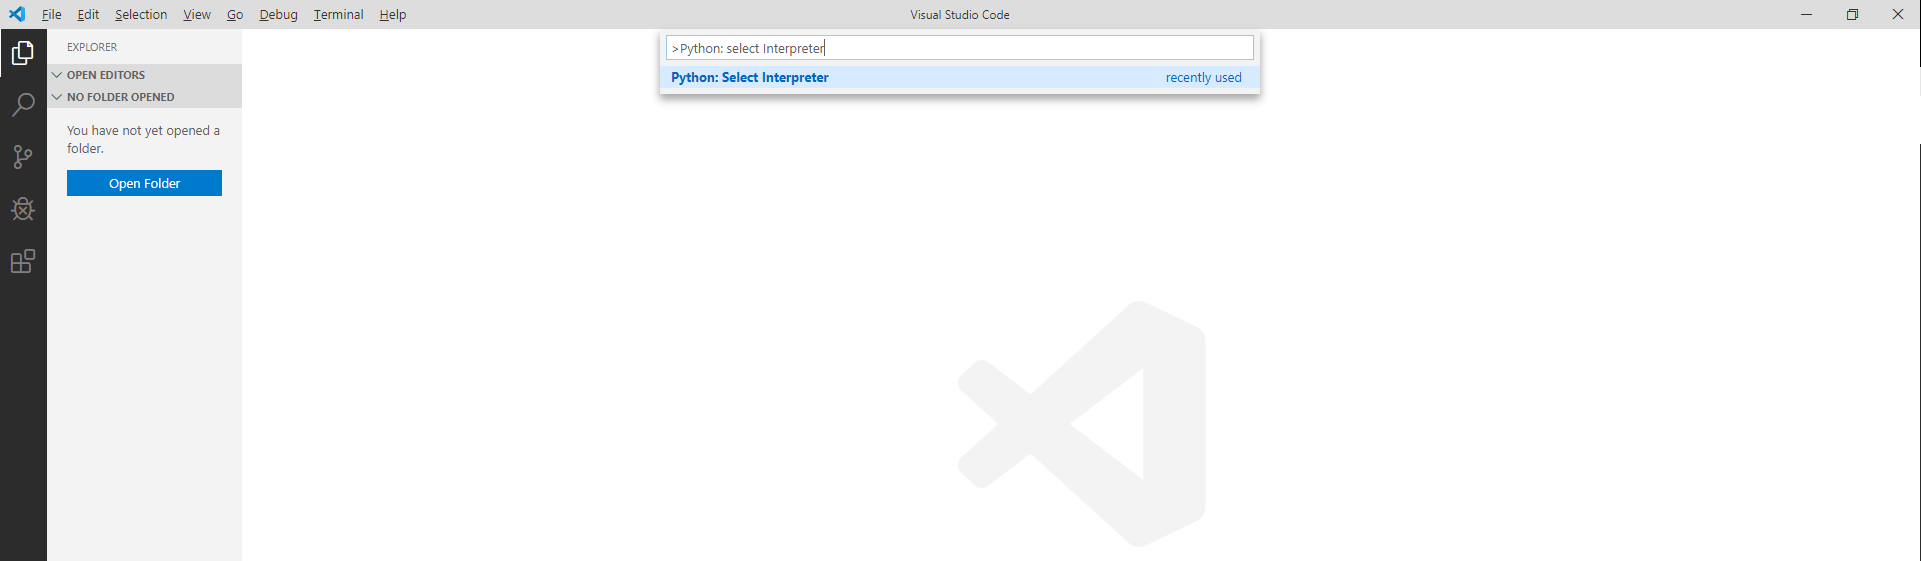
1.3.2 Configure the Python interpreter version
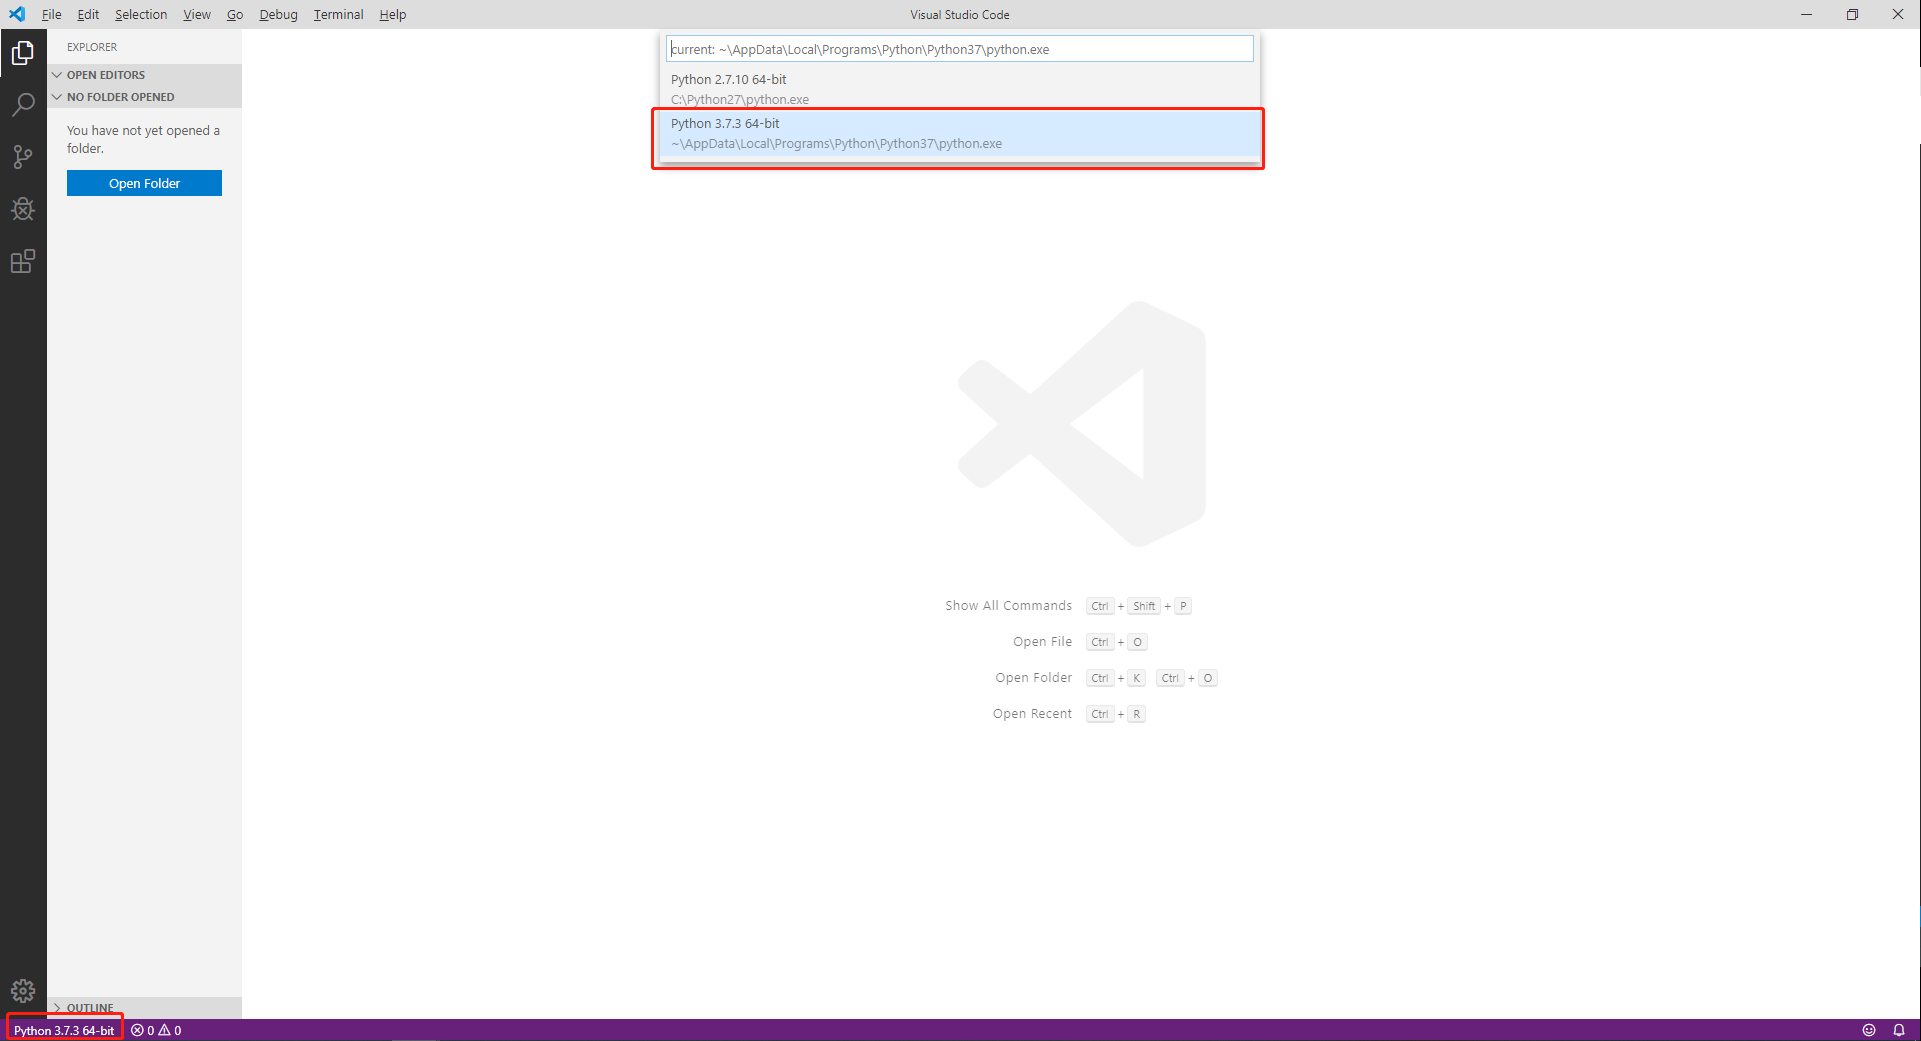
Press Ctrl+Shift+P. On the displayed Command Palette, enter >Python: select Interpreter.
Select a required Python interpreter. In this document, the Python 3.7.X interpreter is used. The selected 3.7.X version shall be consistent with that on the Edge Computing > Python Edge Computing page. Then, the selected Python interpreter version is displayed in the lower-left corner of VS Code.
1.3.3 Configure the project template
1.3.3.1 Apply the InHand standard project template
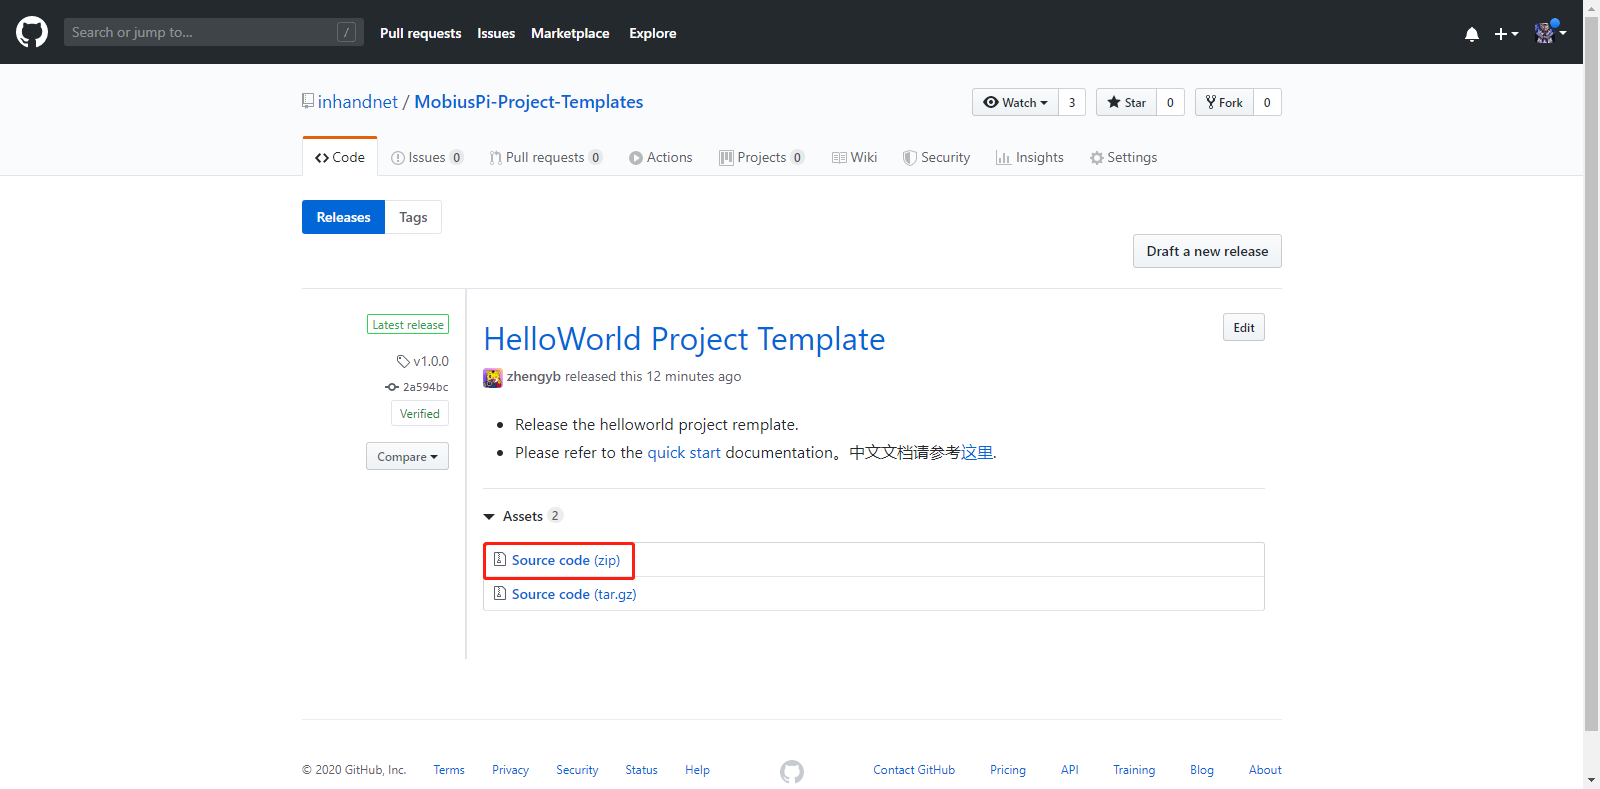
Step 1: Click Here to download a MobiusPi project template.
MobiusPi provides multiple project templates for you to quickly initialize your project directory. For more information about each project template, see README.md. In this document, the standard project template helloworld-template is used as an example.
Step 2: Open the project template.
Decompress the downloaded project template package, use VS Code to open the helloworld-template folder in the decompressed package, choose Files > Open Folder, and select the decompressed helloworld-template folder.

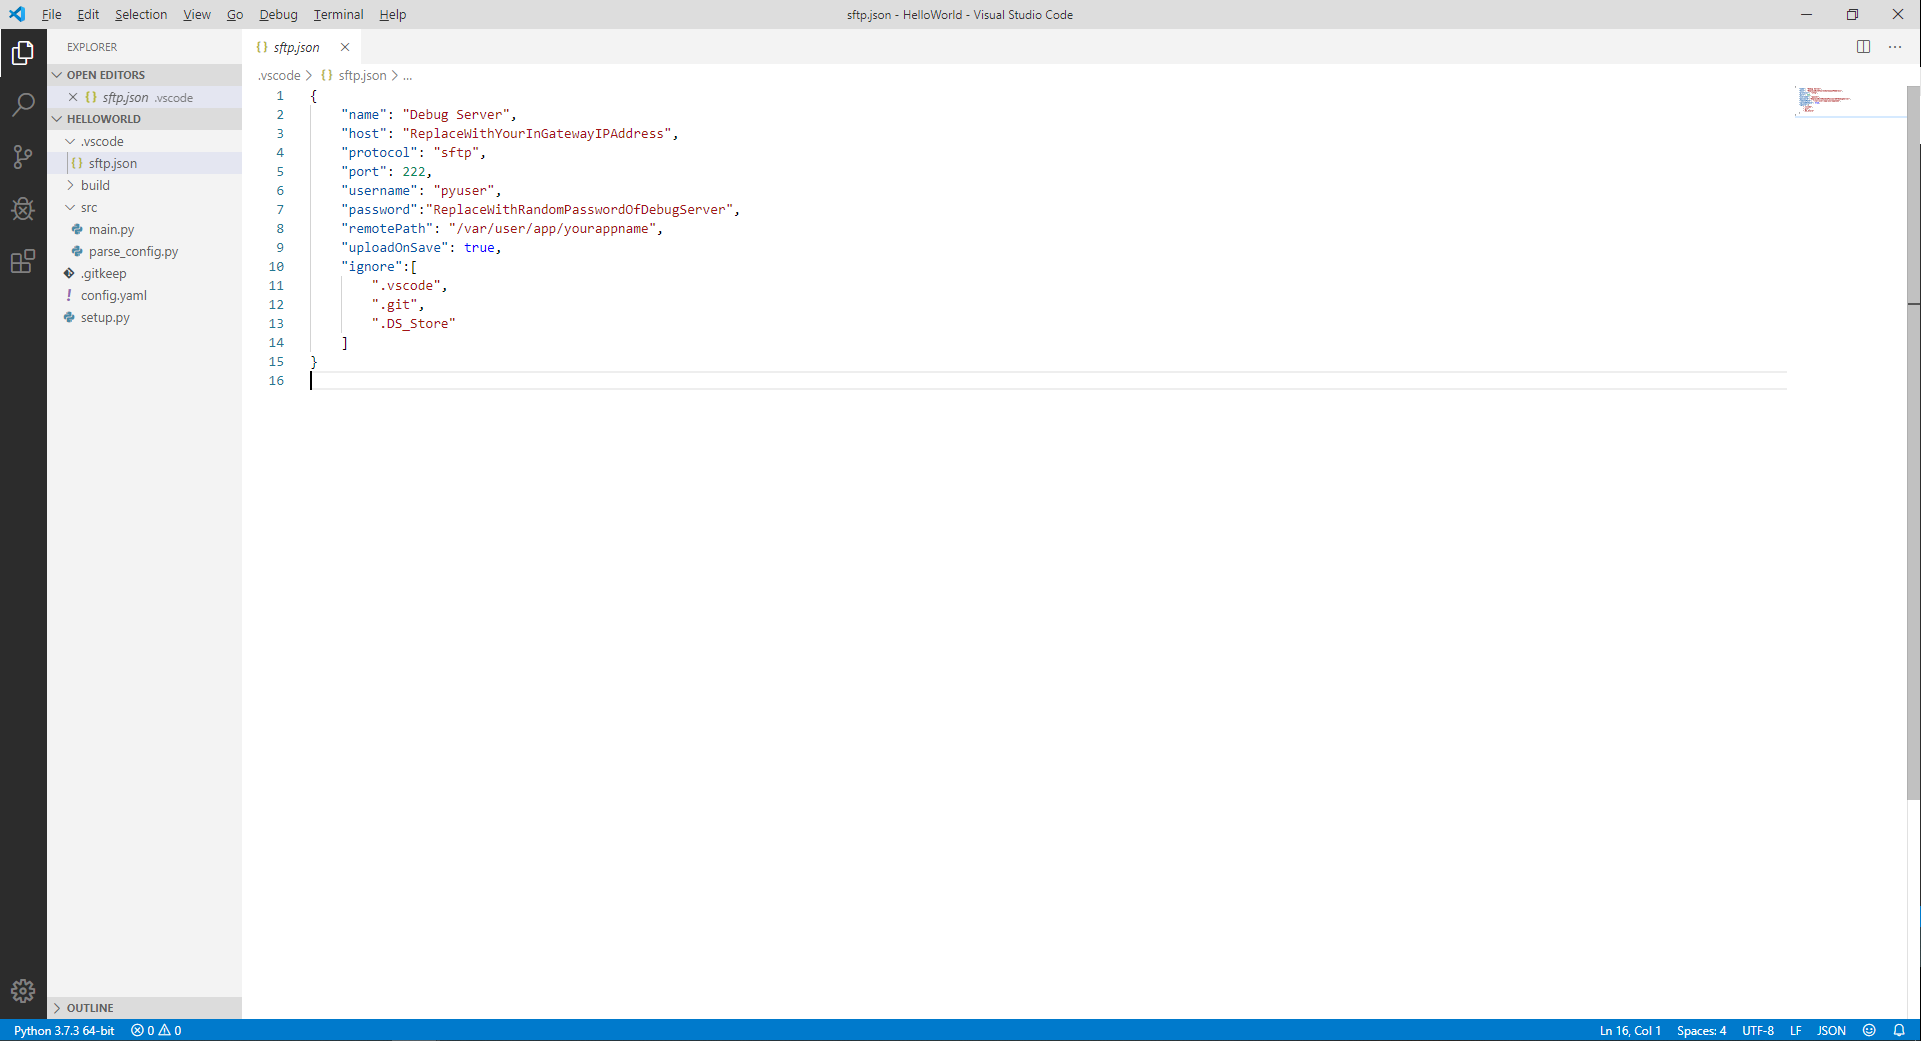
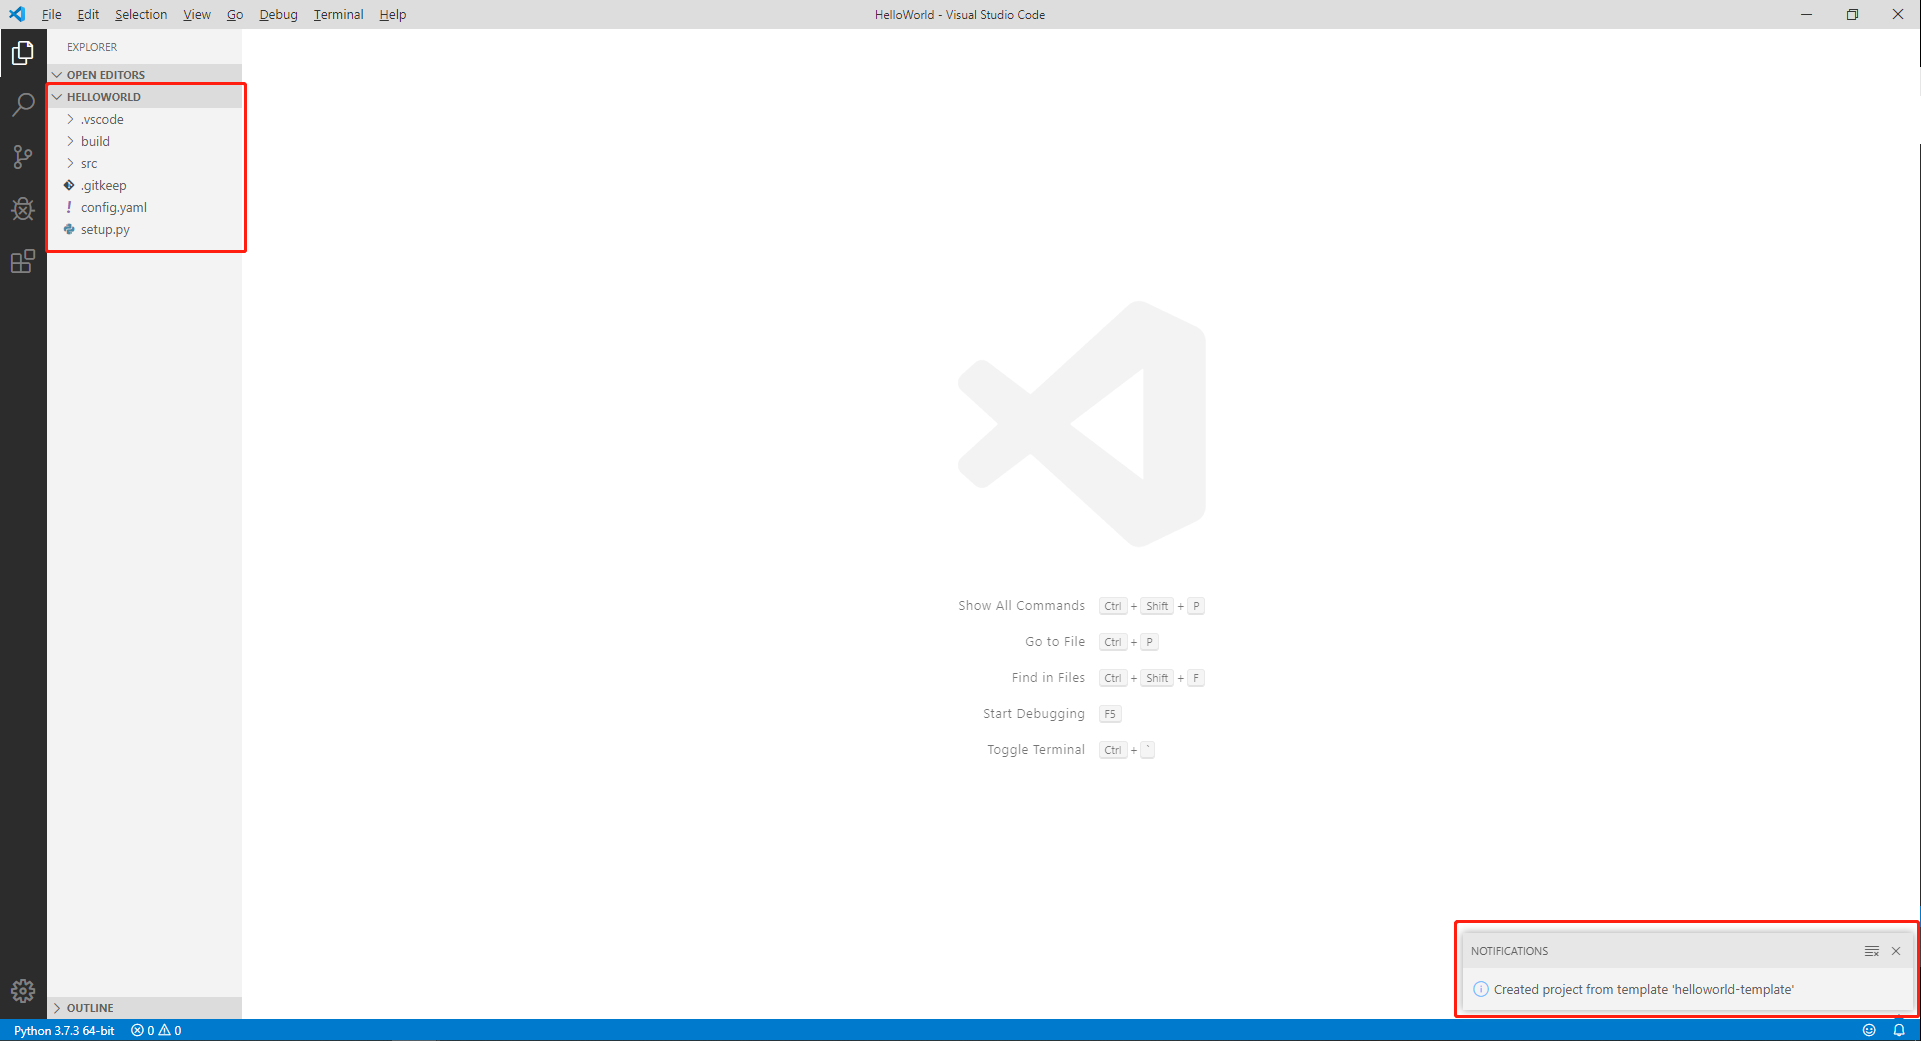
The following figure shows the opened project template folder helloworld-template. The project template contains the following information:
├── .vscode
│  └── sftp.json
├── build
├── lib
├── src
│  │── main.py
│  └── parse_config.py
├── config.yaml
└── setup.py
.vscode: The VS Code configuration folder.sftp.json: The configuration file of the SFTP plug-in, which is used to connect to MobiusPi over SFTP.
build: The App release package folder.lib: The folder of the App third-party dependency library.src: The App source code folder.main.py: The App entry.parse_config.py: The App parsing configuration file.
config.yaml: The App configuration file.setup.py: The App version, SDK version, and other information.
Step 3: In the Command Palette, enter the
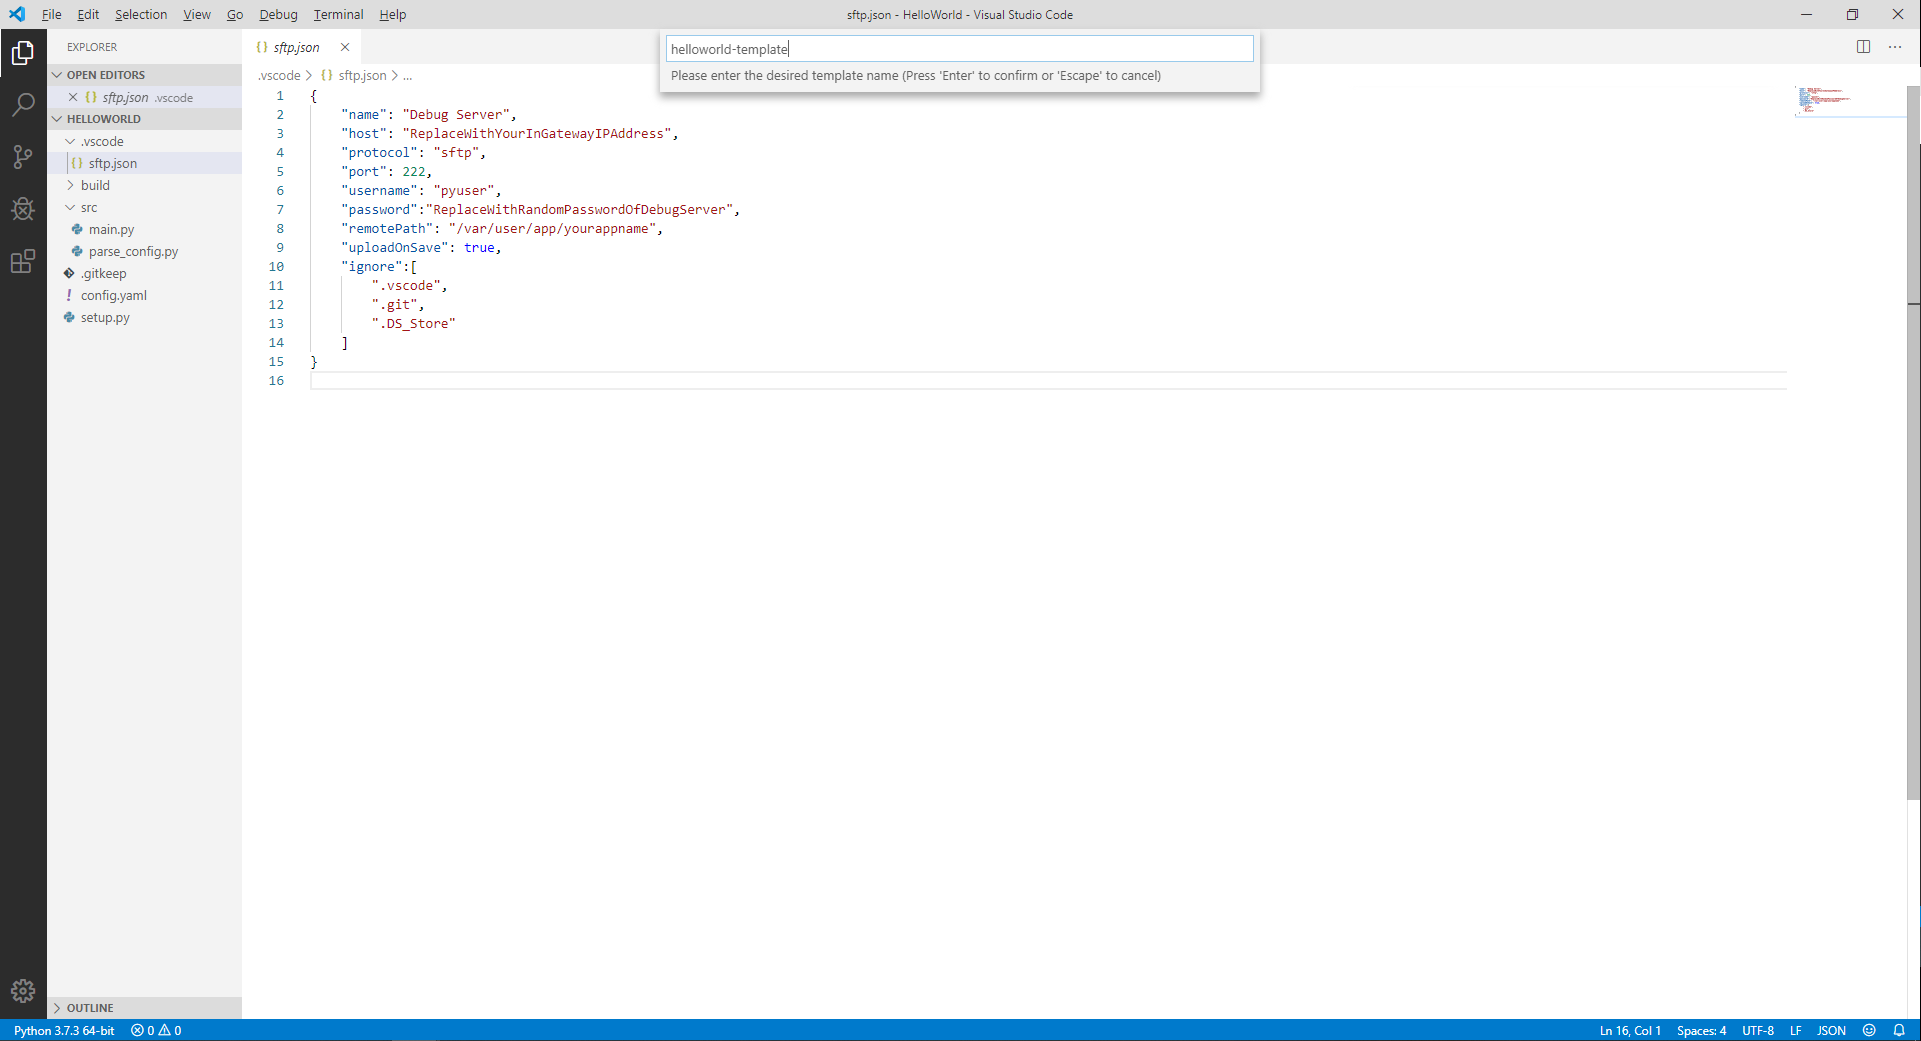
>Project:Save Project as Templatecommand to save the current project file as a template.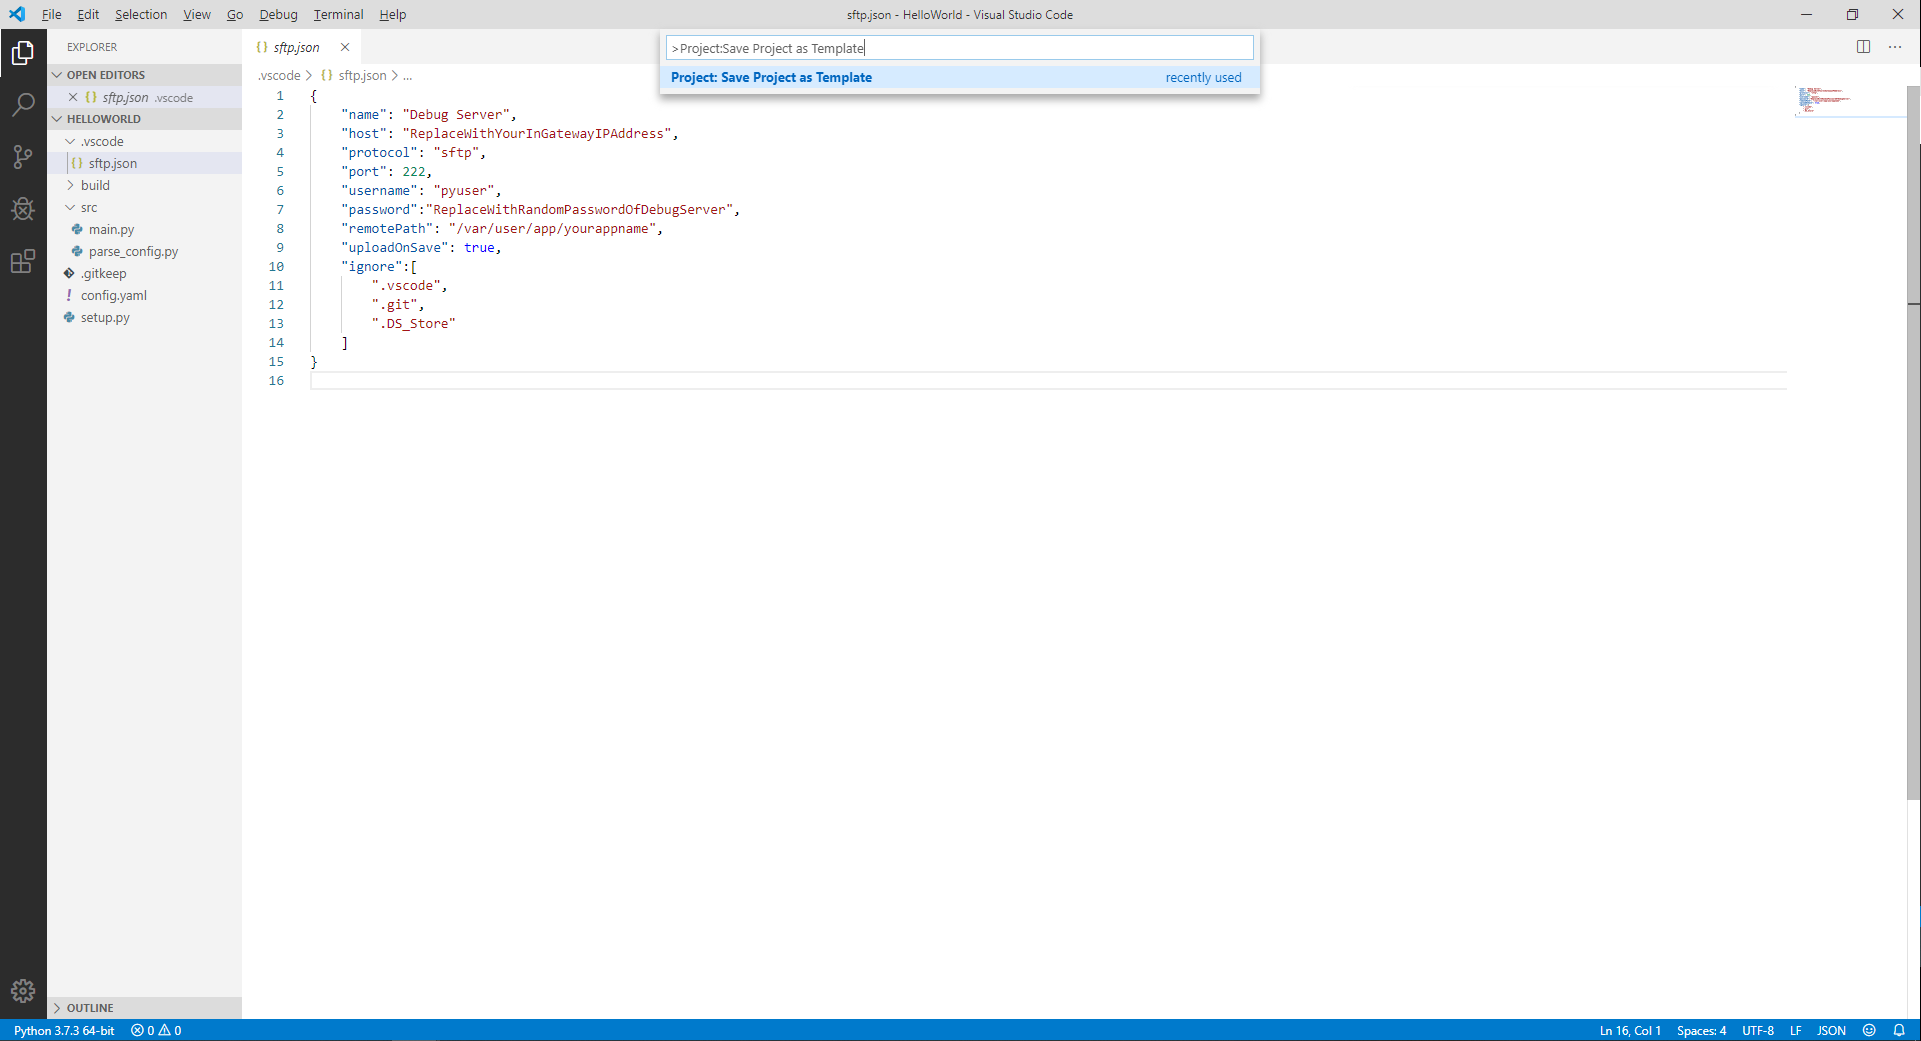
Enter a name for your template, such as helloworld-template.
1.3.3.2 Custom project template
Step 1: Create a project template folder which must contain the following information. You can add other files as needed.
├── .vscode
│  └── sftp.json
├── build
├── src
│  └── main.py
└── setup.py
.vscode: The VS Code configuration file. You can enter the>SFTP:Configcommand in the VS Code Command Palette to quickly create the .vscode folder and the sftp.json file.sftp.json: The configuration file of the SFTP plug-in, which is used to connect to MobiusPi over SFTP.
build: The App release package folder.src: The App source code folder.main.py: The App entry.
setup.py: The App version, SDK version, and other information. We recommend that you define the information according to the standard template.
Step 2: Use VS Code to open the custom project template folder, choose Files > Open Folder, and select the custom project template folder.
Step 3: In the Command Palette, enter the
>Project:Save Project as Templatecommand to save the current project file as a template.
2. Compile the MobiusPi App: Hello World
This document takes the HelloWorld App as an example to describe how to develop MobiusPi Python Apps in VS Code. This App can print a “hello world!” log every 10s in MobiusPi and allows you to import the configuration file and modify the log.
- 2.1 Use a template to create a project
- 2.2 Encoding
- 2.3 Debugging
- 2.4 Build an App release package
- 2.5 Deploy the App on the MobiusPi web page
- 2.6 View the App running status
- 2.7 Update the App configuration file
- 2.8 Annex
2.1 Use a template to create a project
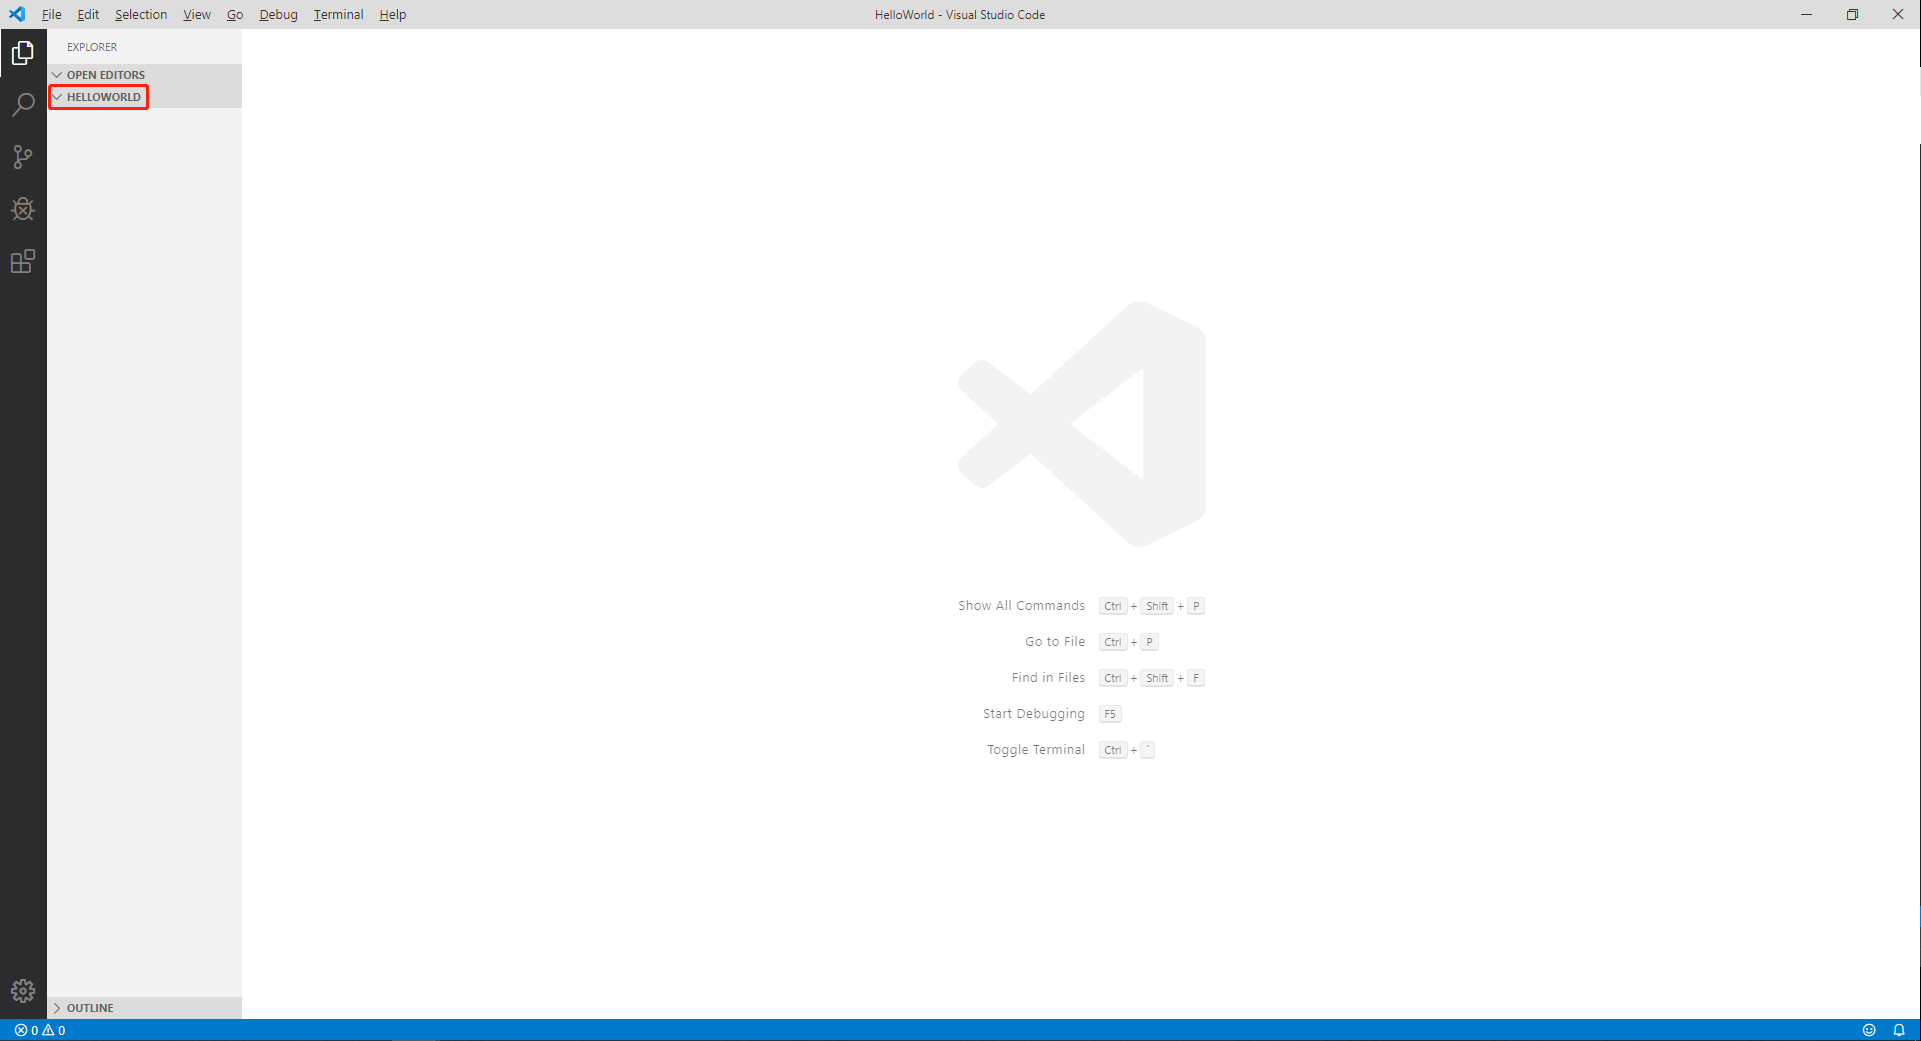
Step 1: Use VS Code to open the project folder of the Python App. The following figure is displayed:
Step 2: In the Command Palette, enter the
>Project:Create Project From Templatecommand to quickly create a project directory based on the existing template.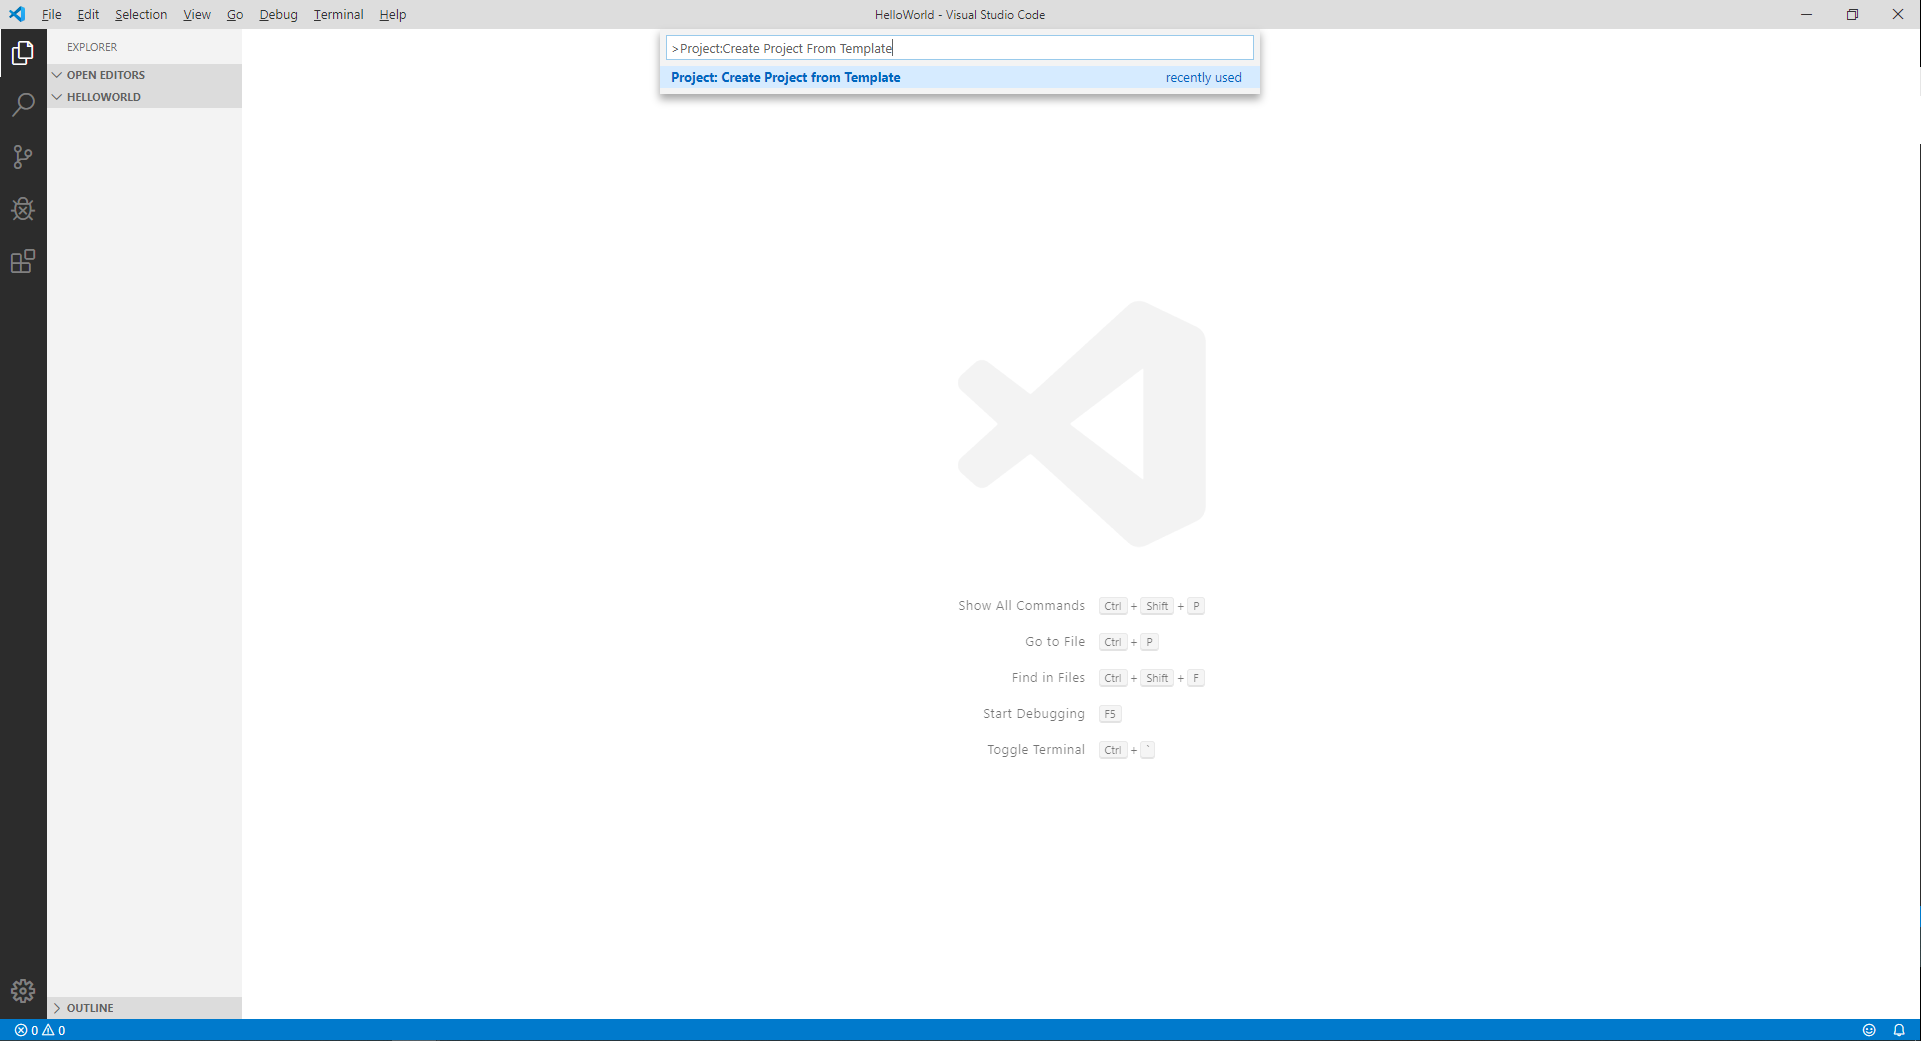
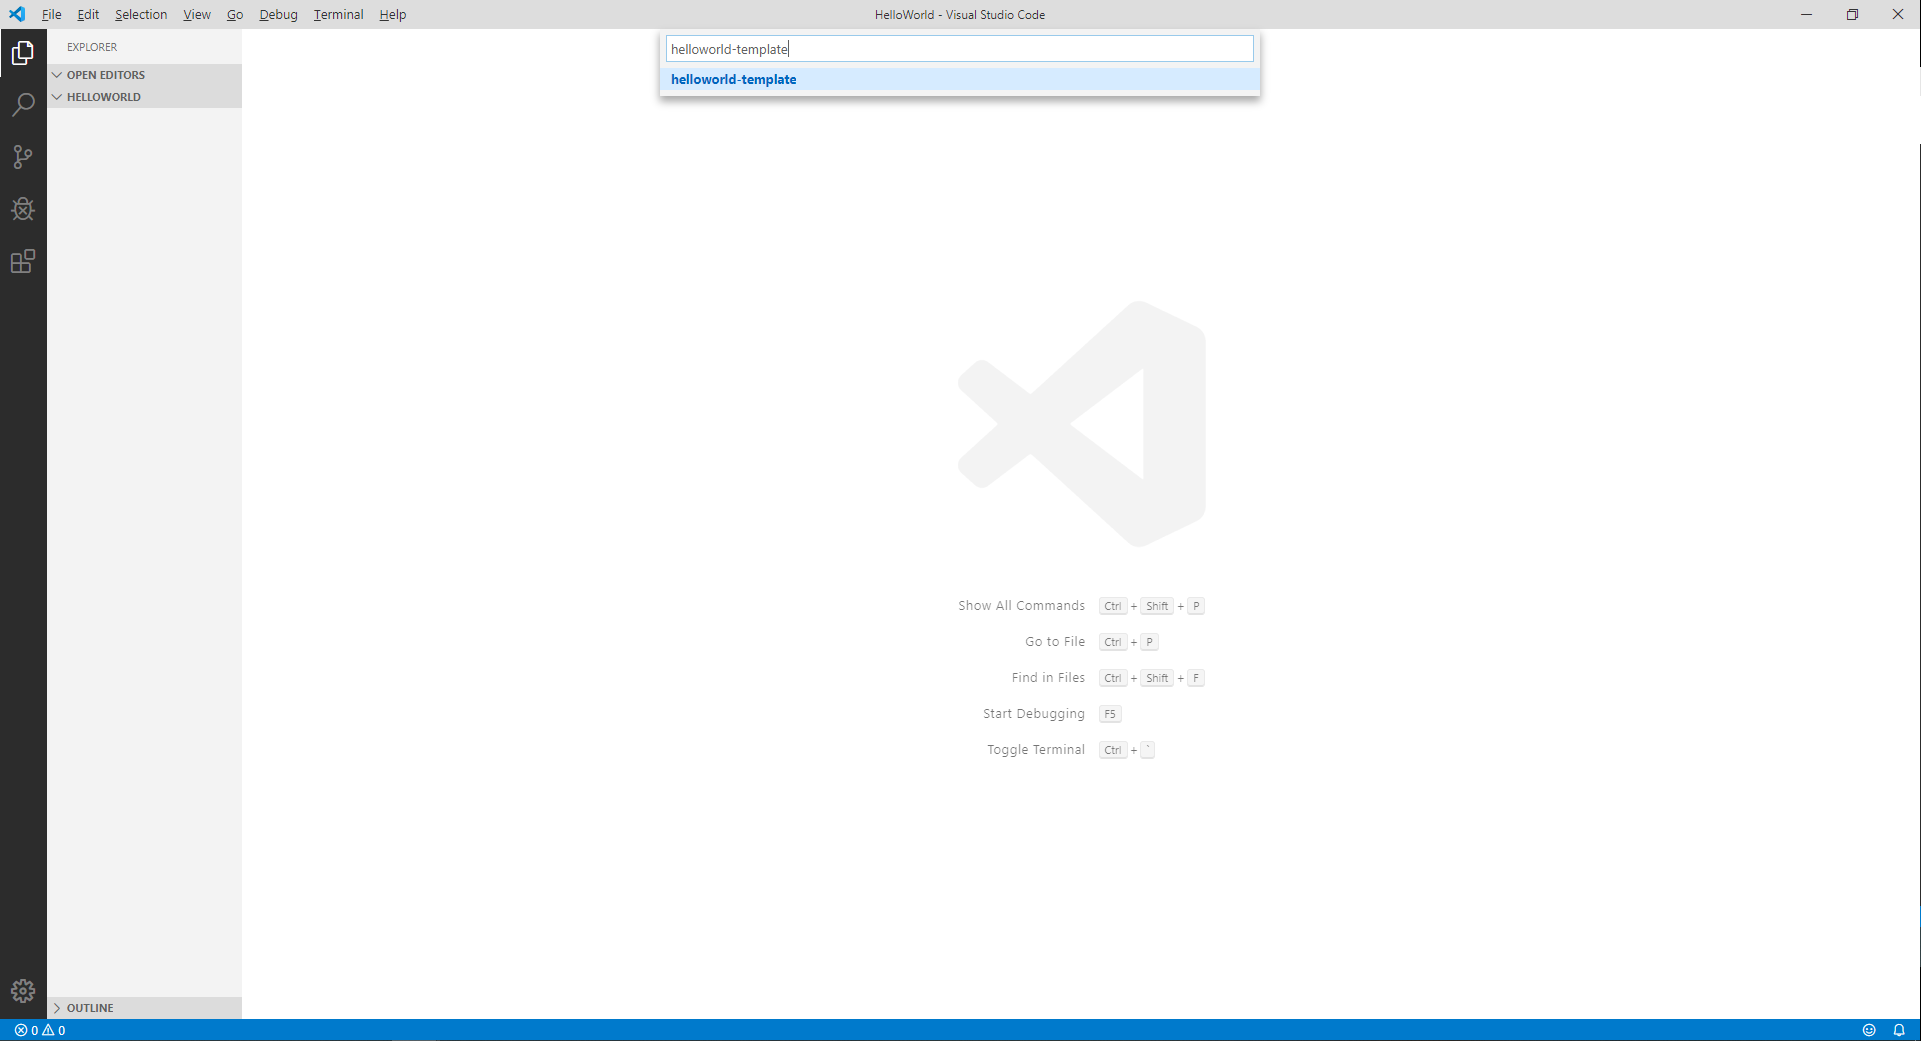
Step 3: Enter the name of the helloworld-template, and press Enter.
After the template is selected, VS Code automatically adds the file that you add in the template to the folder of the current project.
2.2 Encoding
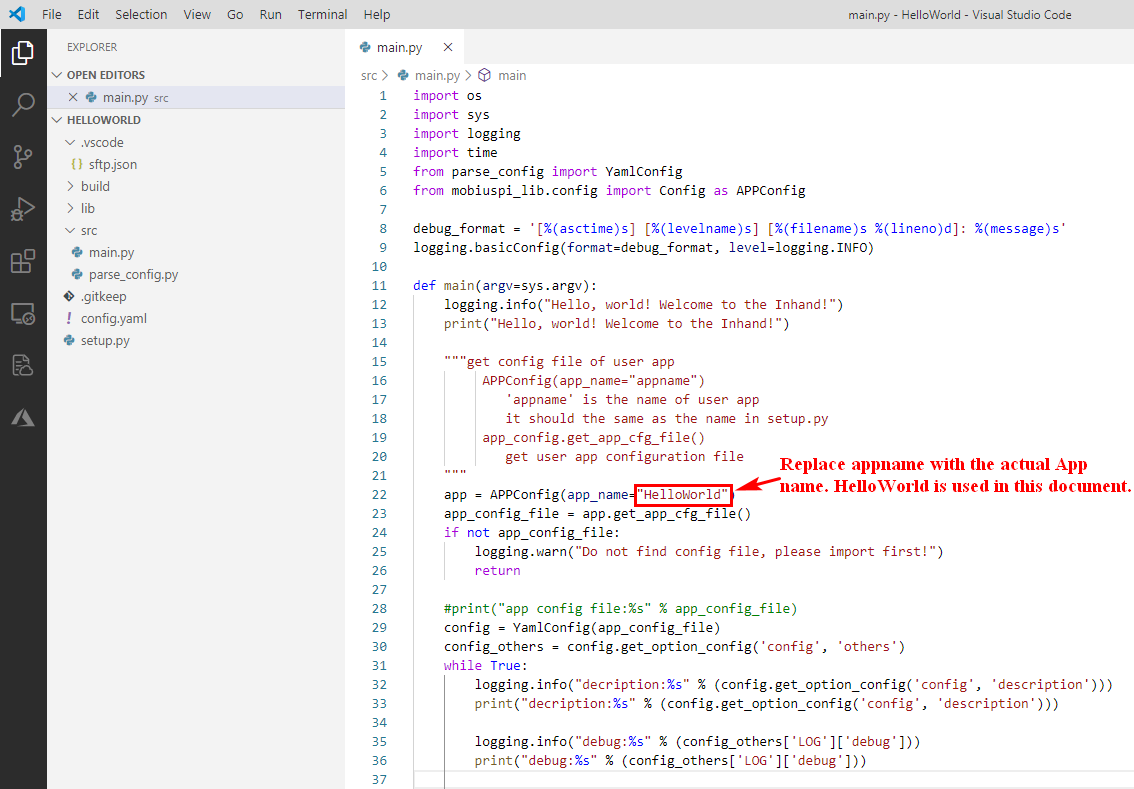
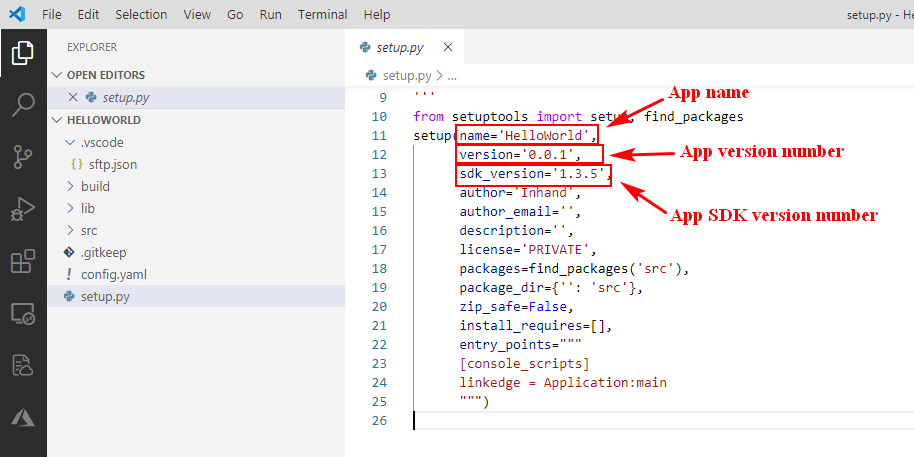
The standard project template helloworld-template can print a “hello world!” log every 10s in MobiusPi and allows you to import the configuration file and modify the log. To modify the App name, modify the code in main.py and setup.py by referring to the following figure. Note: The Python App name cannot contain any space.
2.3 Debugging
2.3.1 Create an SFTP connection
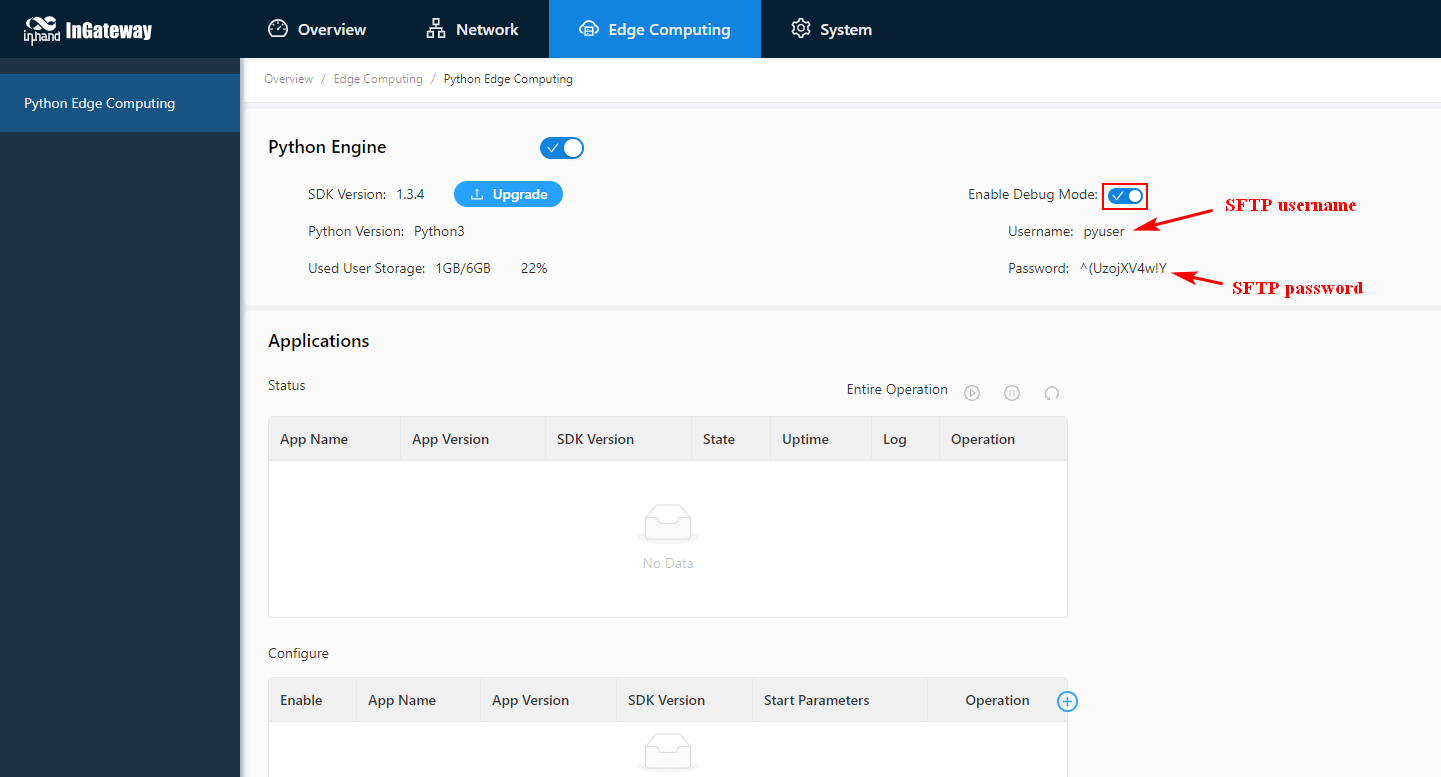
To debug the code remotely, upload the local code to the remote server (MobiusPi). Before uploading the local code, ensure that the debugging mode has been enabled for MobiusPi. After the debugging mode is enabled, the following figure is displayed:
Step 1: Open the
sftp.jsonfile.In the Command Palette, enter the
>SFTP:Configcommand and then open thesftp.jsonfile.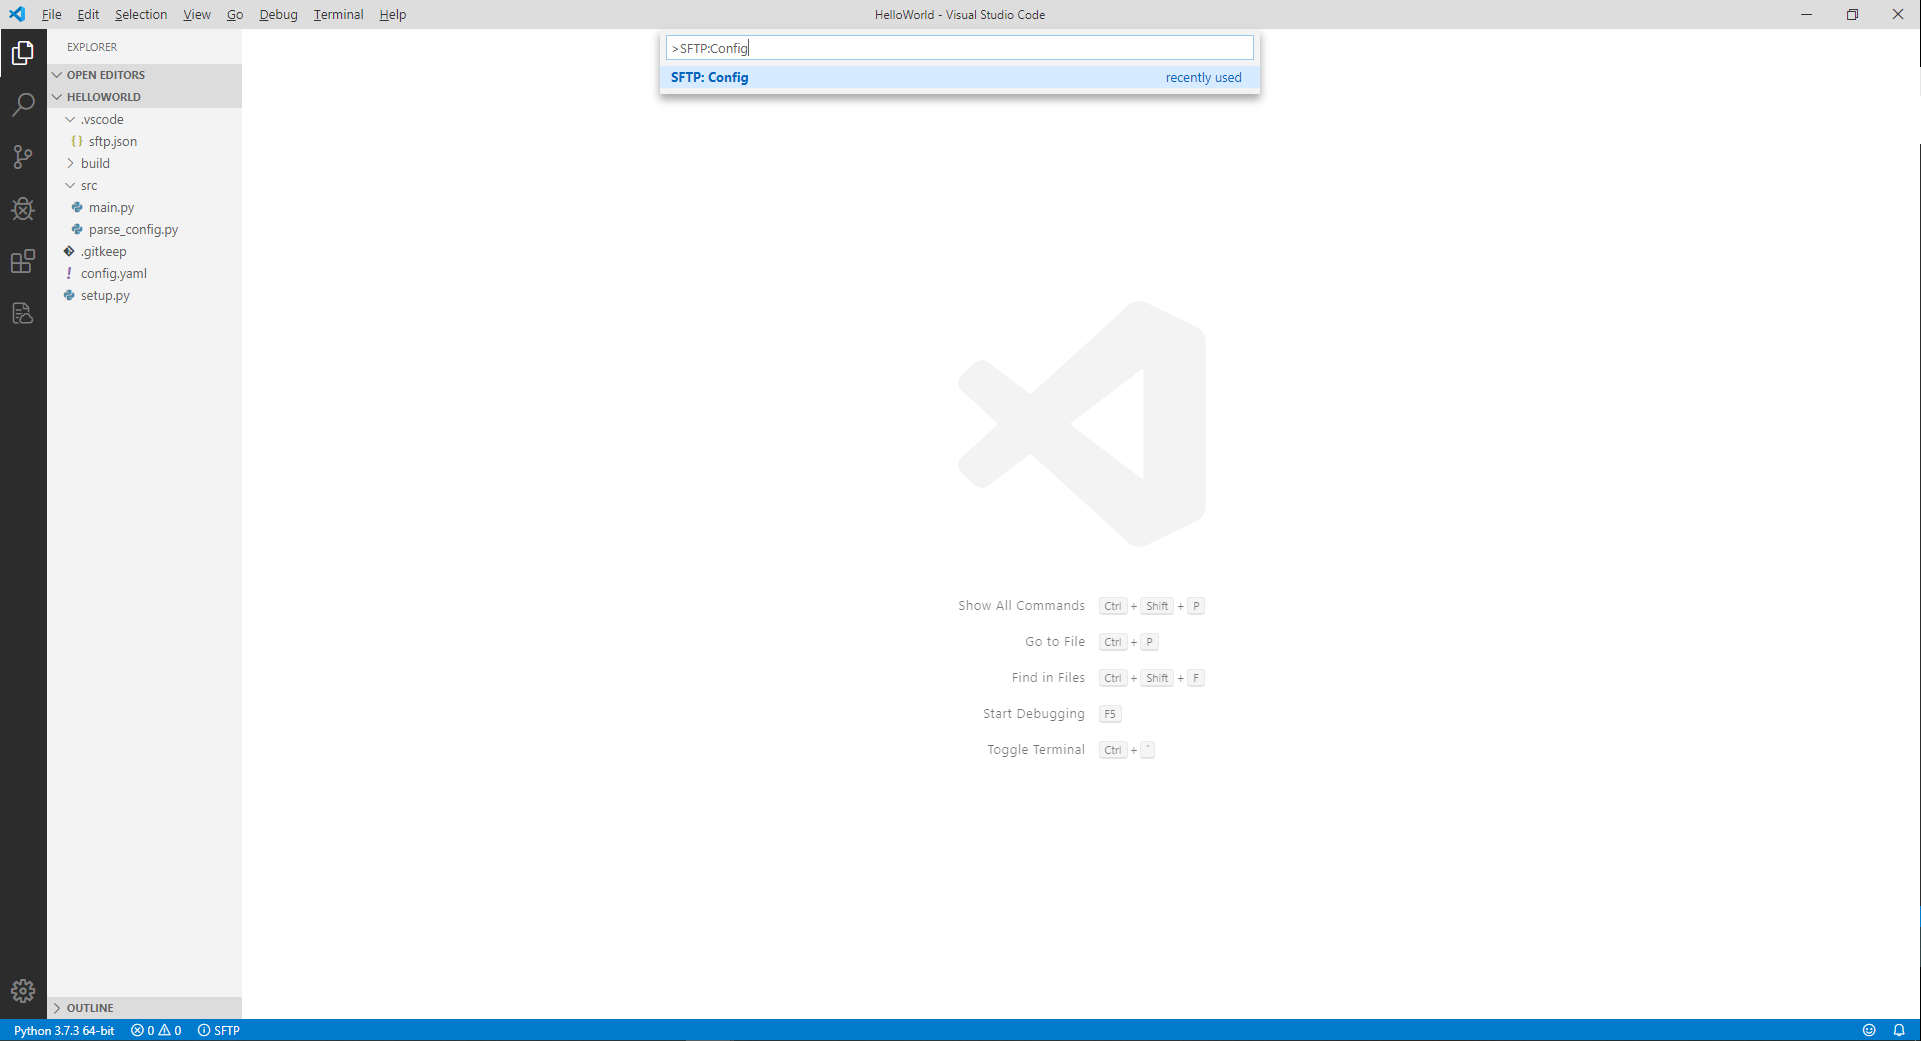
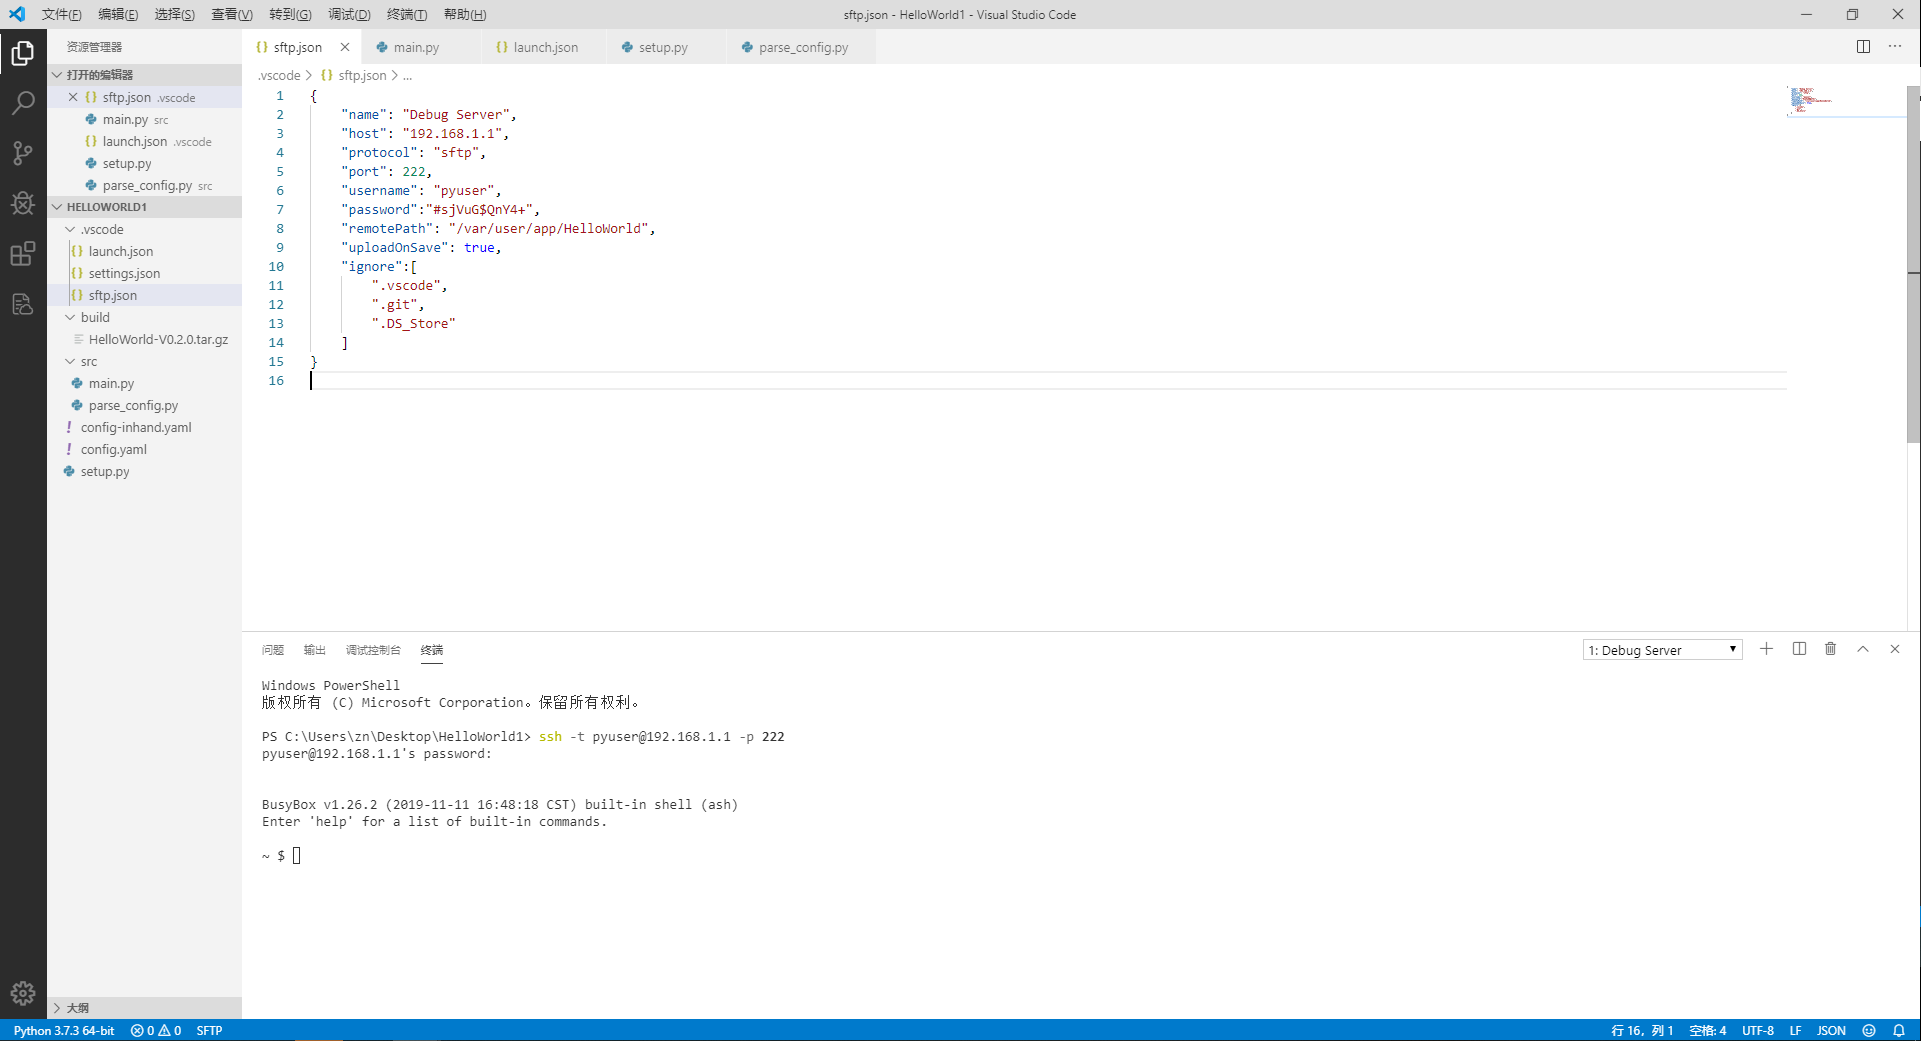
Step 2: Configure the SFTP connection.
Configure the SFTP connection for IG501
In the
sftp.jsonfile, configure the SFTP connection according to the connection parameters on the Edge Computing > Python Edge Computing page. Note: The Python App name must be same to that inmian.py.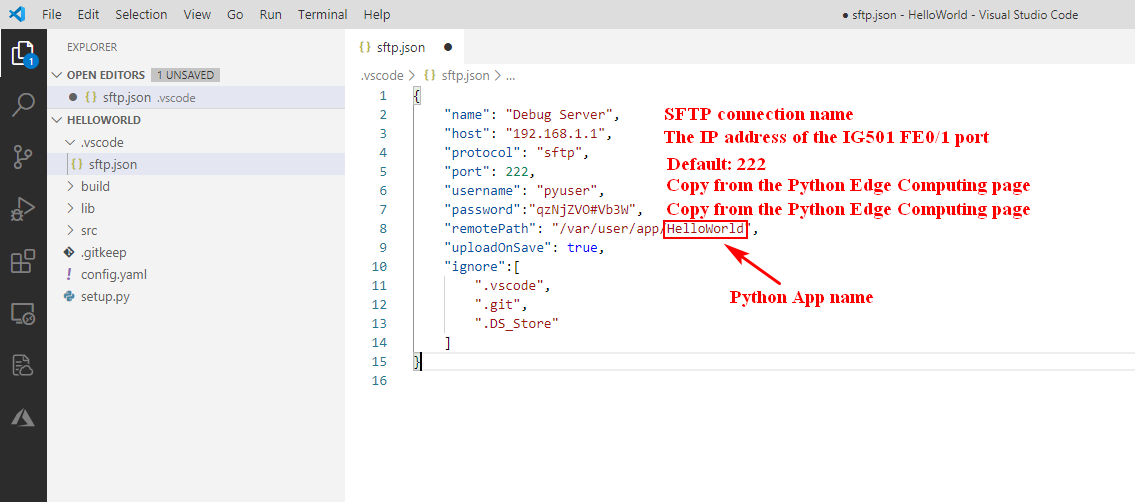
Configure the SFTP connection for IG502
In the
sftp.jsonfile, configure the SFTP connection according to the connection parameters on the Edge Computing > Python Edge Computing page. Note: The Python App name must be same to that inmian.py.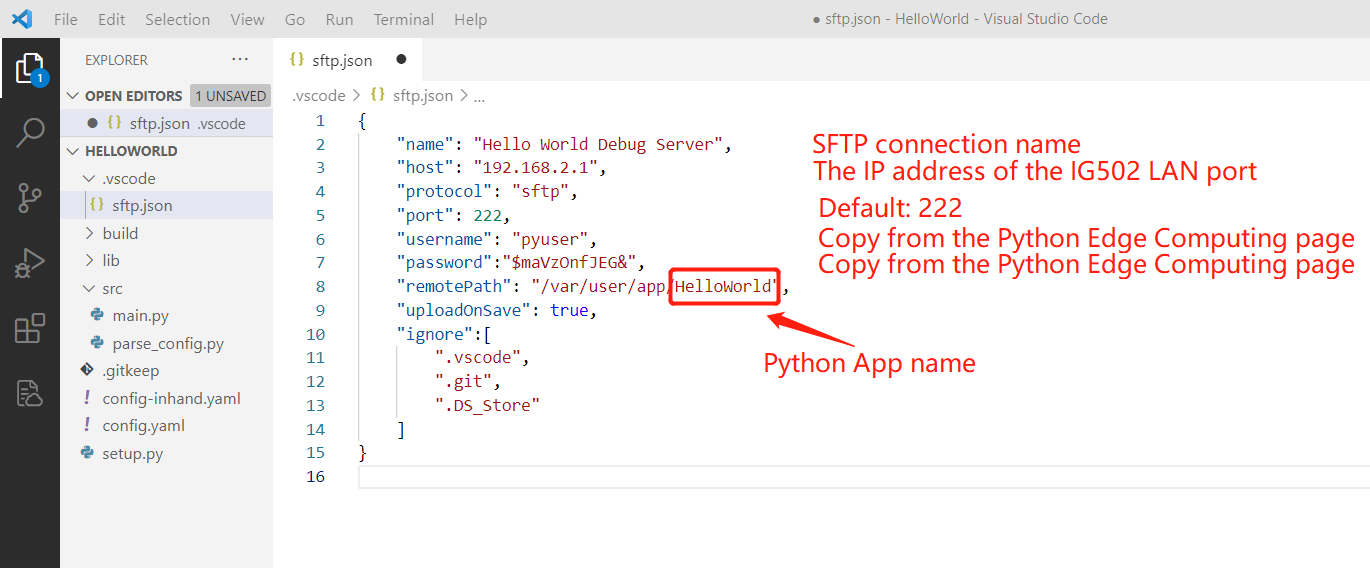
Configure the SFTP connection for IG902
In the
sftp.jsonfile, configure the SFTP connection according to the connection parameters on the Edge Computing > Python Edge Computing page. Note: The Python App name must be same to that inmian.py.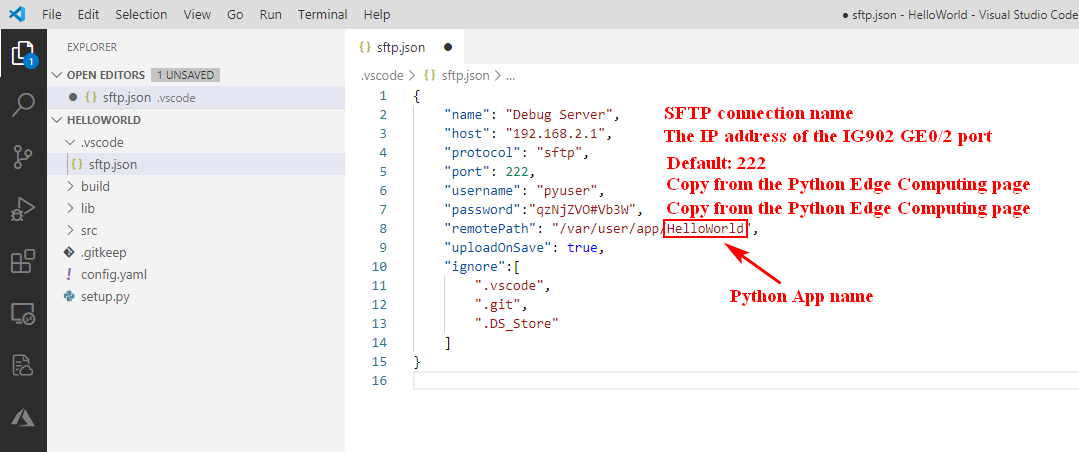
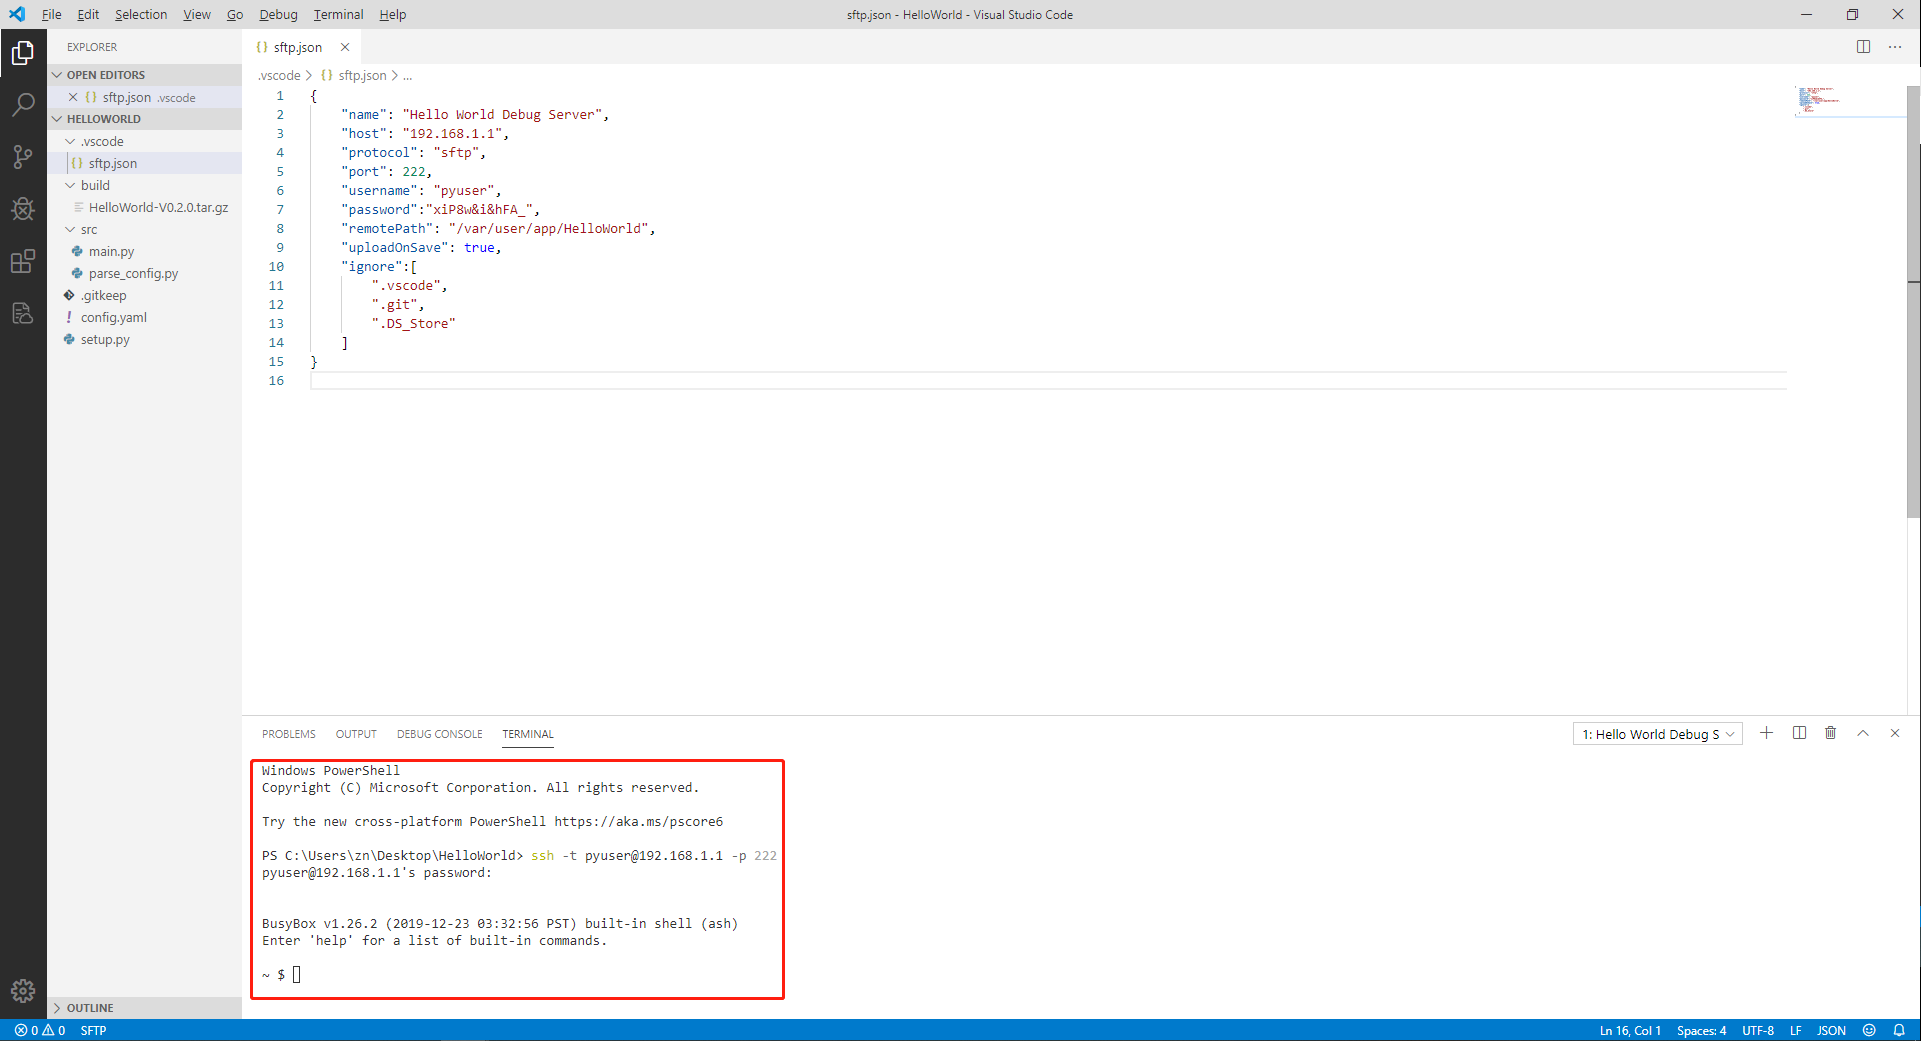
Step 3: After the configuration is completed and saved, enter the
>SFTP:Open SSH in Terminalcommand in the Command Palette to connect to the remote server.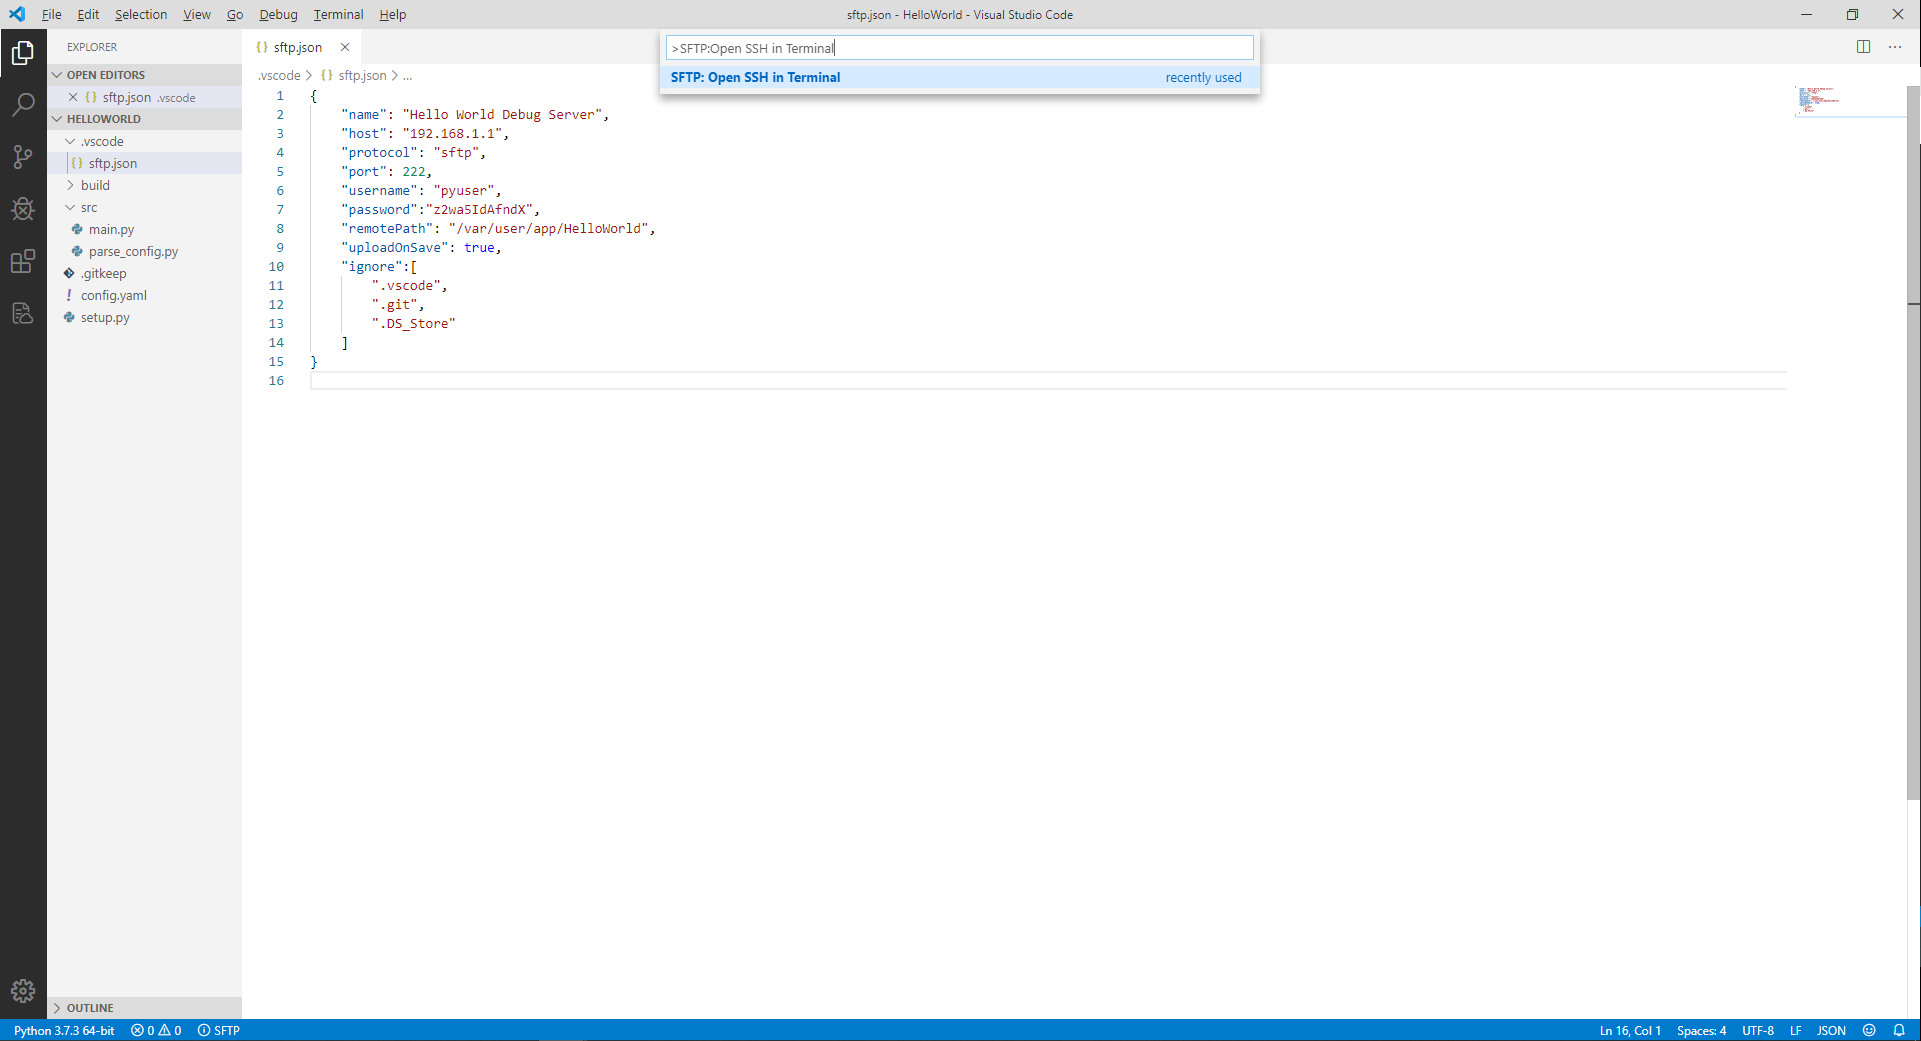
Step 4: In the Command Palette, you are requested to select the SFTP server to be connected. Select the SFTP server in
sftp.jsonand press Enter.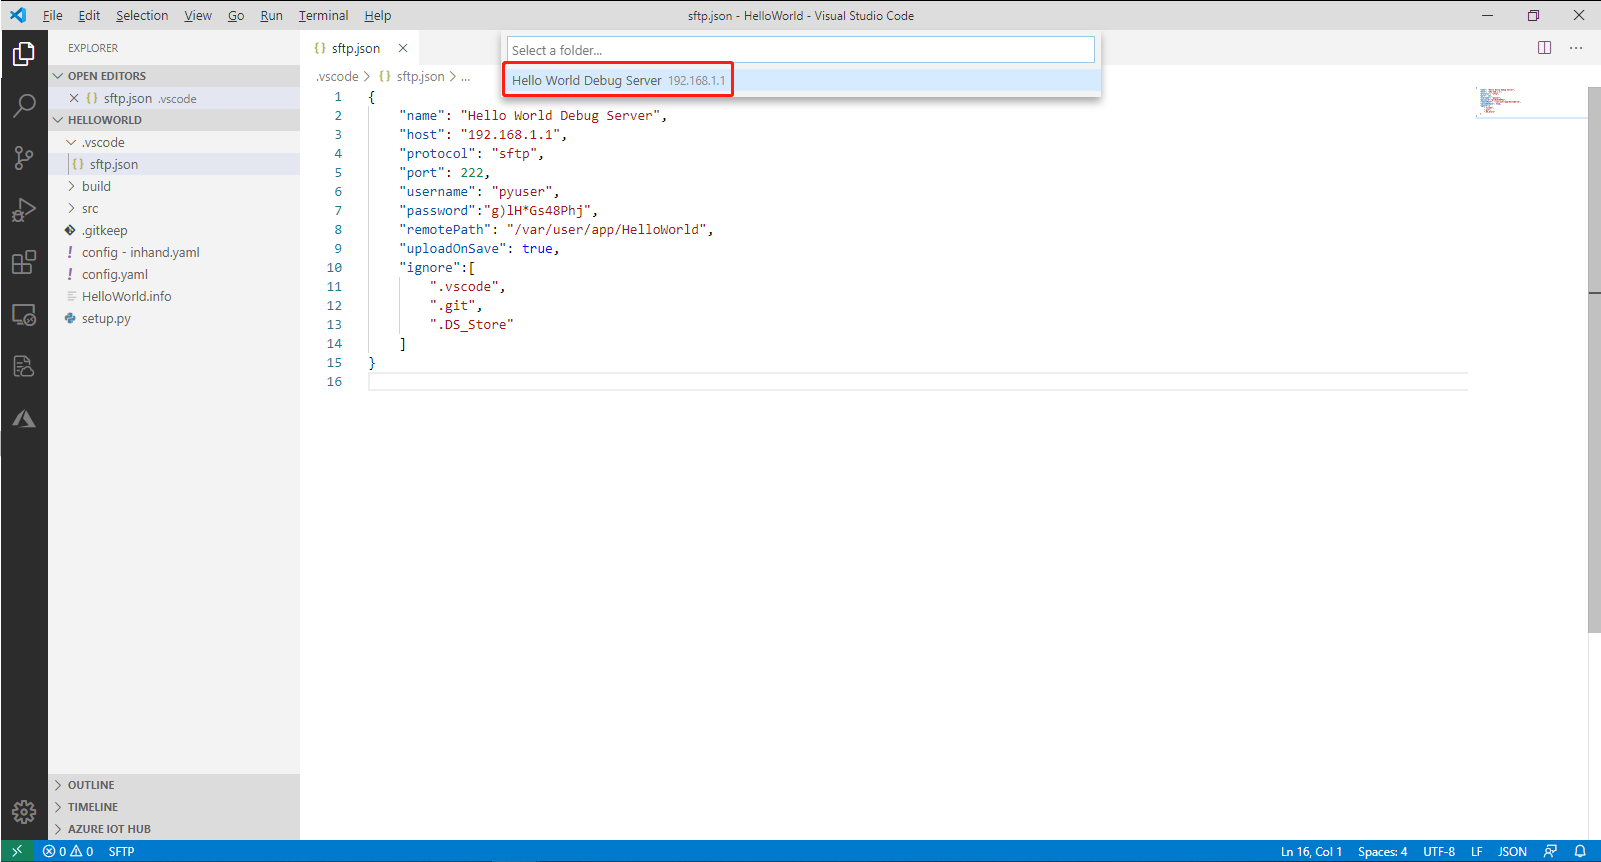
Step 5: If this is the first time you connect to the server, the TERMINAL window prompts you to confirm whether you want to connect to the server. Enter Yes and press Enter. Then, enter the
>SFTP:Open SSH in Terminalcommand and the IP address of the SFTP server in the Command Palette again.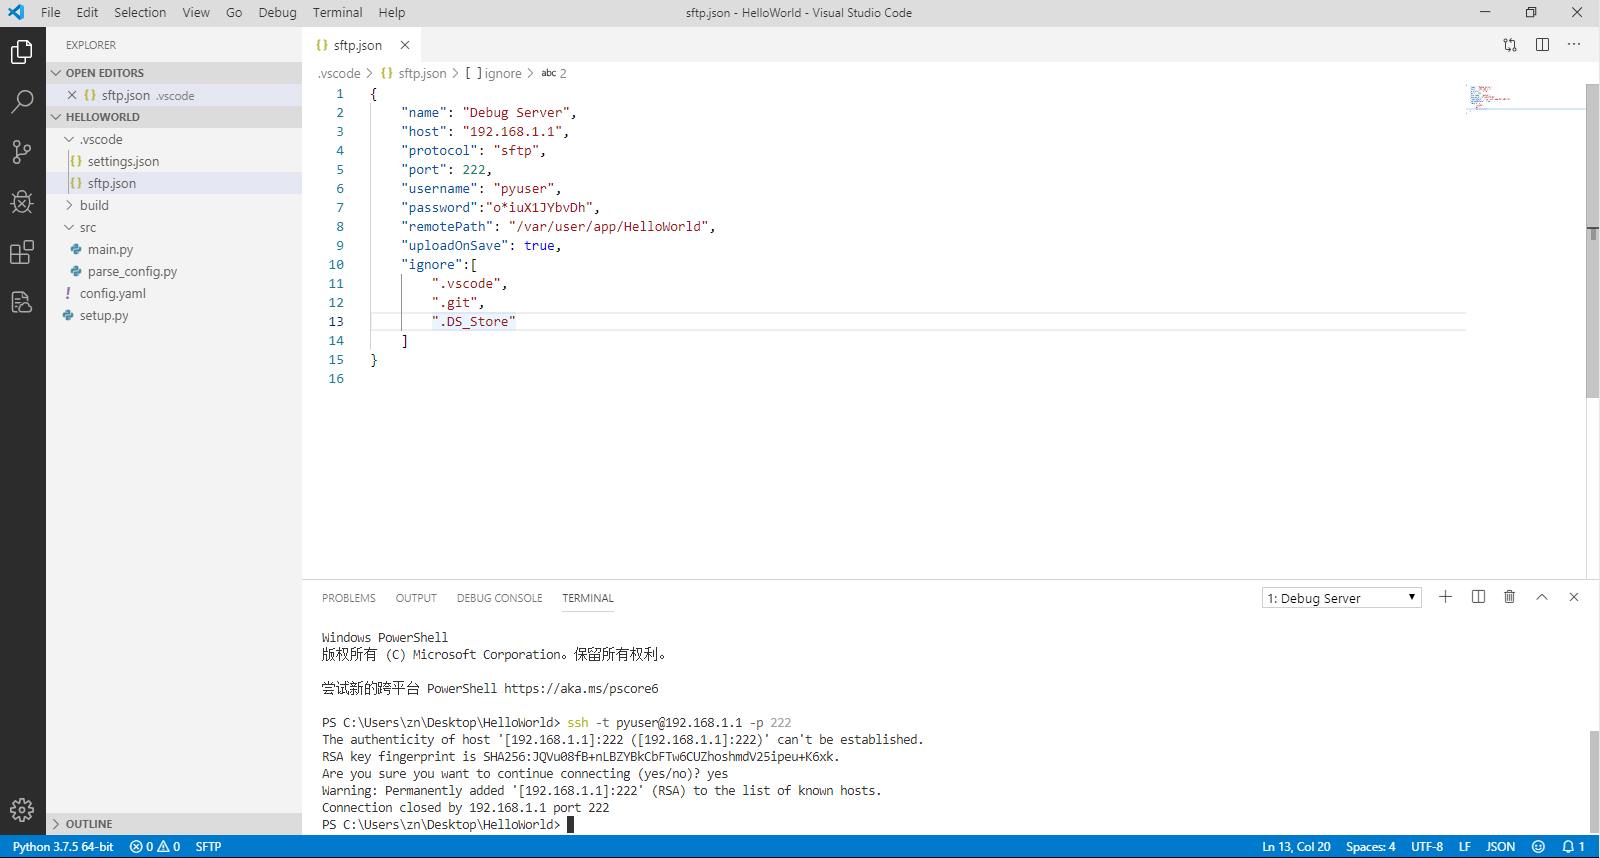
Step 6: The TERMINAL window prompts you to enter the password. You only need to copy the password in the
sftp.jsonfile, and paste it to the required place.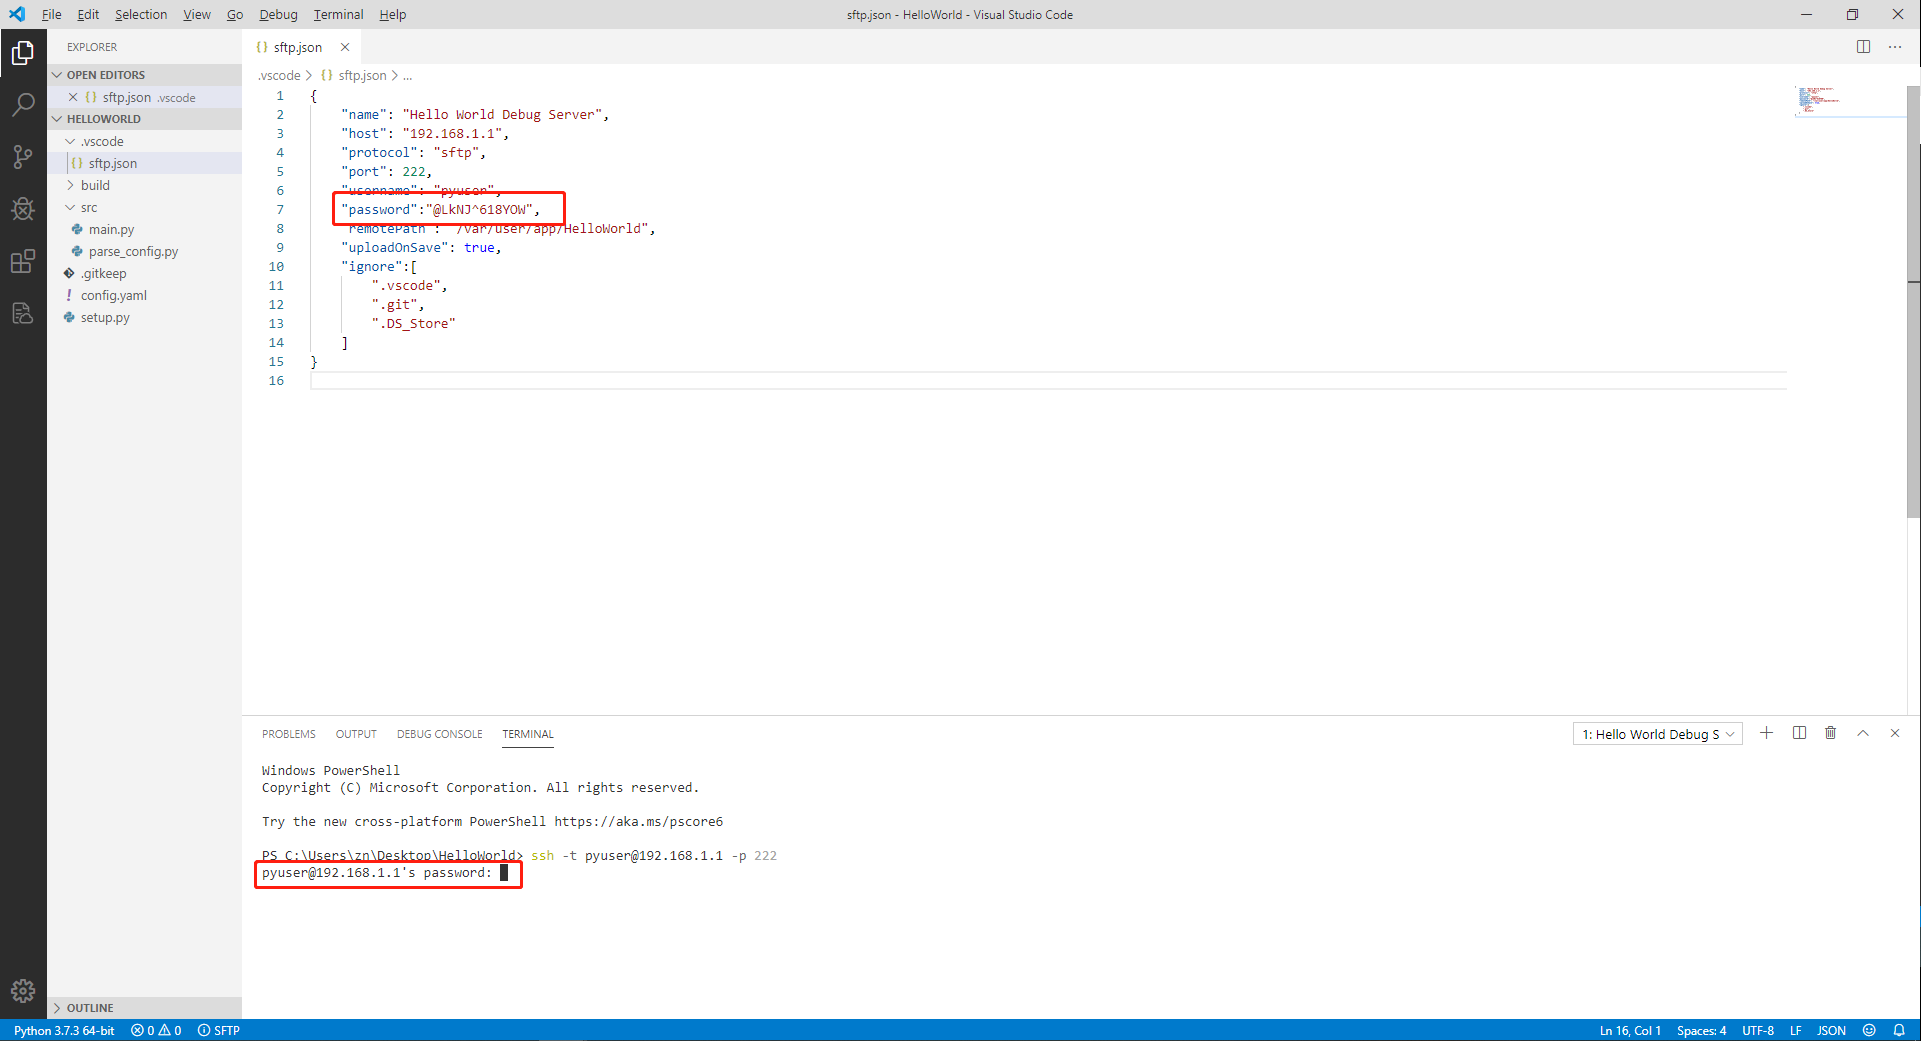
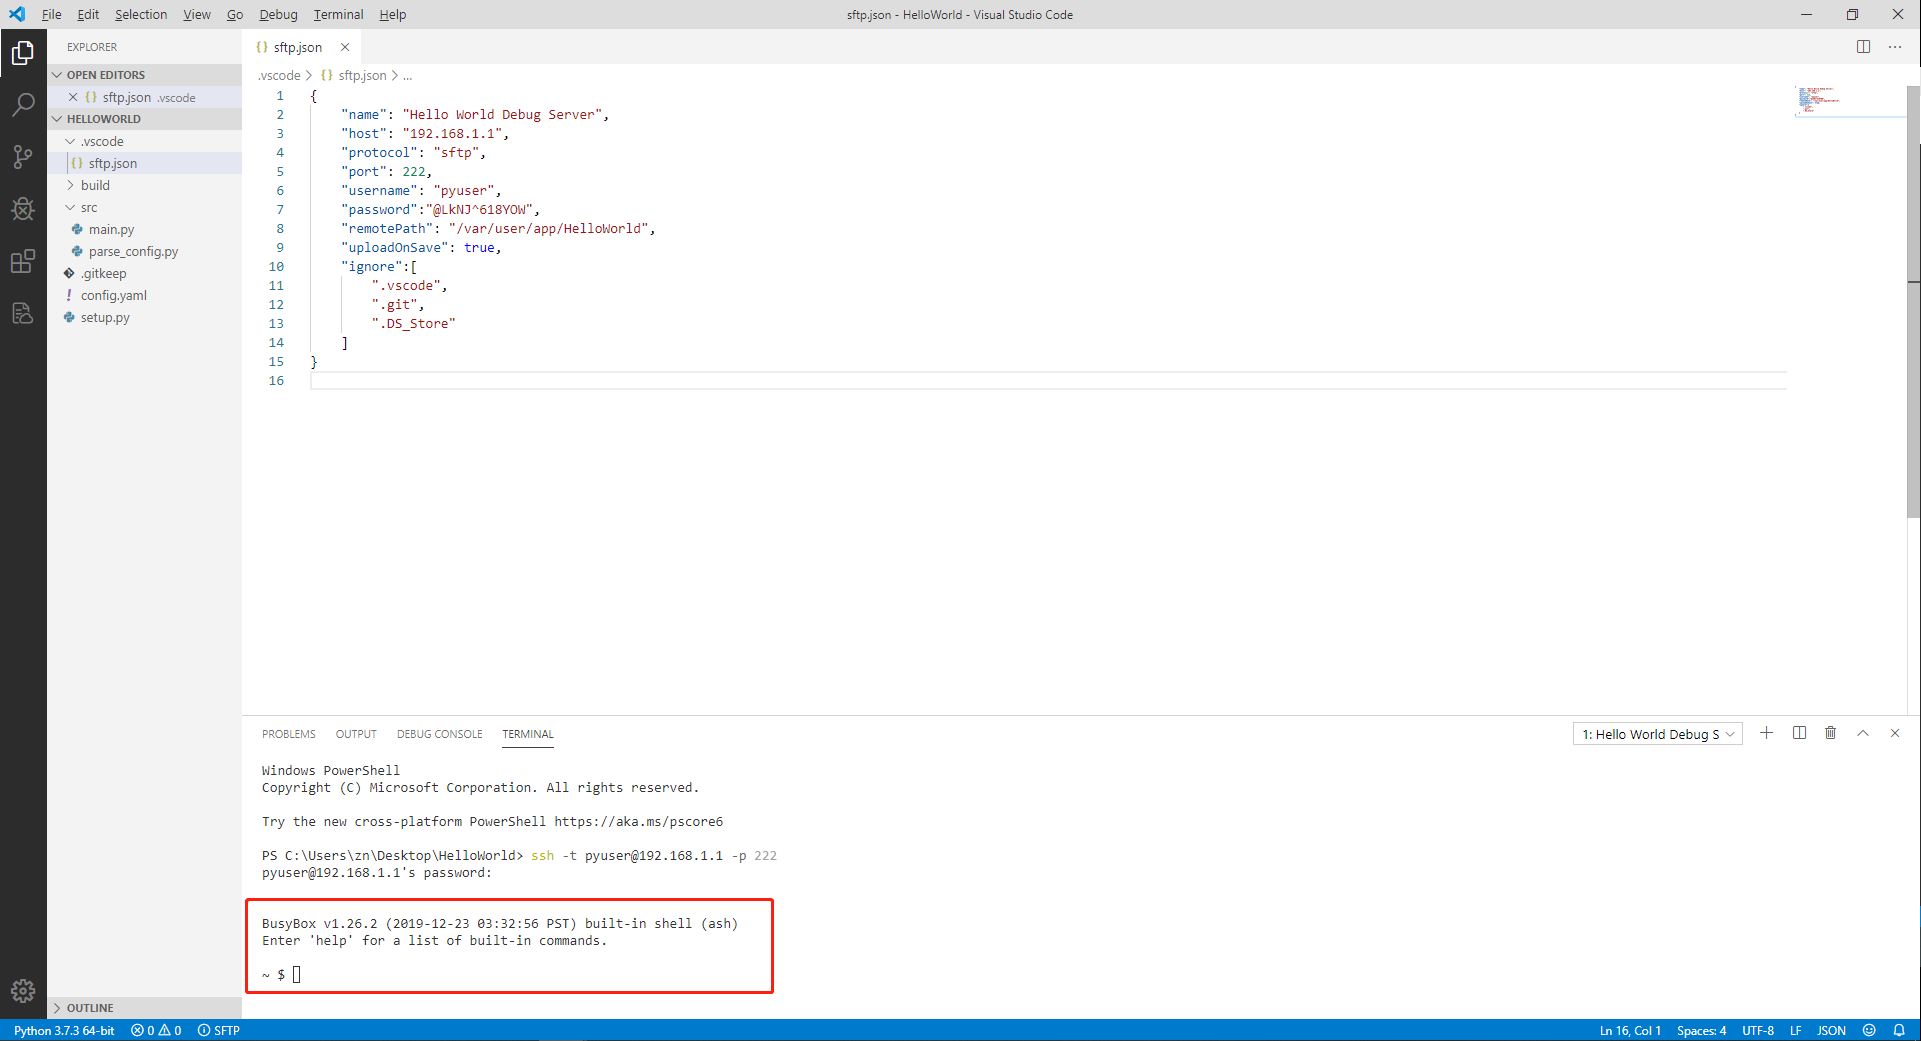
After an SFTP connection with MobiusPi is created, the page is shown as follows:
2.3.2 Debug the code
Step 1: Synchronize the code.
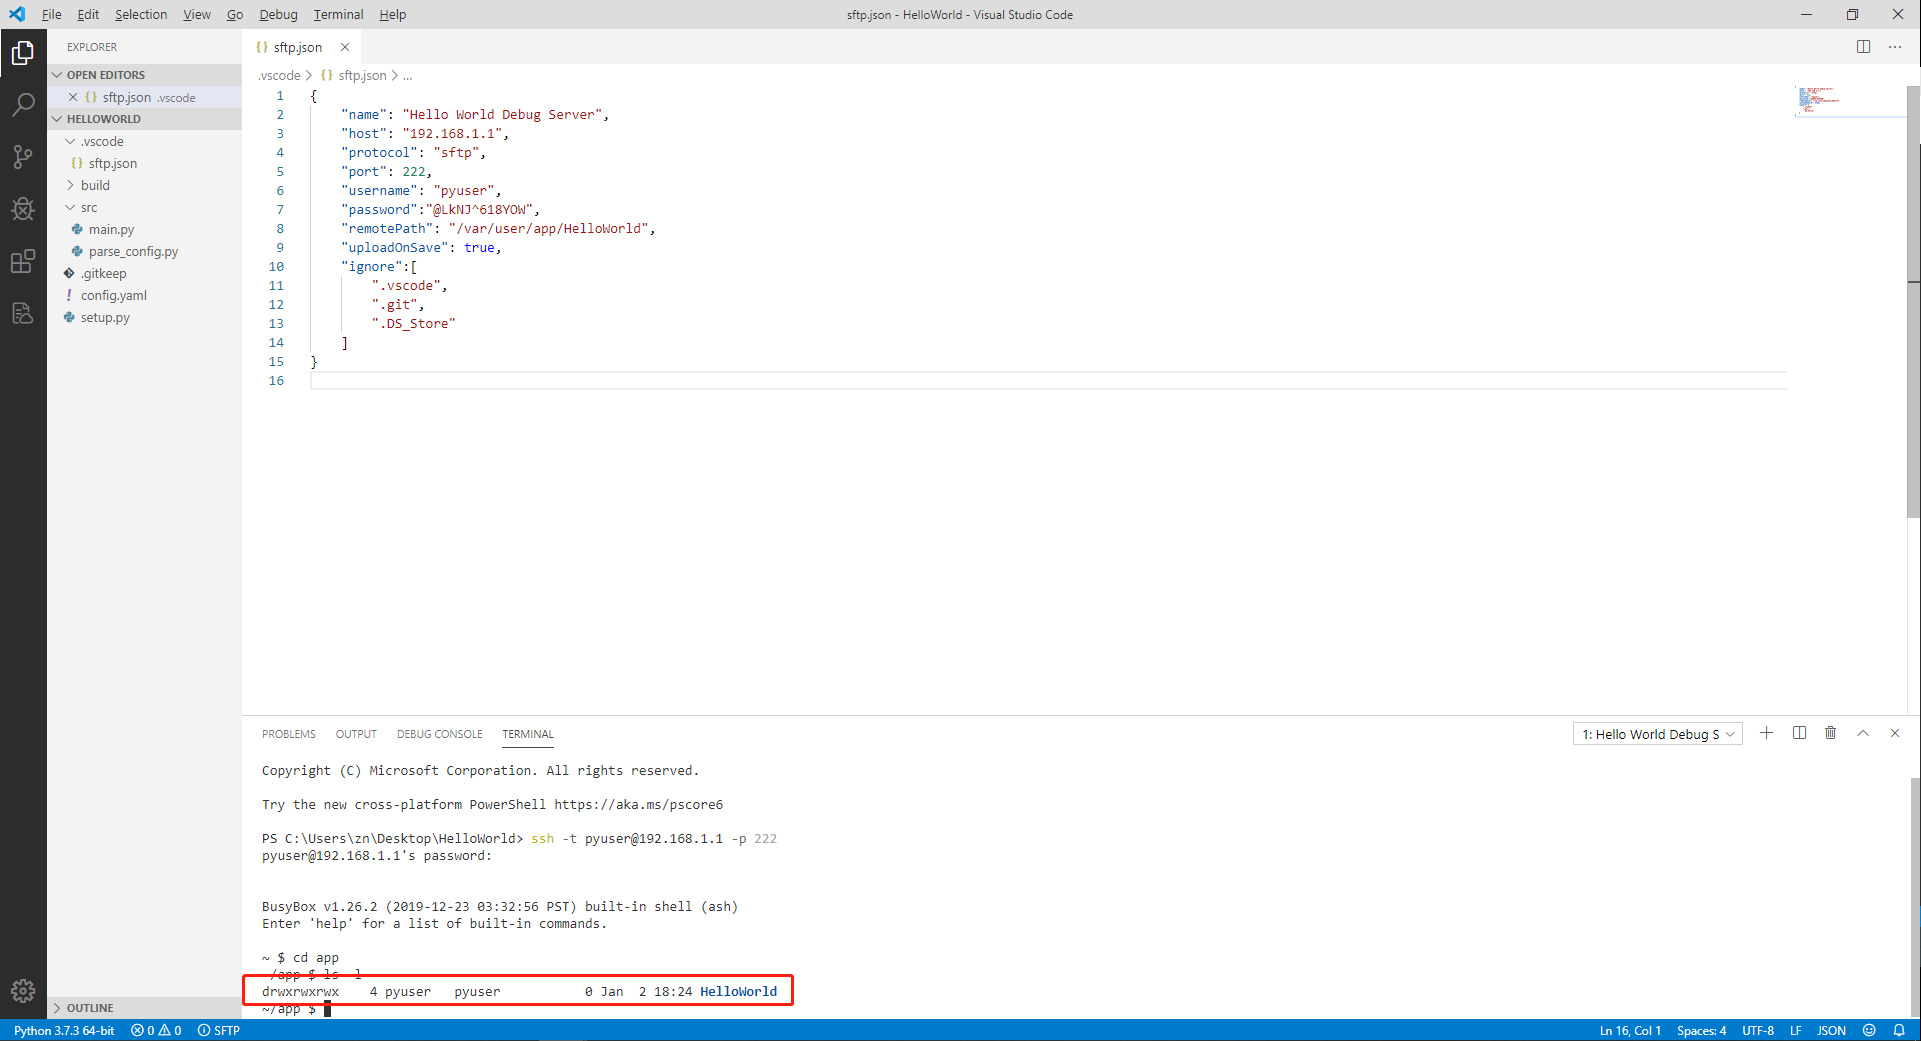
After the SFTP connection is created, right-click the blank area on the left, and choose Sync Local > Remote to synchronize the code to the remote server. Later, if you modify or delete code on the local PC, the code changes will be automatically synchronized to the remote server.
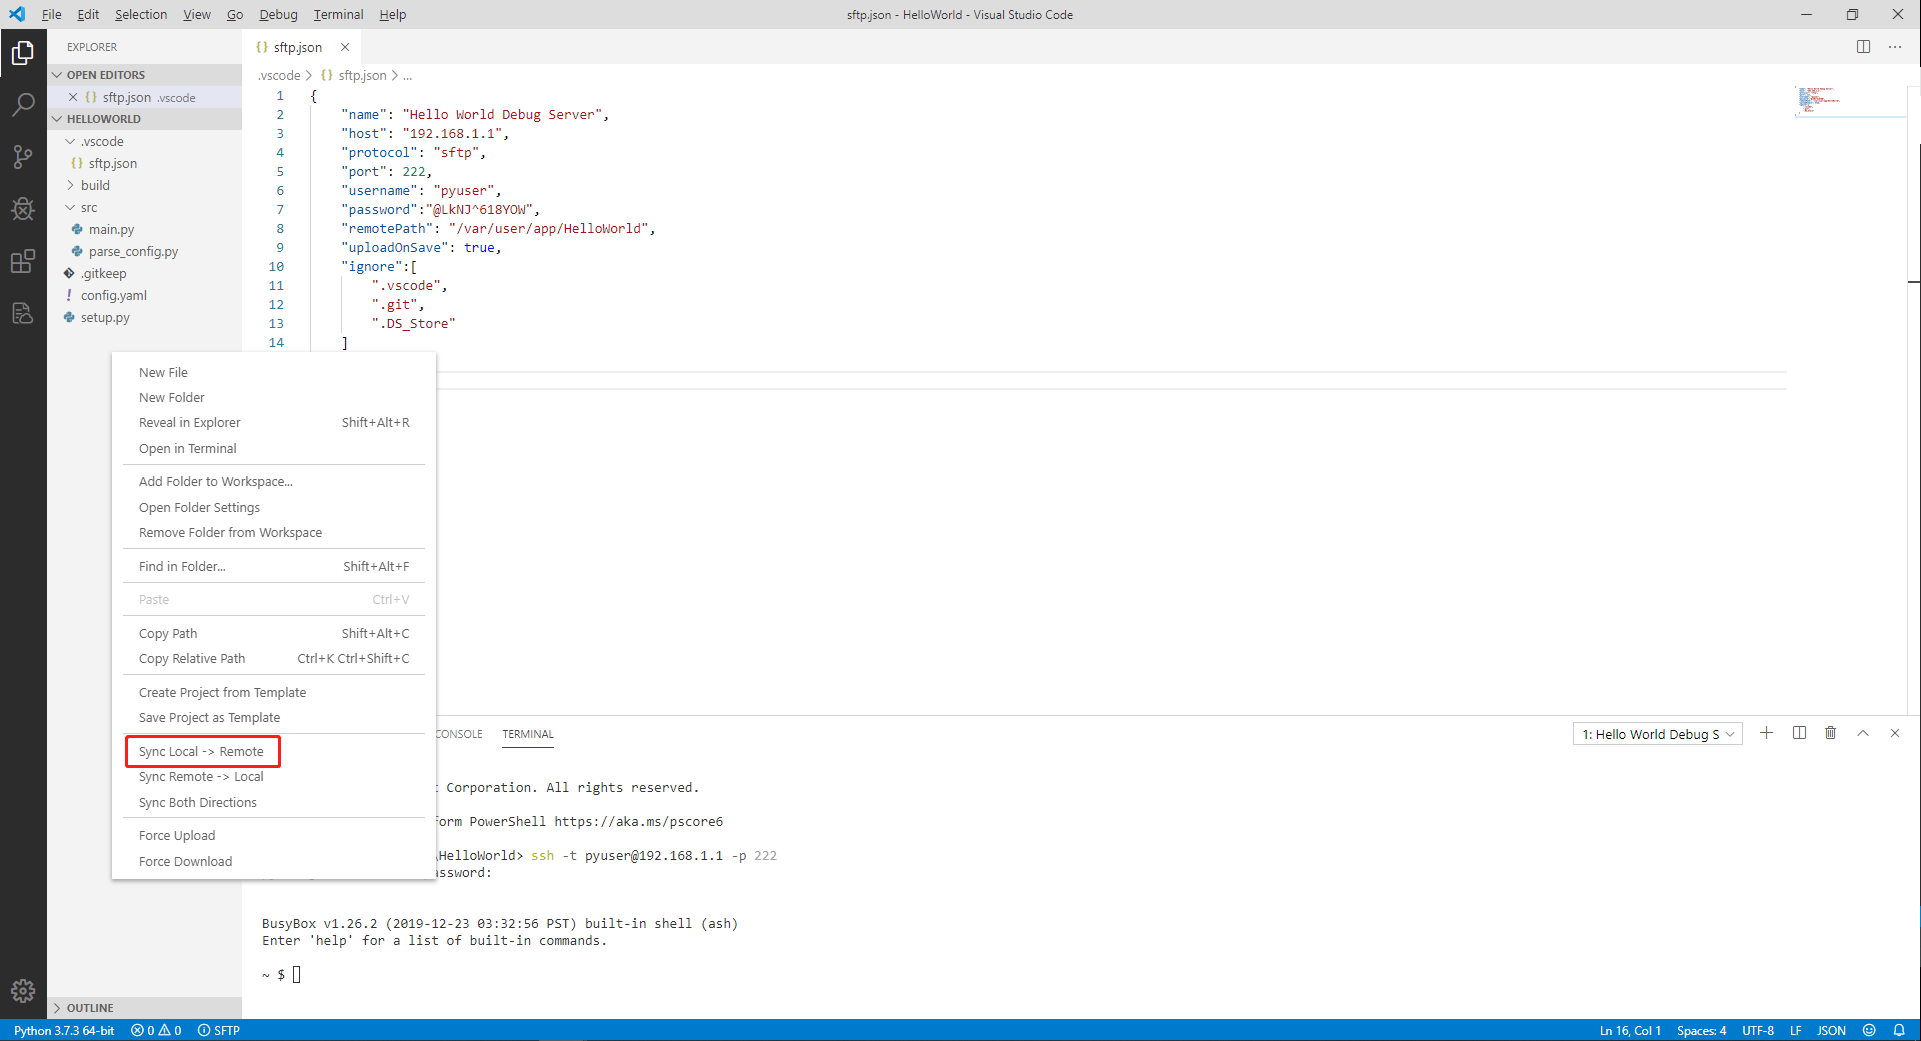
You can check whether the remote server has received the App code in the TERMINAL window. In the TERMINAL window, enter the following command to view uploaded App folder information:
cd app
ls -l
Step 2: Debug the script in the TERMINAL window.
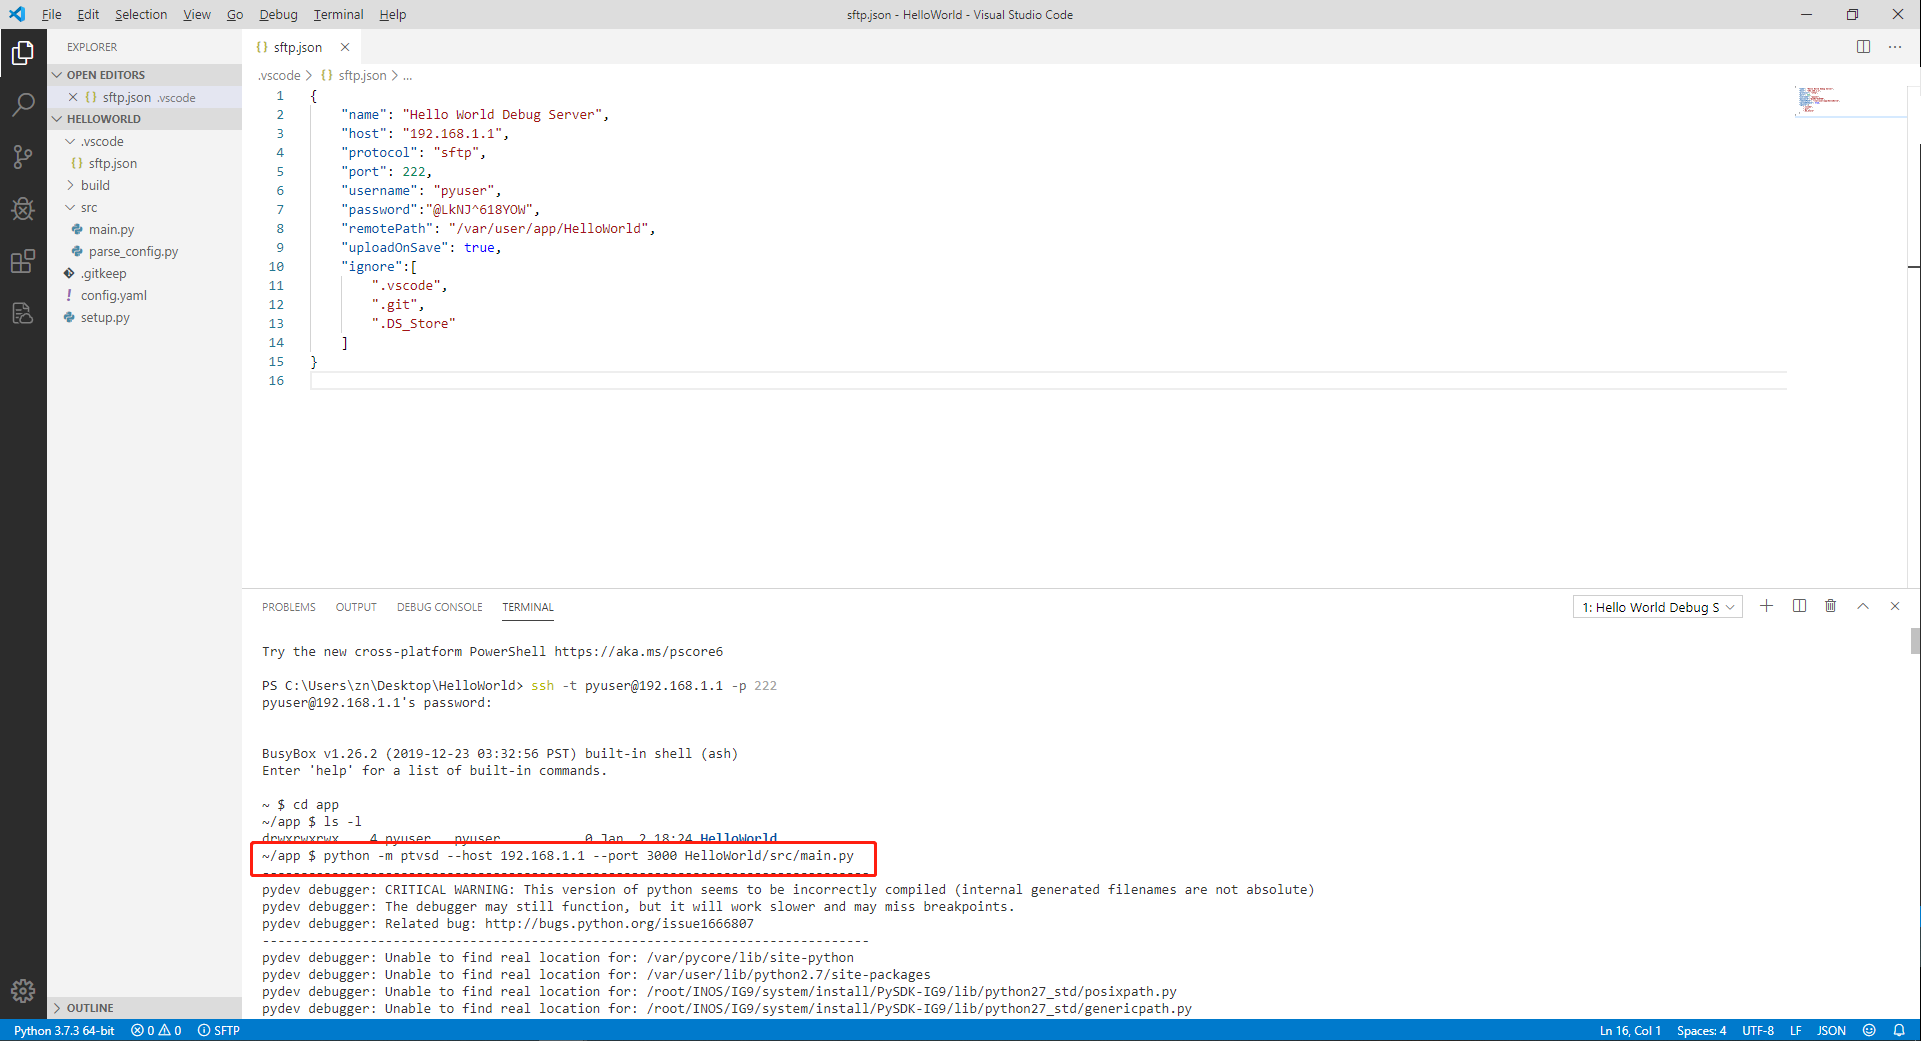
Method 1: Use ptvsd to debug the script
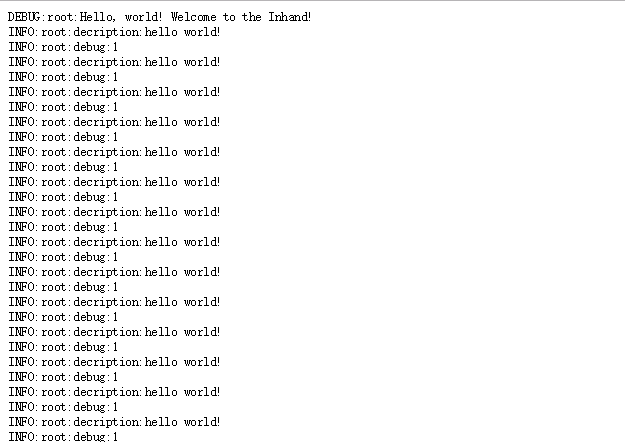
After the code is synchronized, in the TERMINAL window, enter the following command to execute the script on MobiusPi immediately (take IG501 as an example). After the script is executed, you can view the execution result in the TERMINAL window: the log “hello world!” is printed. Note: MobiusPi’s Python development environment does not provide ptvsd dependent libraries by default, you can refer to 2.8.2 Install the third-party dependency library to SDK to install it yourself
python -m ptvsd --host 192.168.1.1 --port 3000 HelloWorld/src/main.py
192.168.1.1is the IP address of the host configured insftp.json.3000is the recommended debugging port number.HelloWorld/src/main.pyis the execution path ofmian.py, which can be adjusted as needed.
For more information about the ptvsd plug-in, see ptvsd user manual.
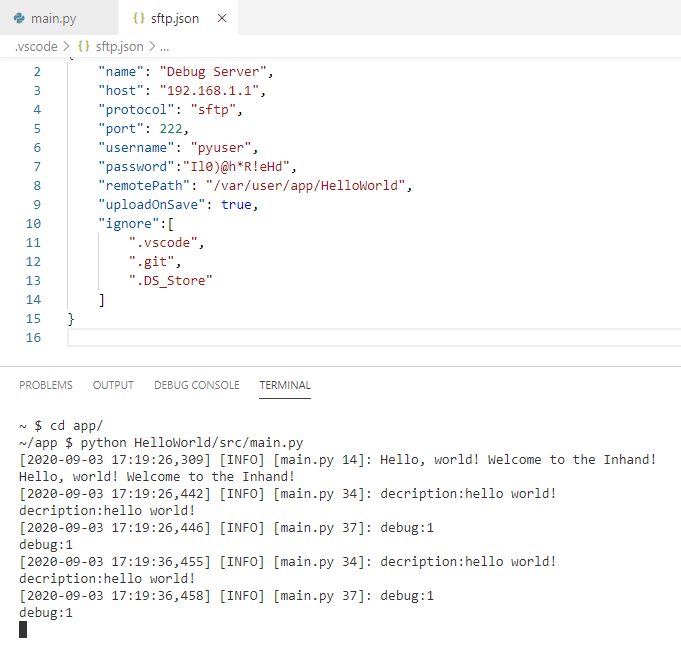
Method 2: Run the script directly
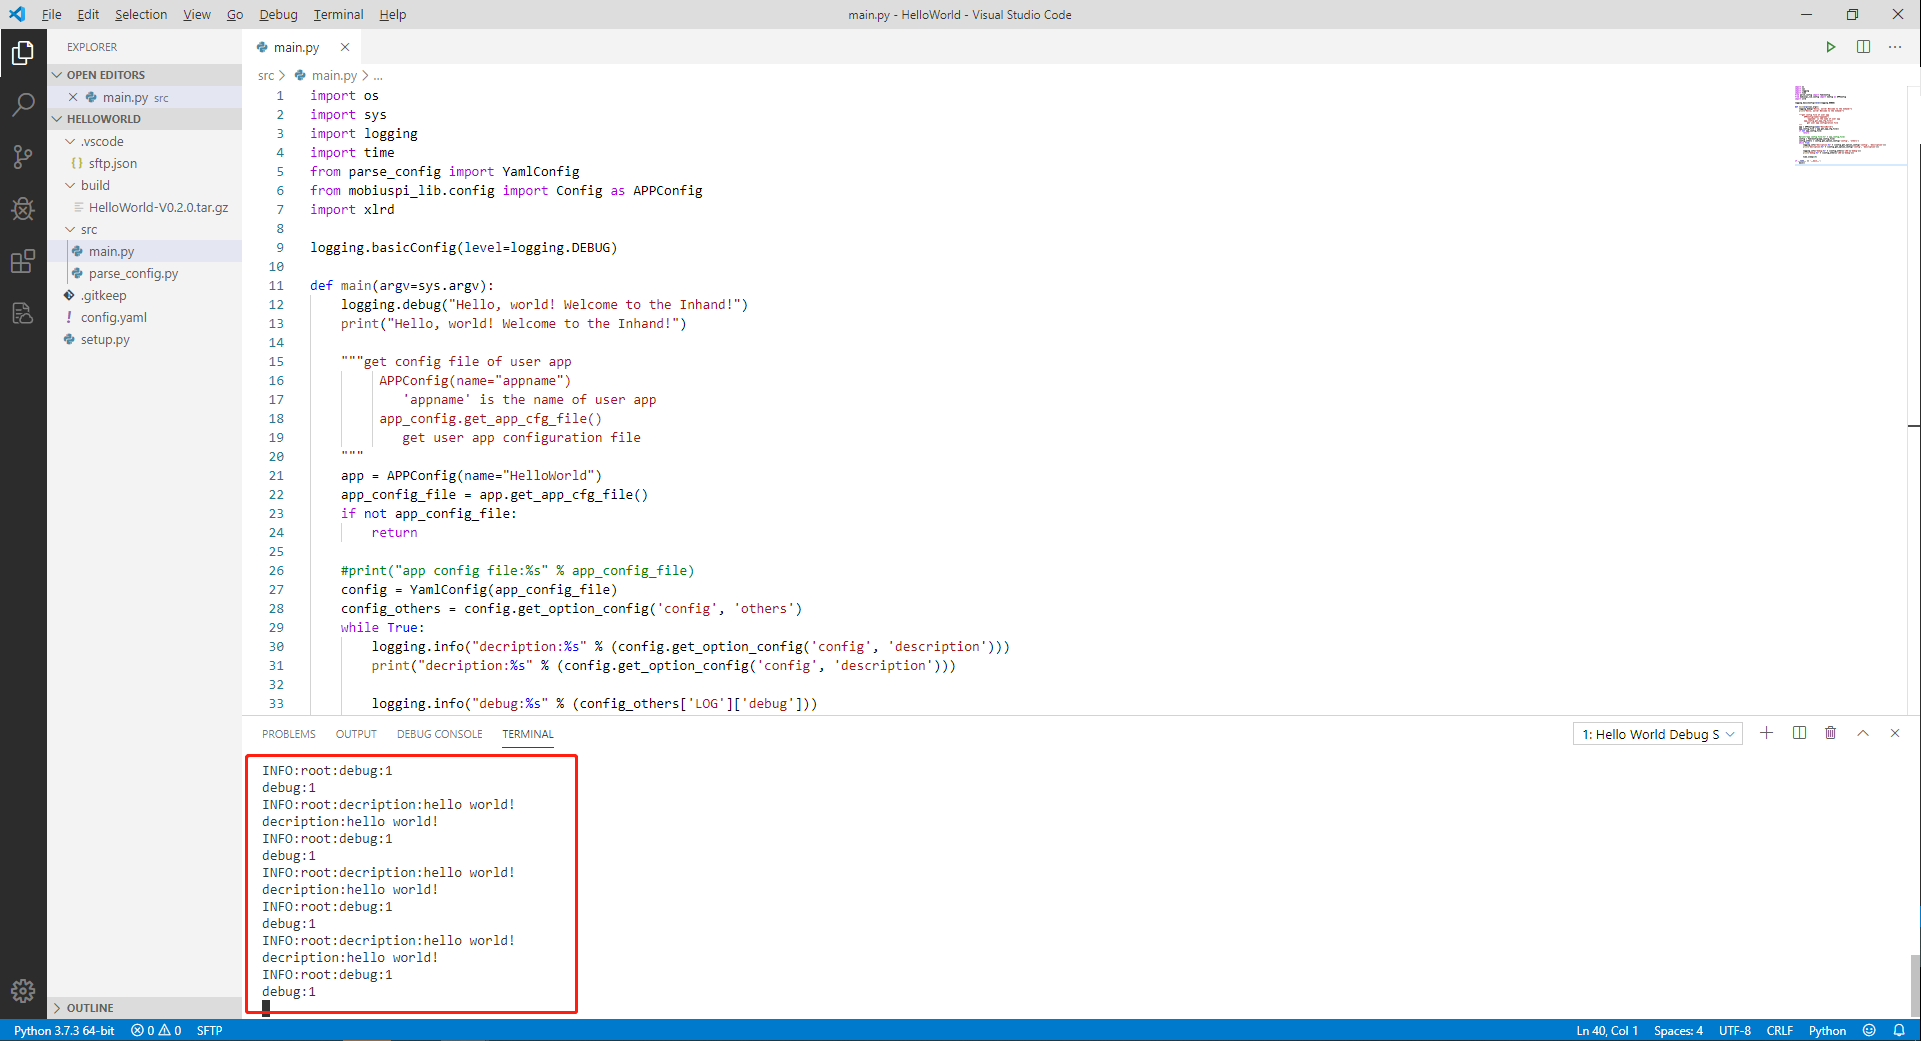
After the code is synchronized, in the TERMINAL window, enter the following command to execute the script on IG501 immediately. After the script is executed, you can view the execution result in the TERMINAL window: the log “hello world!” is printed. (
HelloWorld/src/main.pyis the execution path ofmian.py, which can be adjusted as needed.)python HelloWorld/src/main.py
Step 3: After debugging, press
Ctrl + Con the terminal to terminate the debugging process.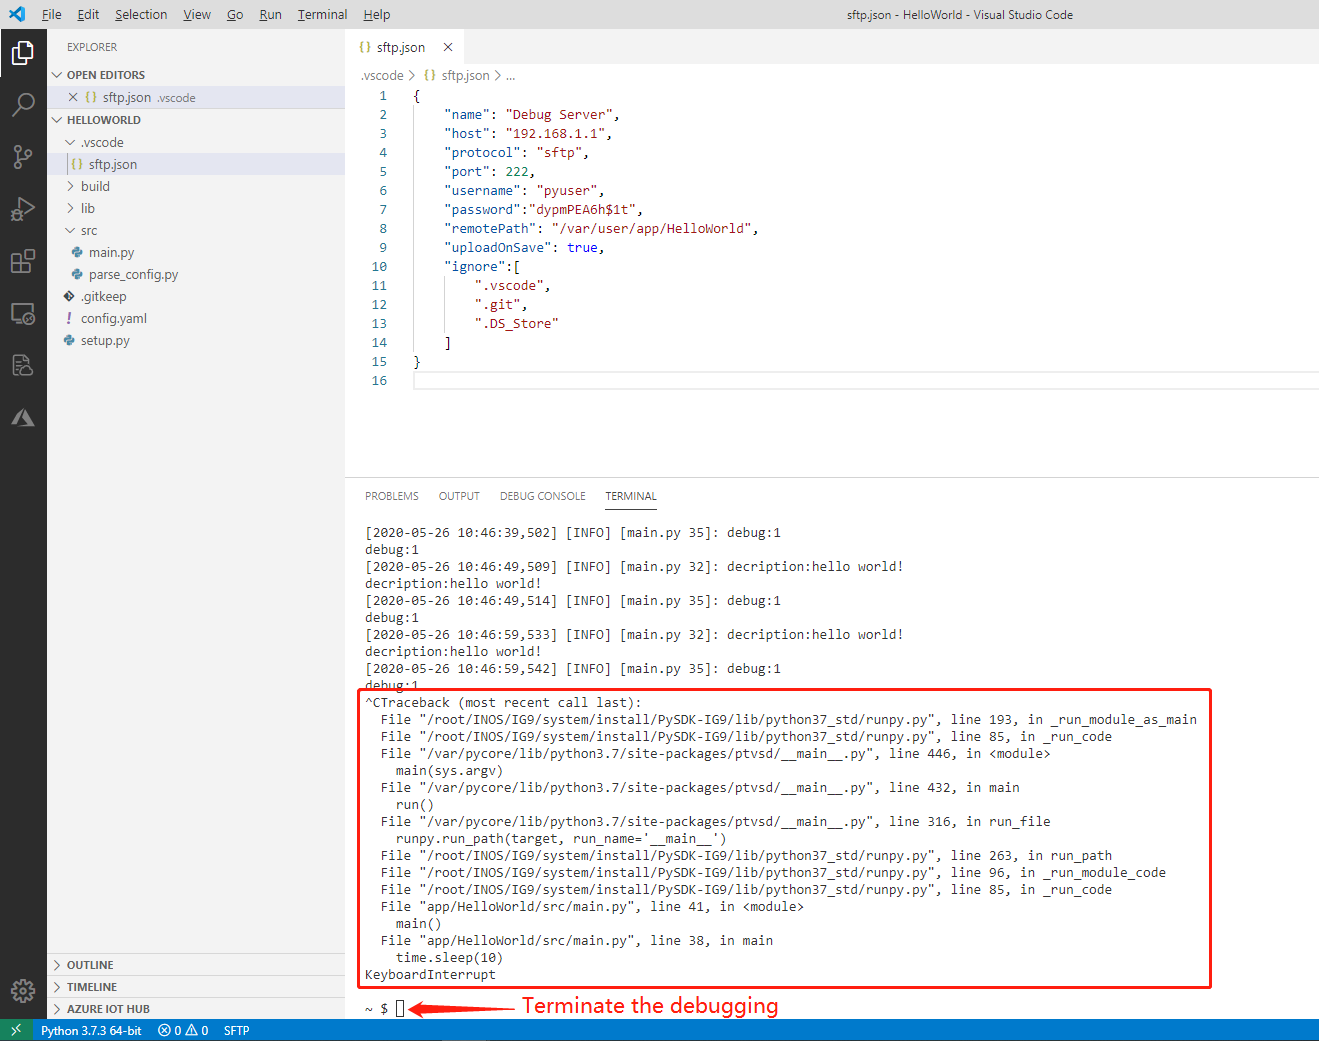
2.4 Build an App release package
After debugging, you can build an App release package to quickly deploy the App to other MobiusPi devices.
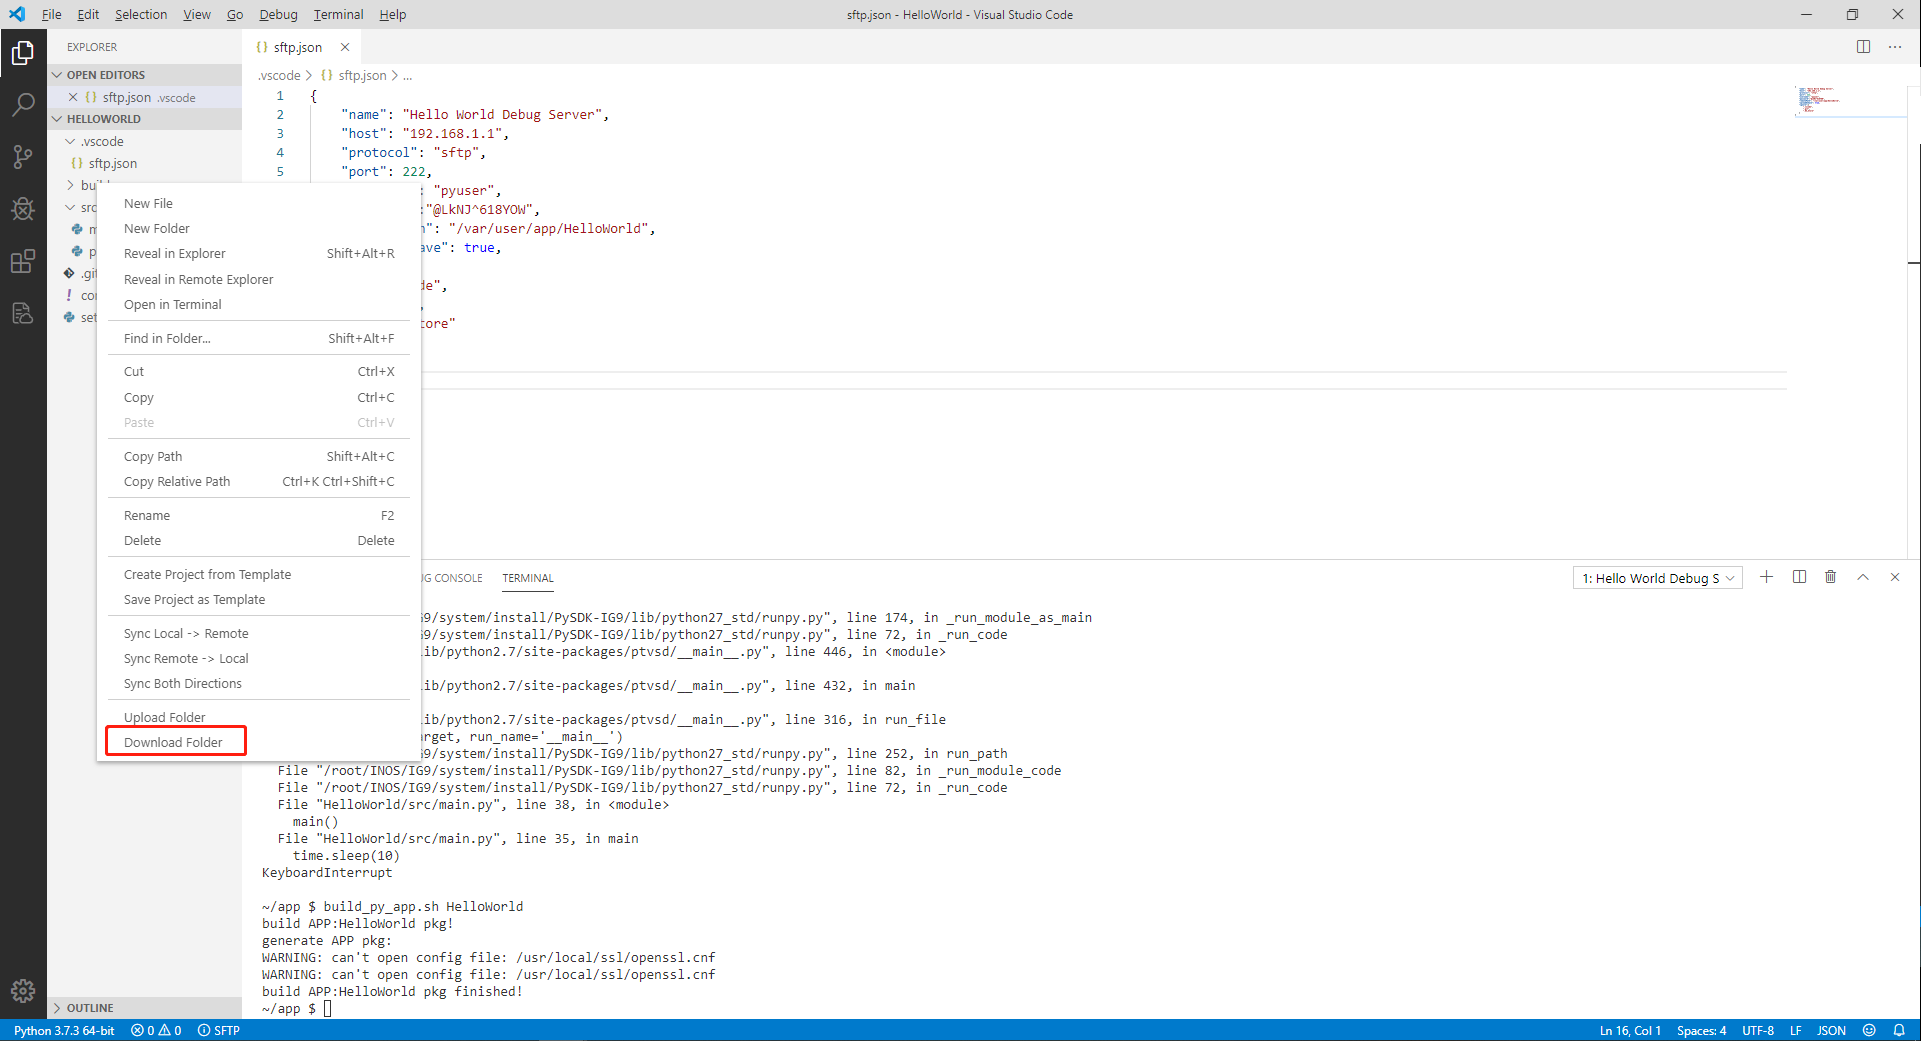
Step 1: Build an App release package.
In the TERMINAL window, run the
build_py_app.sh HelloWorldcommand to build an App release package. (That is, thebuild_py_app.shPython App name.)
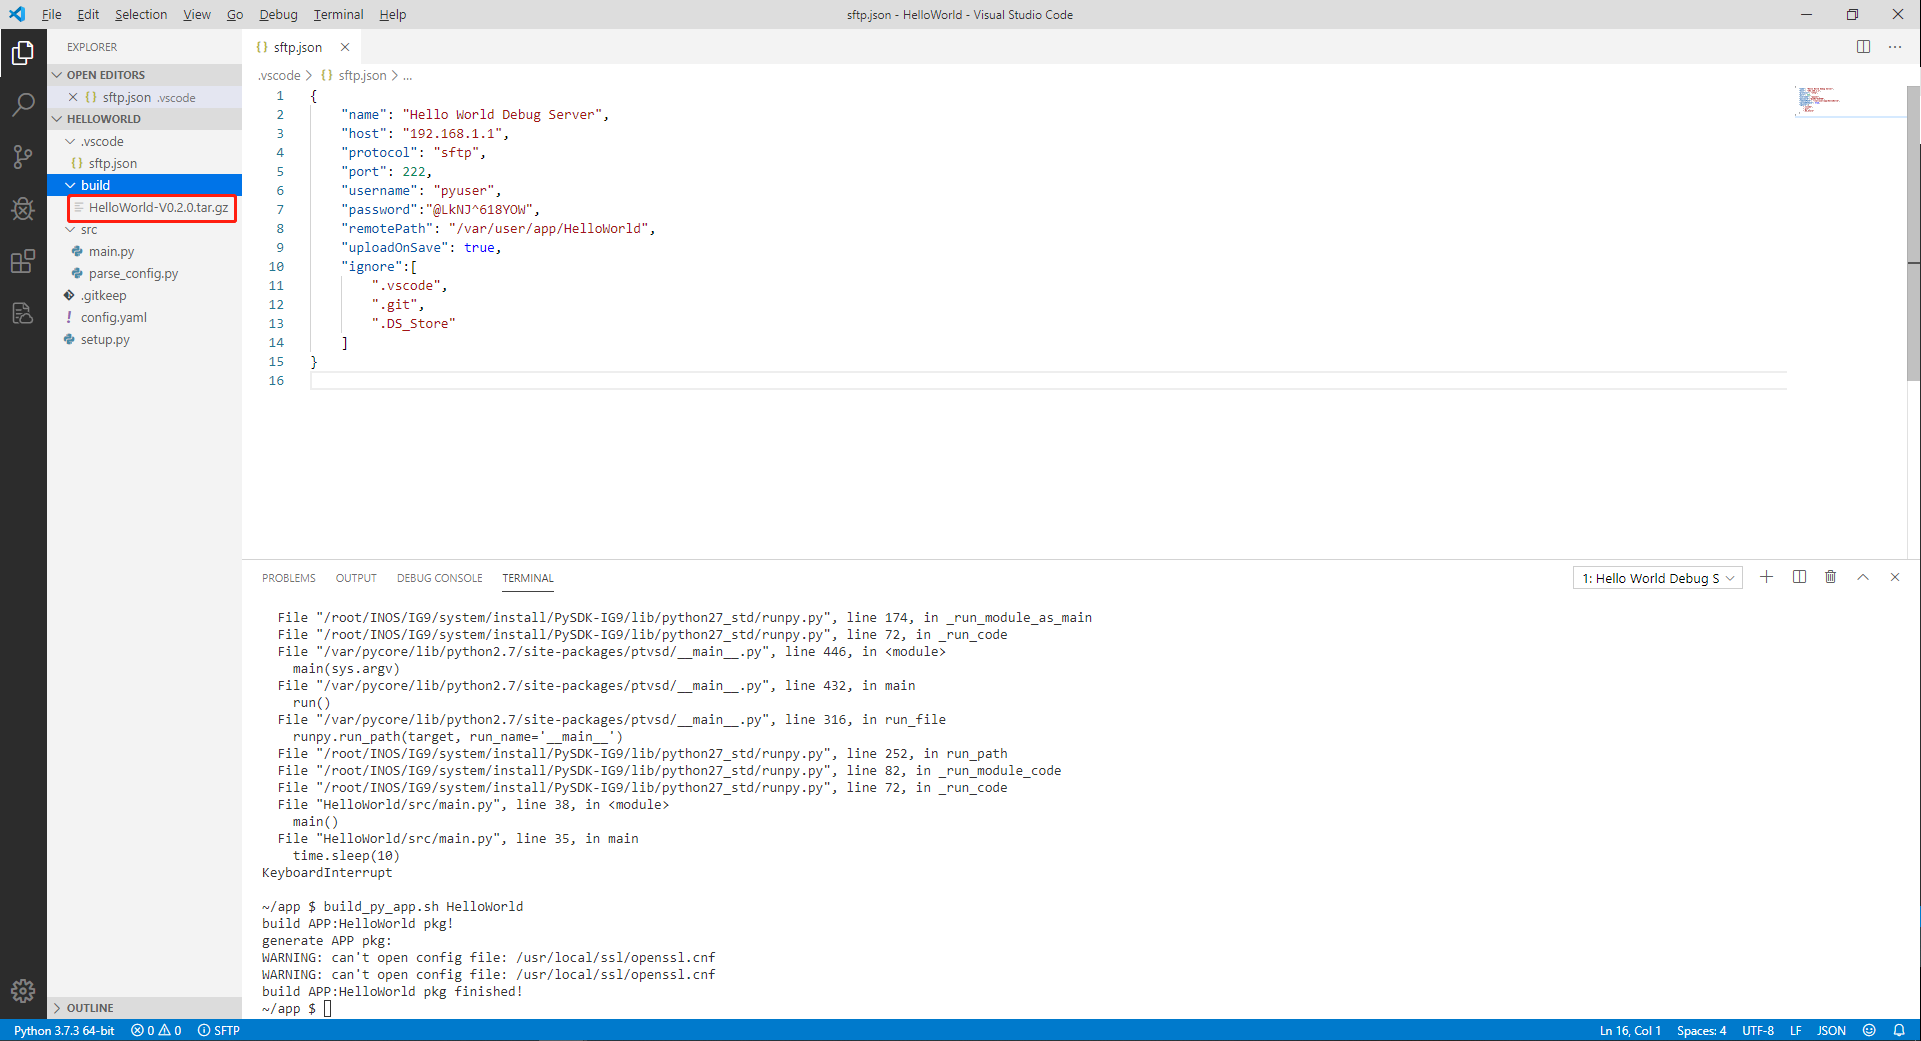
Step 2: Download the App release package.
After the command is executed, the App release package is automatically generated in the build directory on the remote server. Right-click the build folder and select Download Folder to download the built App release package to the local PC for subsequent deployment.
After the package is downloaded, you can view the HelloWorld App release package in the build directory.
2.5 Deploy the App on the MobiusPi web page
Run the main.py script. Or, after the App release package is built, the App is automatically generated on the connected MobiusPi, but this App cannot be started. Refer to the following links to deploy the App to MobiusPi:
2.6 View the App running status
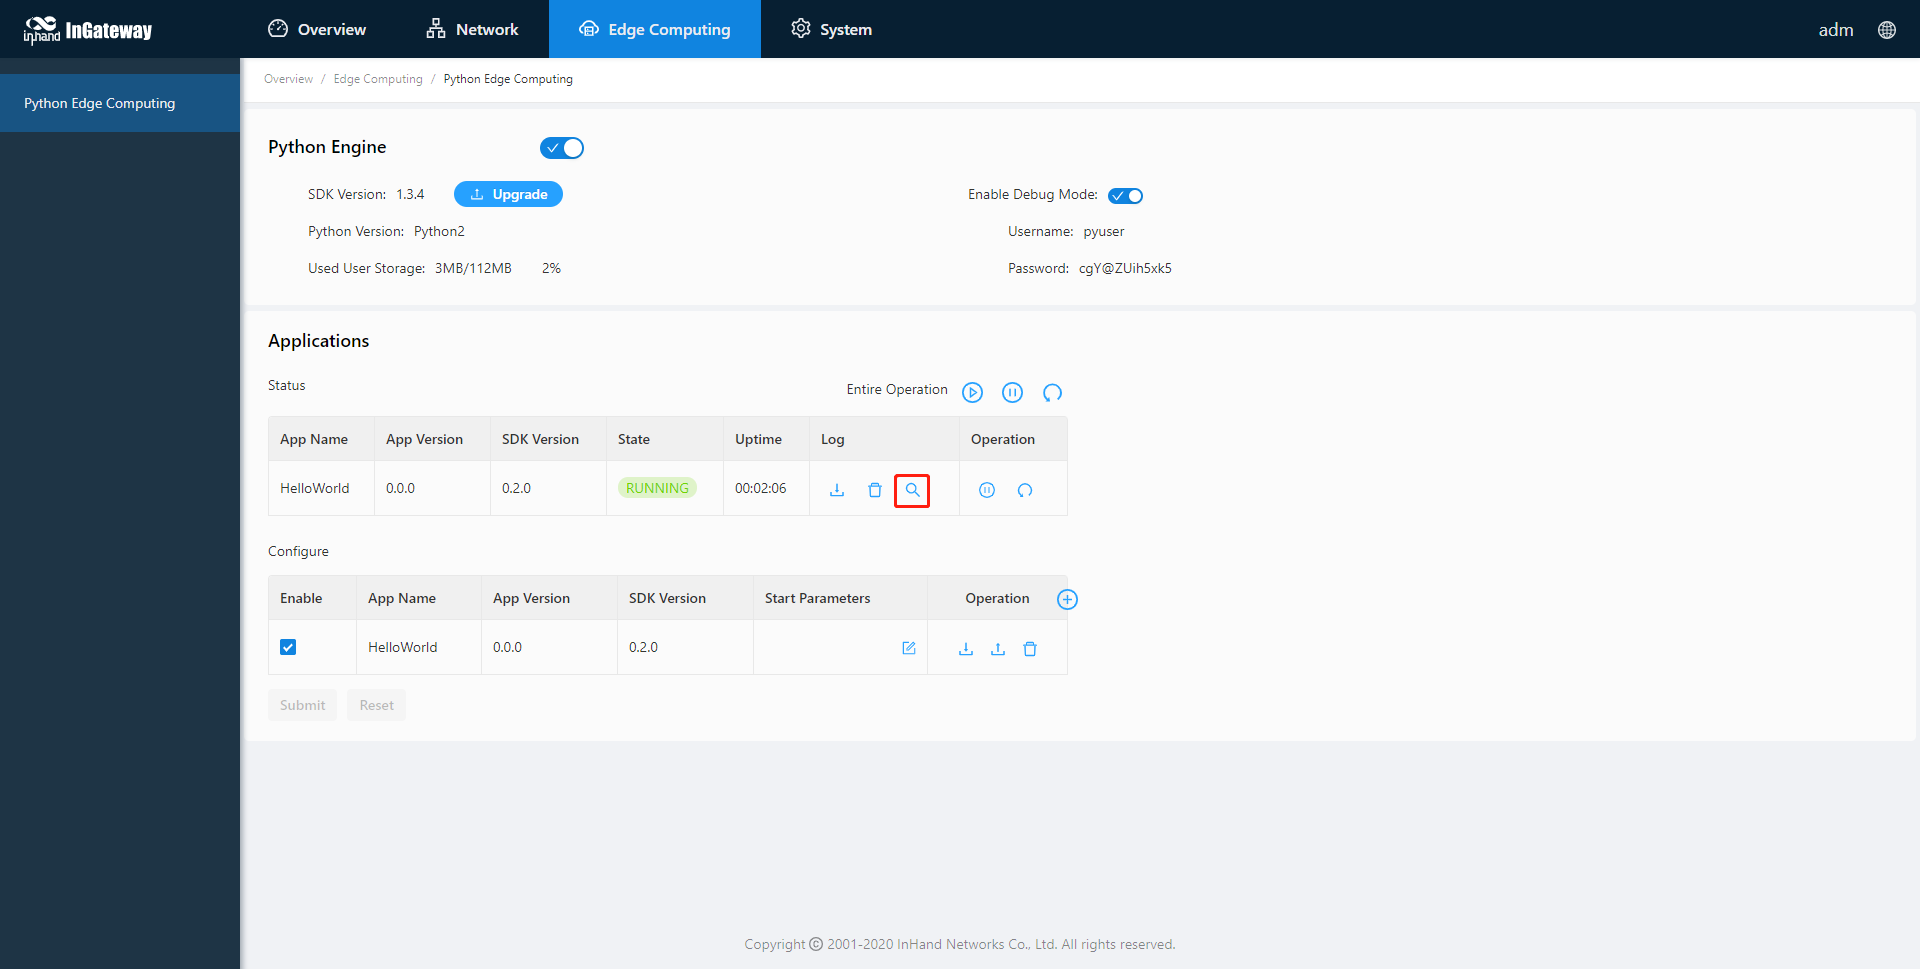
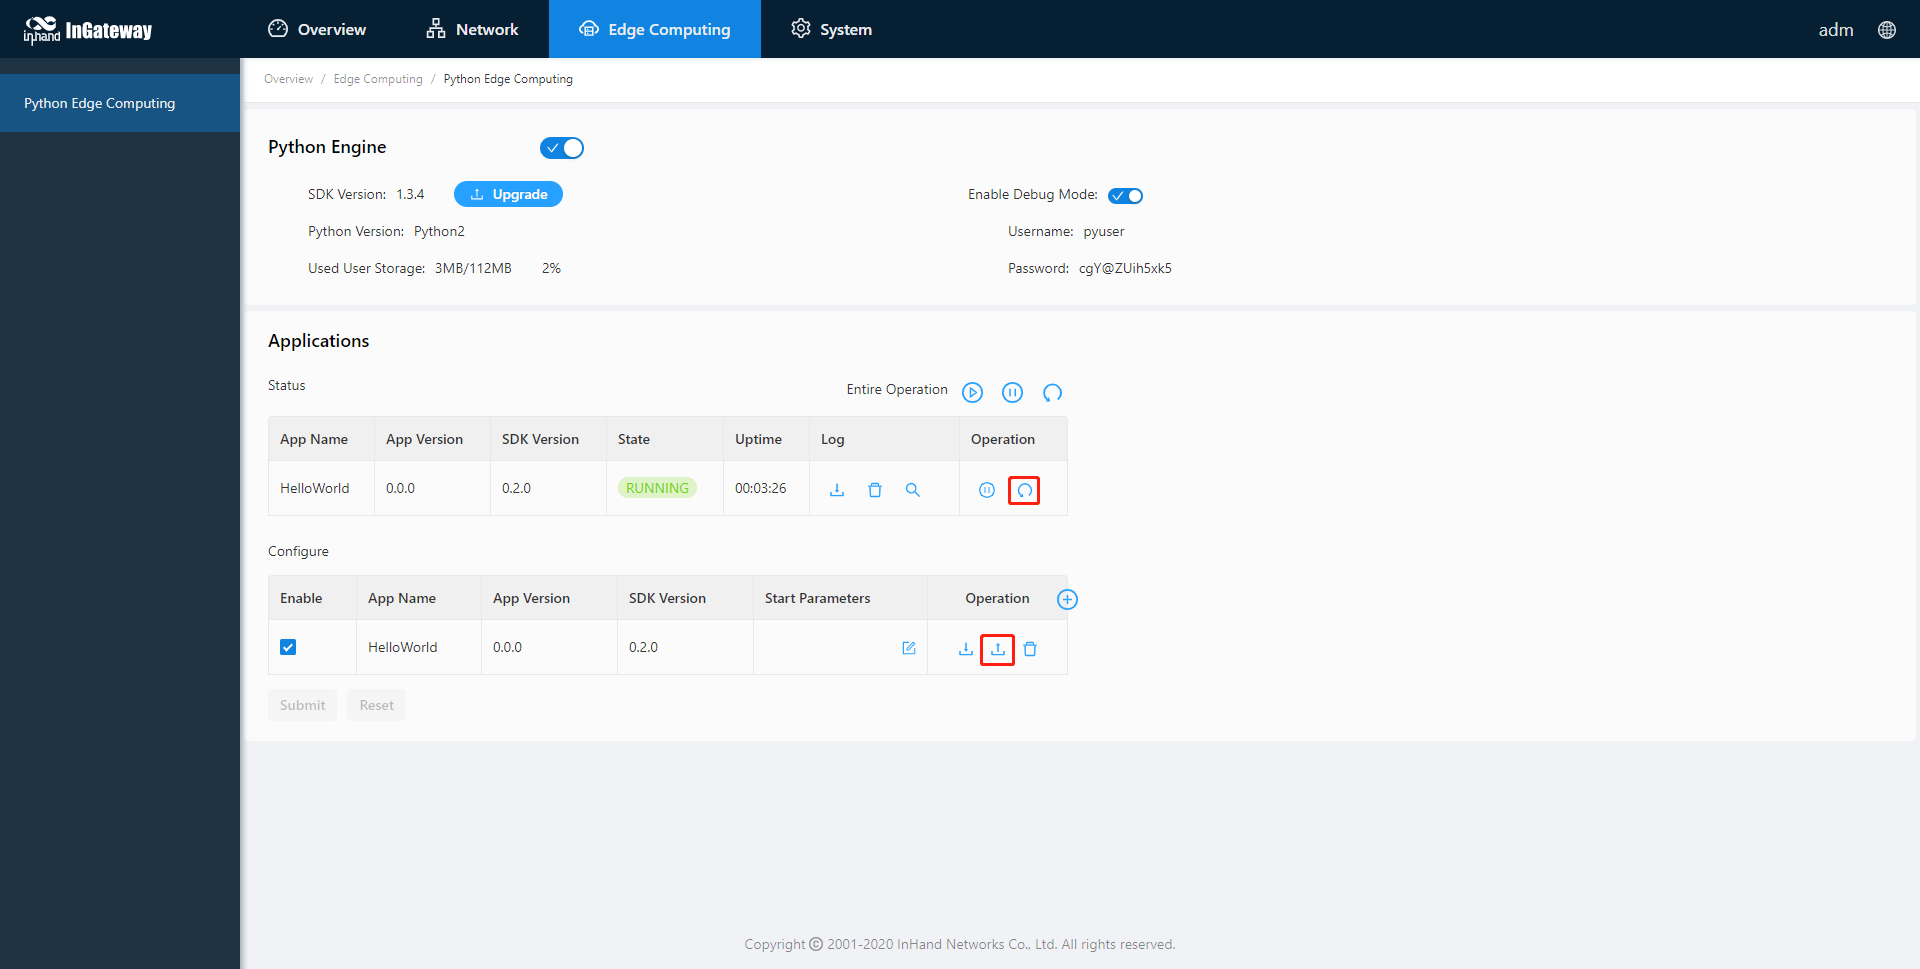
You can view the App running status on the Edge Computing > Python Edge Computing page in MobiusPi.

Click View Logs to view the App running logs.
2.7 Update the App configuration file
Step 1: Modify the configuration file.
In the config.yaml file of the App, modify
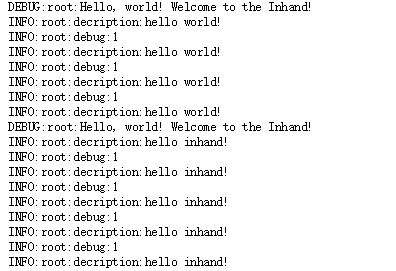
description: "hello world!"todescription: "hello inhand!".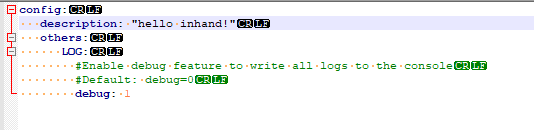
Step 2: Import the configuration file and restart the App.
On the Edge Computing > Python Edge Computing page in MobiusPi, import the modified configuration file of the HelloWorld App, and restart the App.
After restart, the HelloWorld App runs with the updated configuration file and prints a log “hello inhand!” every 10s.
2.8 Annex
- 2.8.1 Install a third-party dependency library for the specified App
- 2.8.2 Install the third-party dependency library to SDK
- 2.8.3 Enable automatic code completion
2.8.1 Install a third-party dependency library for the specified App
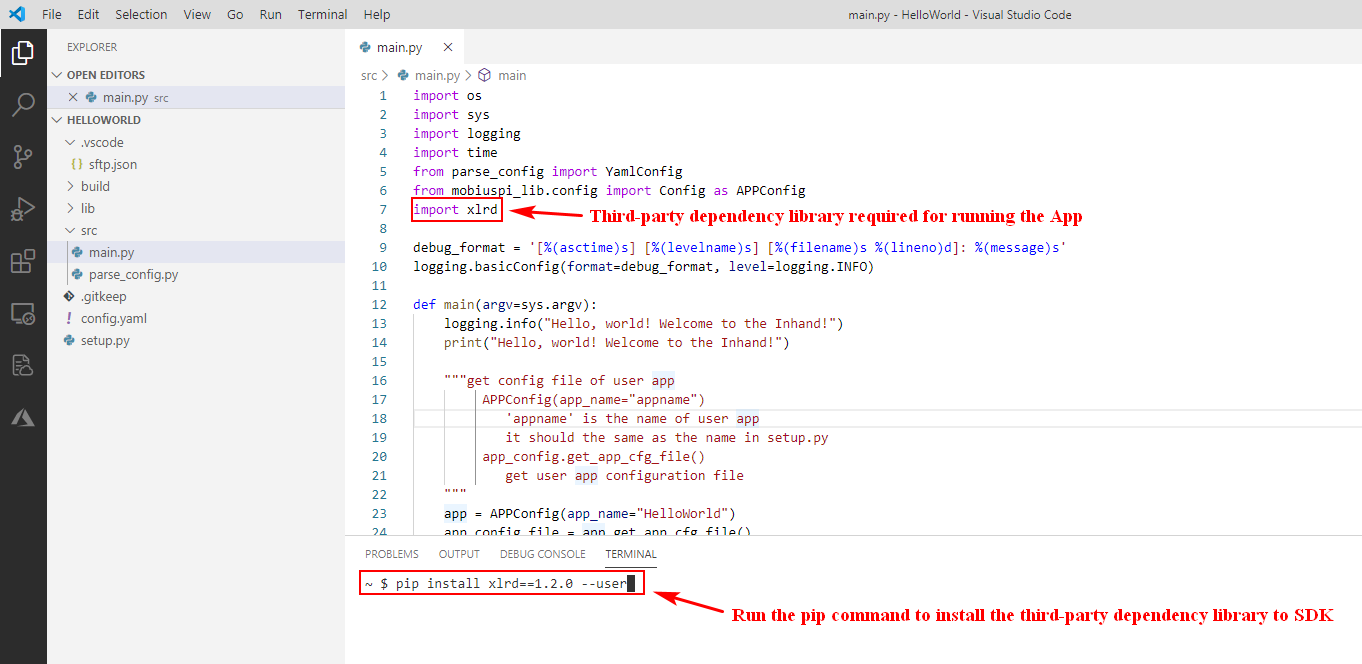
To install a third-party dependency library for the specified App, you need to enable the debugging mode for MobiusPi and connect to the Internet. The following takes installing the xlrd dependency library to the HelloWorld App as an example to describe how to install a third-party dependency library to a specified App.
Step 1: Use VS Code to connect to MobiusPi over SFTP. For more information, see Create an SFTP connection.
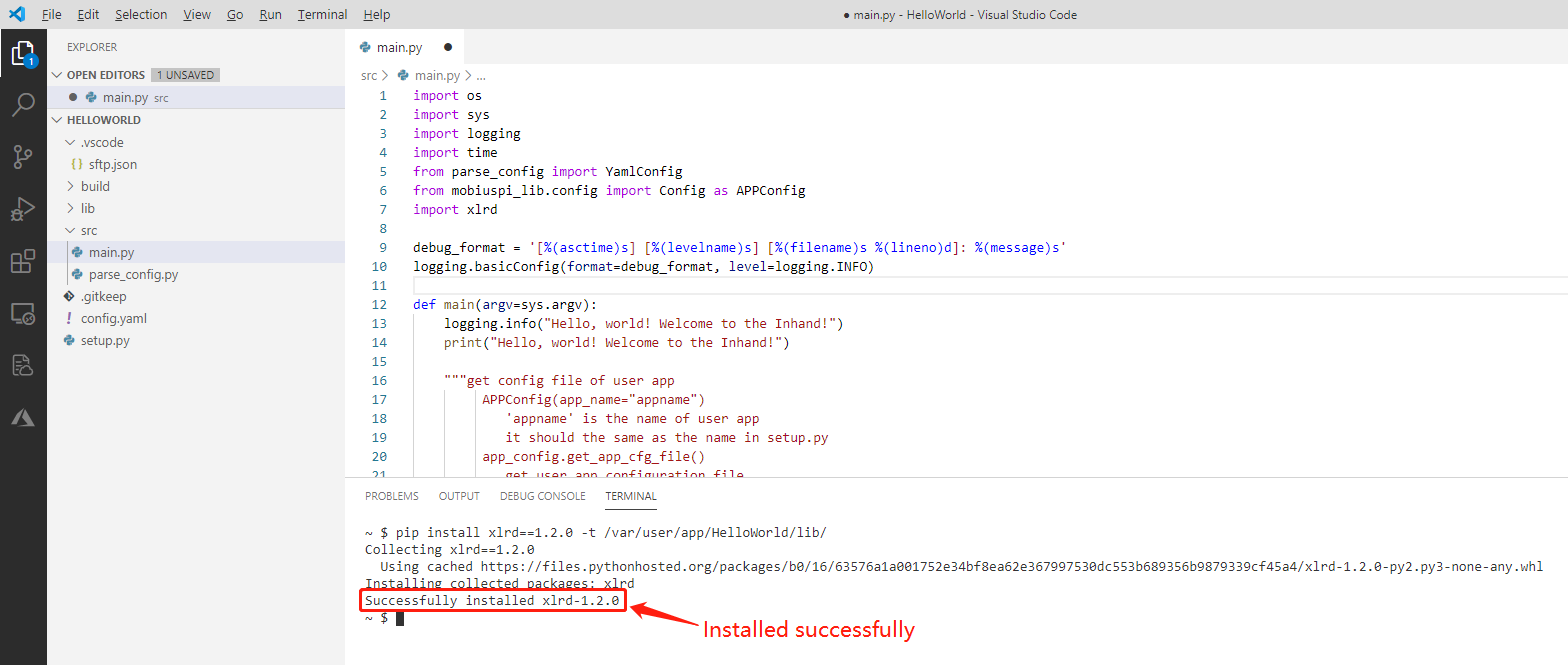
Step 2: Run
pip install+ dependency library name + ==version number +-t+ App’s lib folder path and press Enter to install the dependency library to the specified App. (If the version number is not added, after the pip command is run, the latest dependency library is automatically installed.)pip install xlrd==1.2.0 -t /var/user/app/HelloWorld/lib/
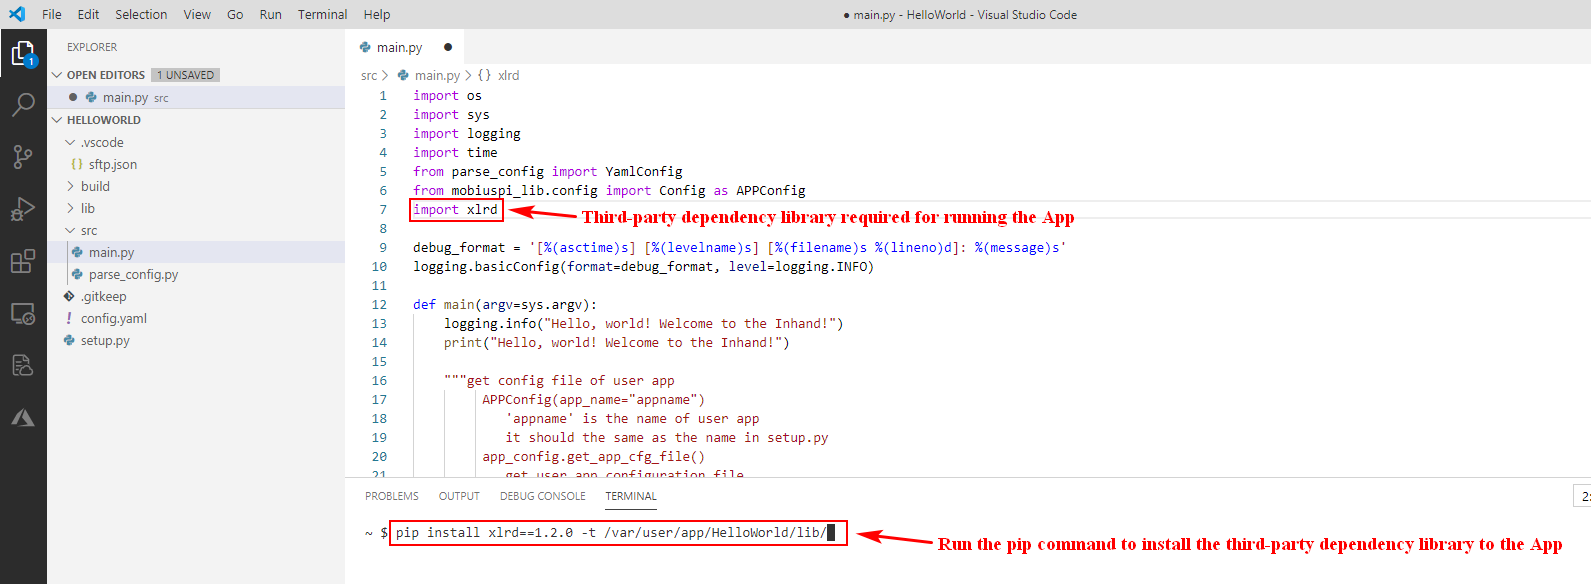
Step 3: Then, the dependency library is automatically downloaded and installed. After the library is installed, the following figure is displayed:
Step 4: Run the
exportcommand to set an environment variable for the App. In the TERMINAL window, run the following command (replace HelloWorld with the actual App name).export LD_LIBRARY_PATH=$LD_LIBRARY_PATH:/var/user/app/HelloWorld/lib/ export PYTHONPATH=$PYTHONPATH:/var/user/app/HelloWorld/lib/
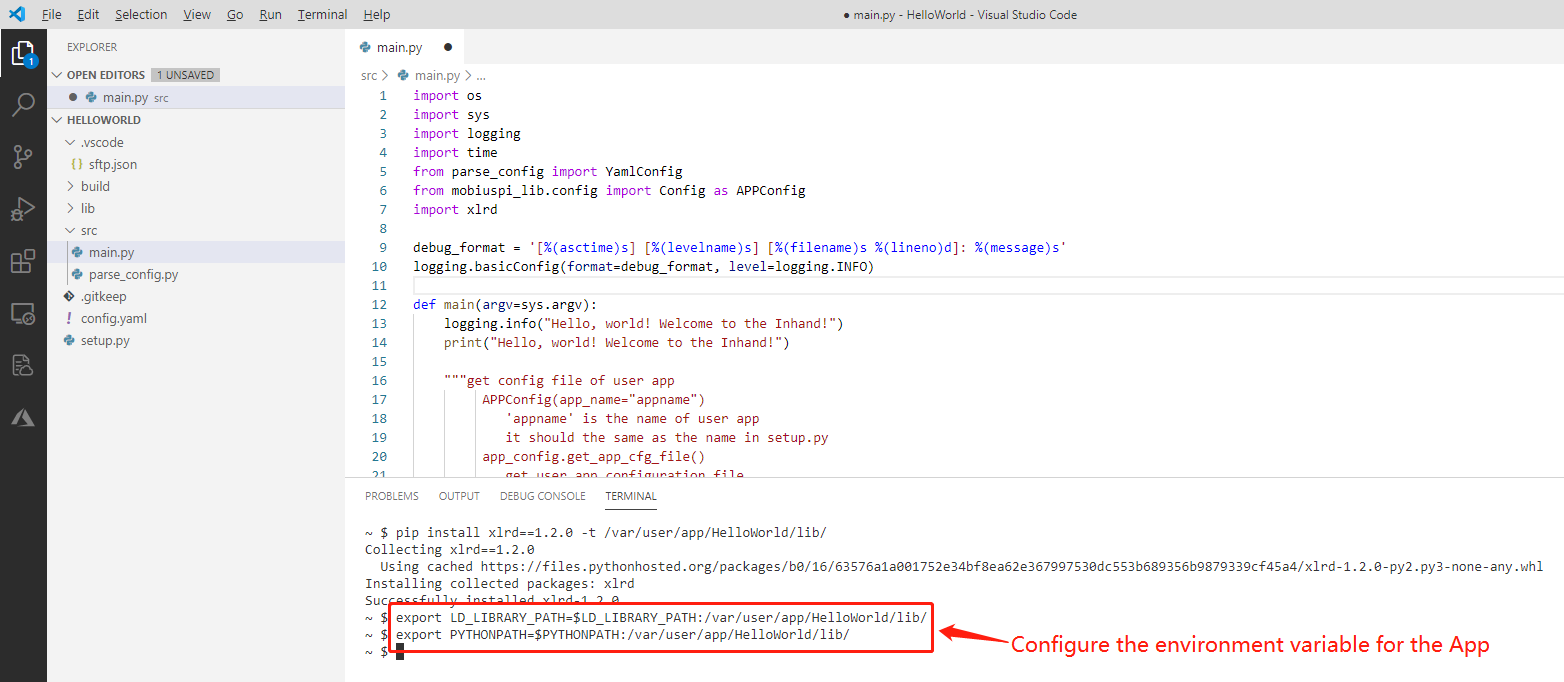
After the third-party dependency library is installed for the specified App, you must configure a corresponding environment variable before debugging this App; otherwise, this App cannot run during debugging. When multiple third-party dependency libraries are installed, you just need to add the environment variable once. After an SFTP connection is created again, you need to configure the environment variable again. When the App is started in MobiusPi, the environment variable of the third-party dependency library is automatically added to the App’s lib folder.(This method is mainly used for third-party dependent libraries where the App needs to install a special version)
Step 5: Run the code to check whether the App runs normally.
2.8.2 Install the third-party dependency library to SDK
To install a third-party dependency library to SDK, you need to enable the debugging mode for MobiusPi and connect to the Internet. The following takes installing the xlrd dependency library to SDK as an example to describe how to install a third-party dependency library to SDK.
Step 1: Use VS Code to connect to MobiusPi over SFTP. For more information, see Create an SFTP connection.
Step 2: Run
pip install+ dependency library name + ==version number +--userand press Enter to install the dependency library to SDK. (If the version number is not added, after the pip command is run, the latest dependency library is automatically installed.)pip install xlrd==1.2.0 --user
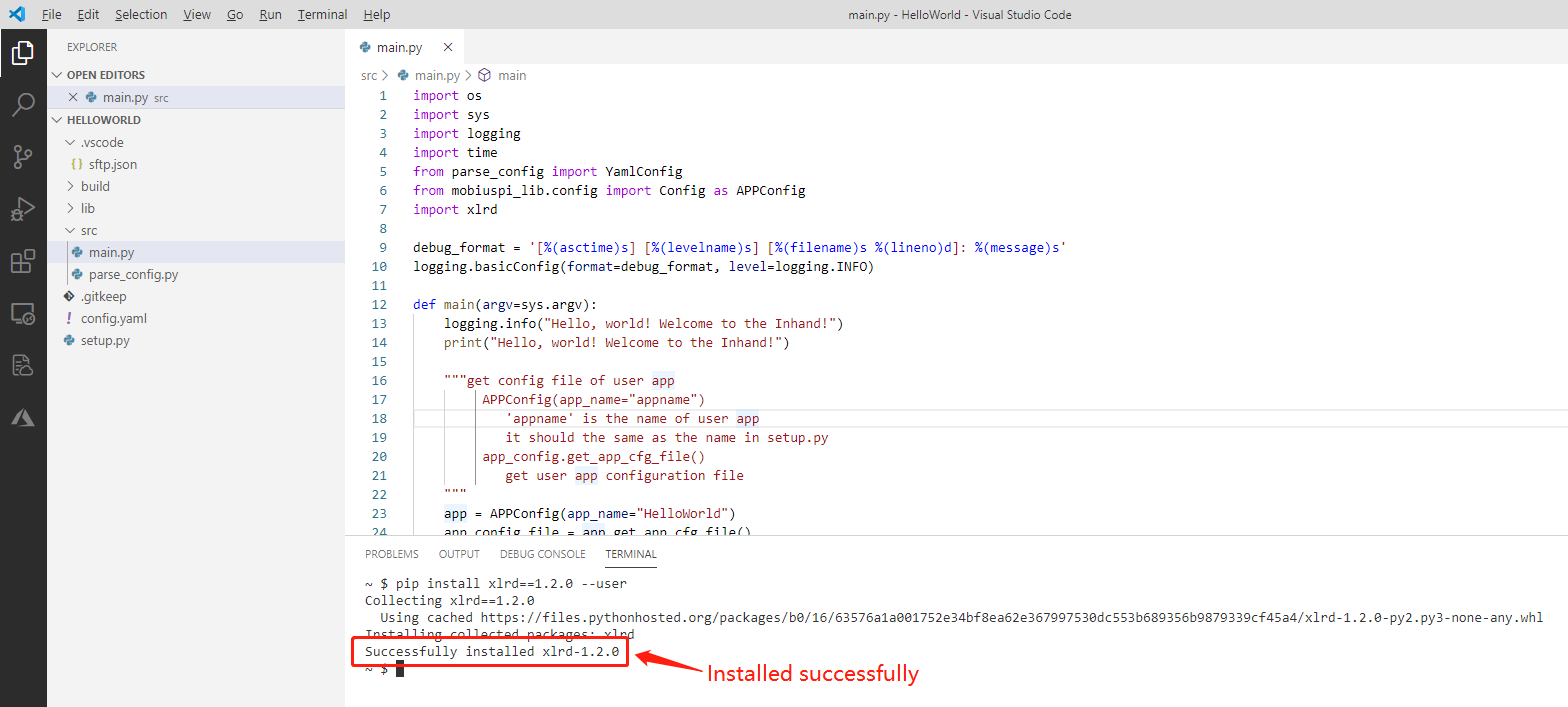
Step 3: Then, the dependency library is automatically downloaded and installed. After the library is installed, the following figure is displayed:
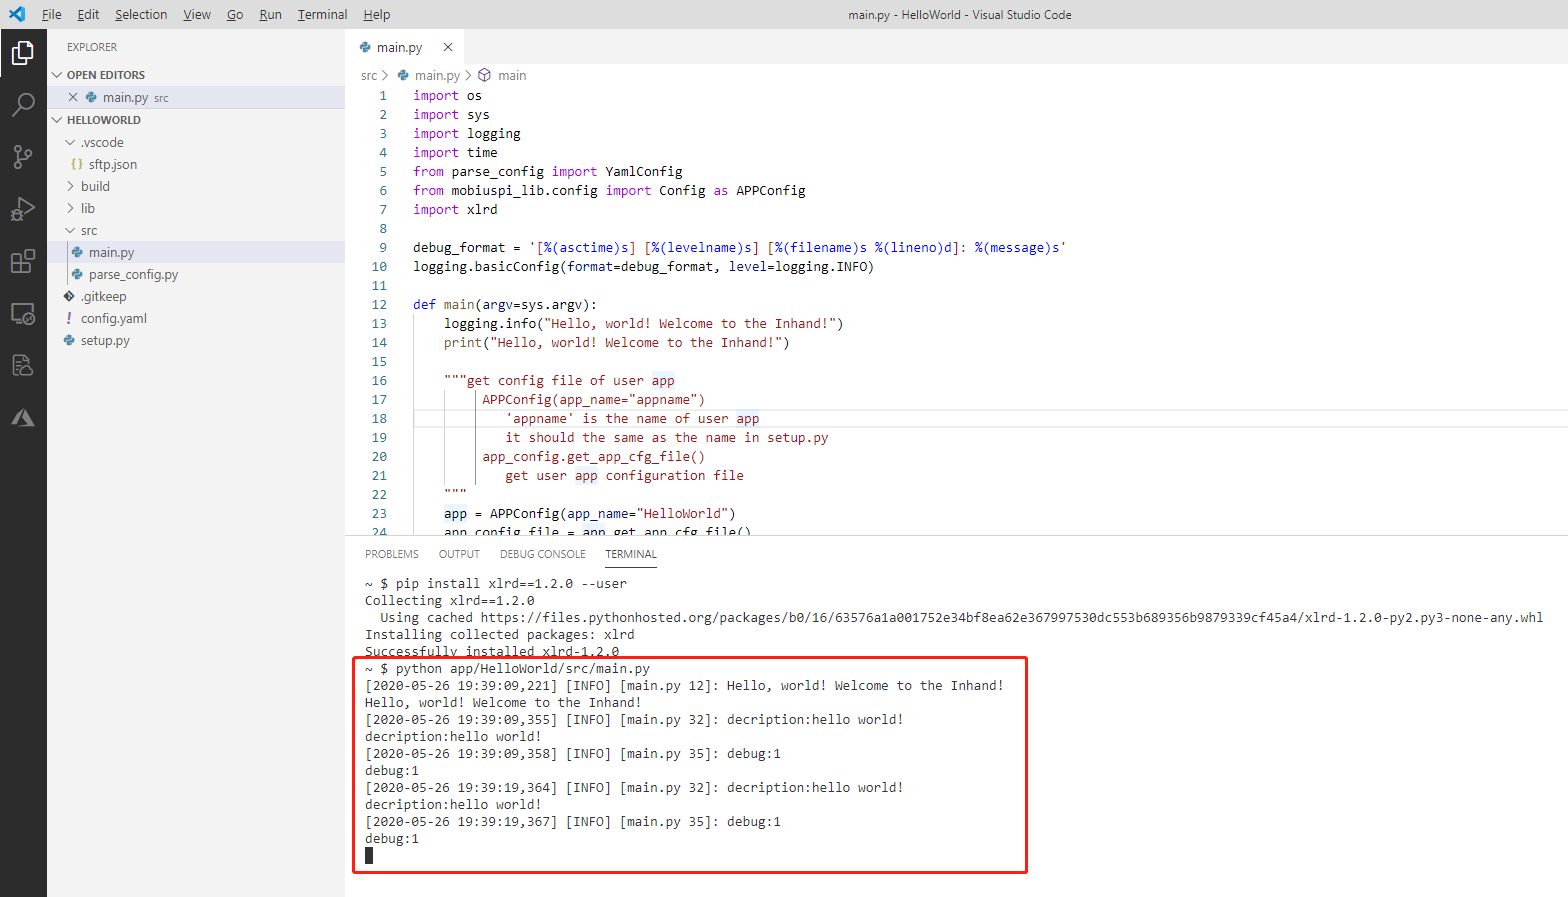
Step 4: Run the code to check whether the App runs normally.
Note: When using this method to install a third-party dependency library, the packaged App release package will be automatically installed into the MobiusPi when it is deployed on other MobiusPi.
2.8.3 Enable automatic code completion
To improve the encoding efficiency, you can implement automatic code completion by using Python extensions.
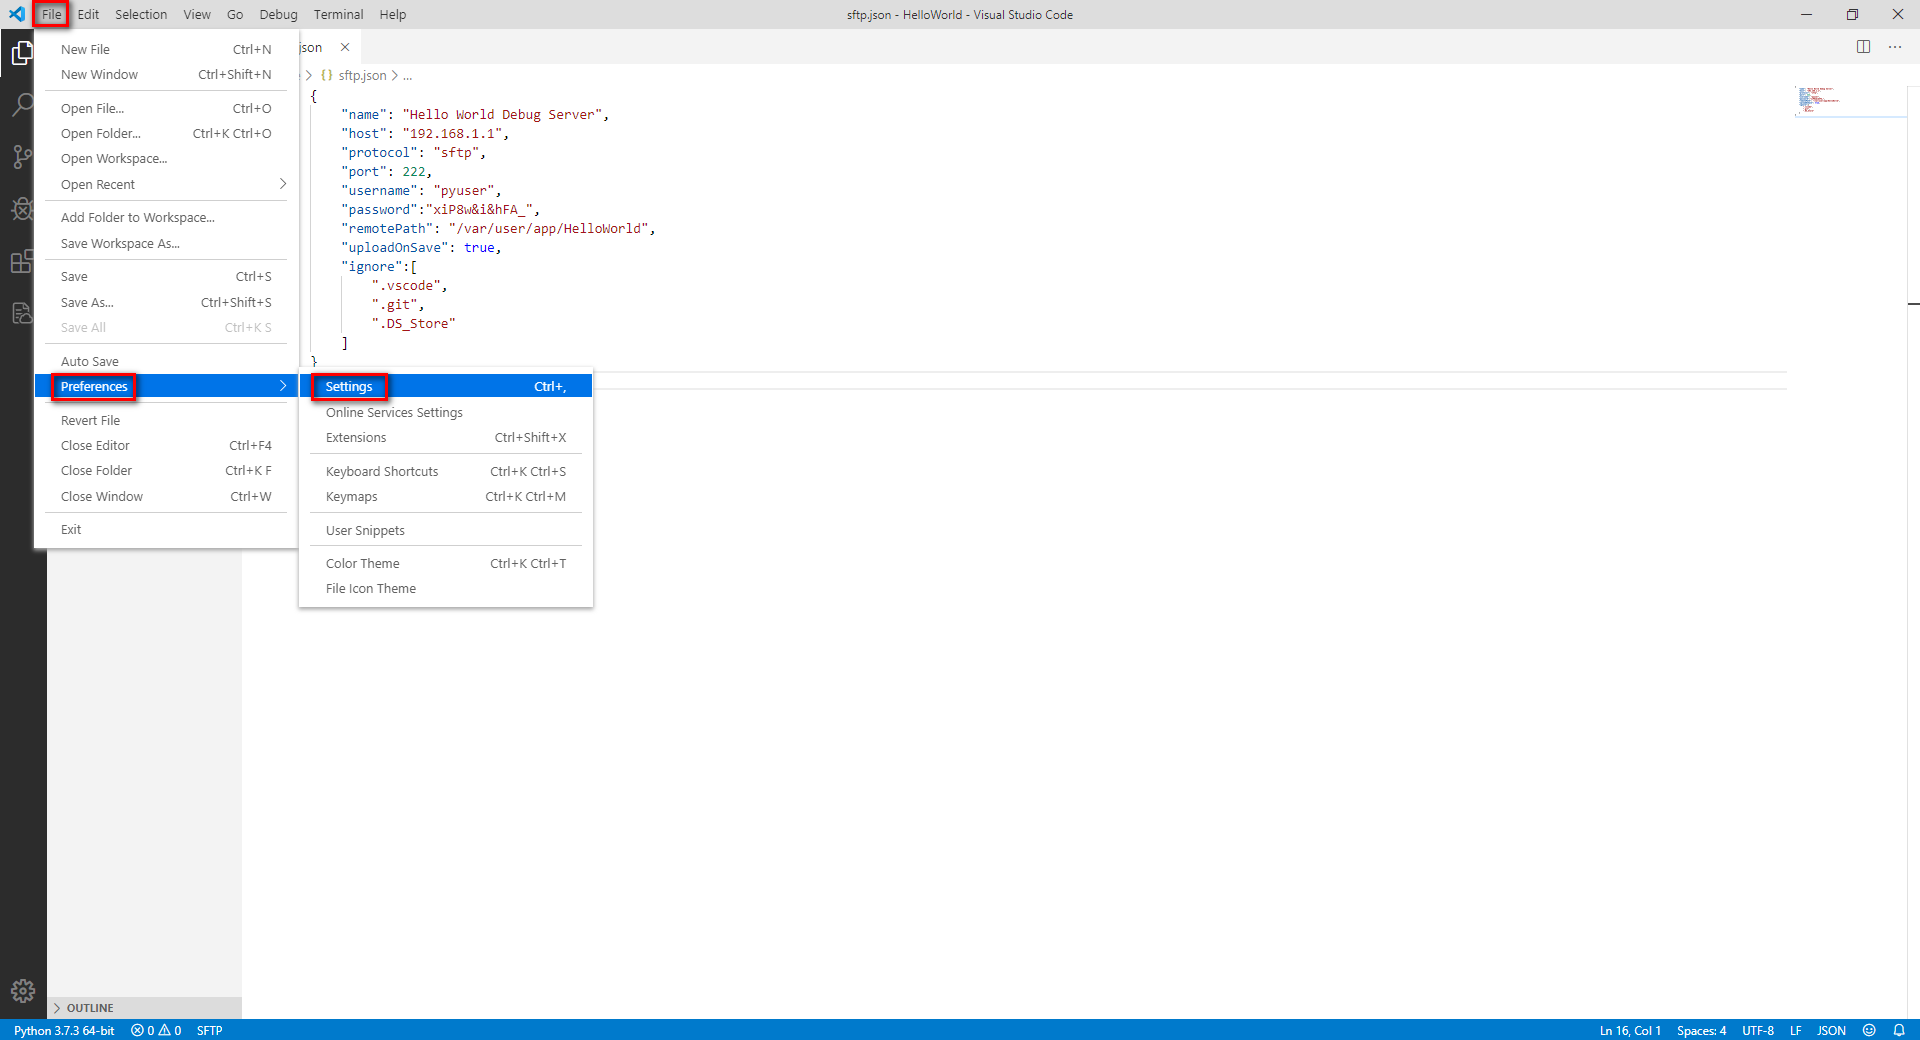
Step 1: Choose Files > Preferences > Settings to enter the Settings page.
Step 2: On the Settings page, choose Extensions > Python, locate Auto Complete: Extra Paths, and then click Edit in setting.json.
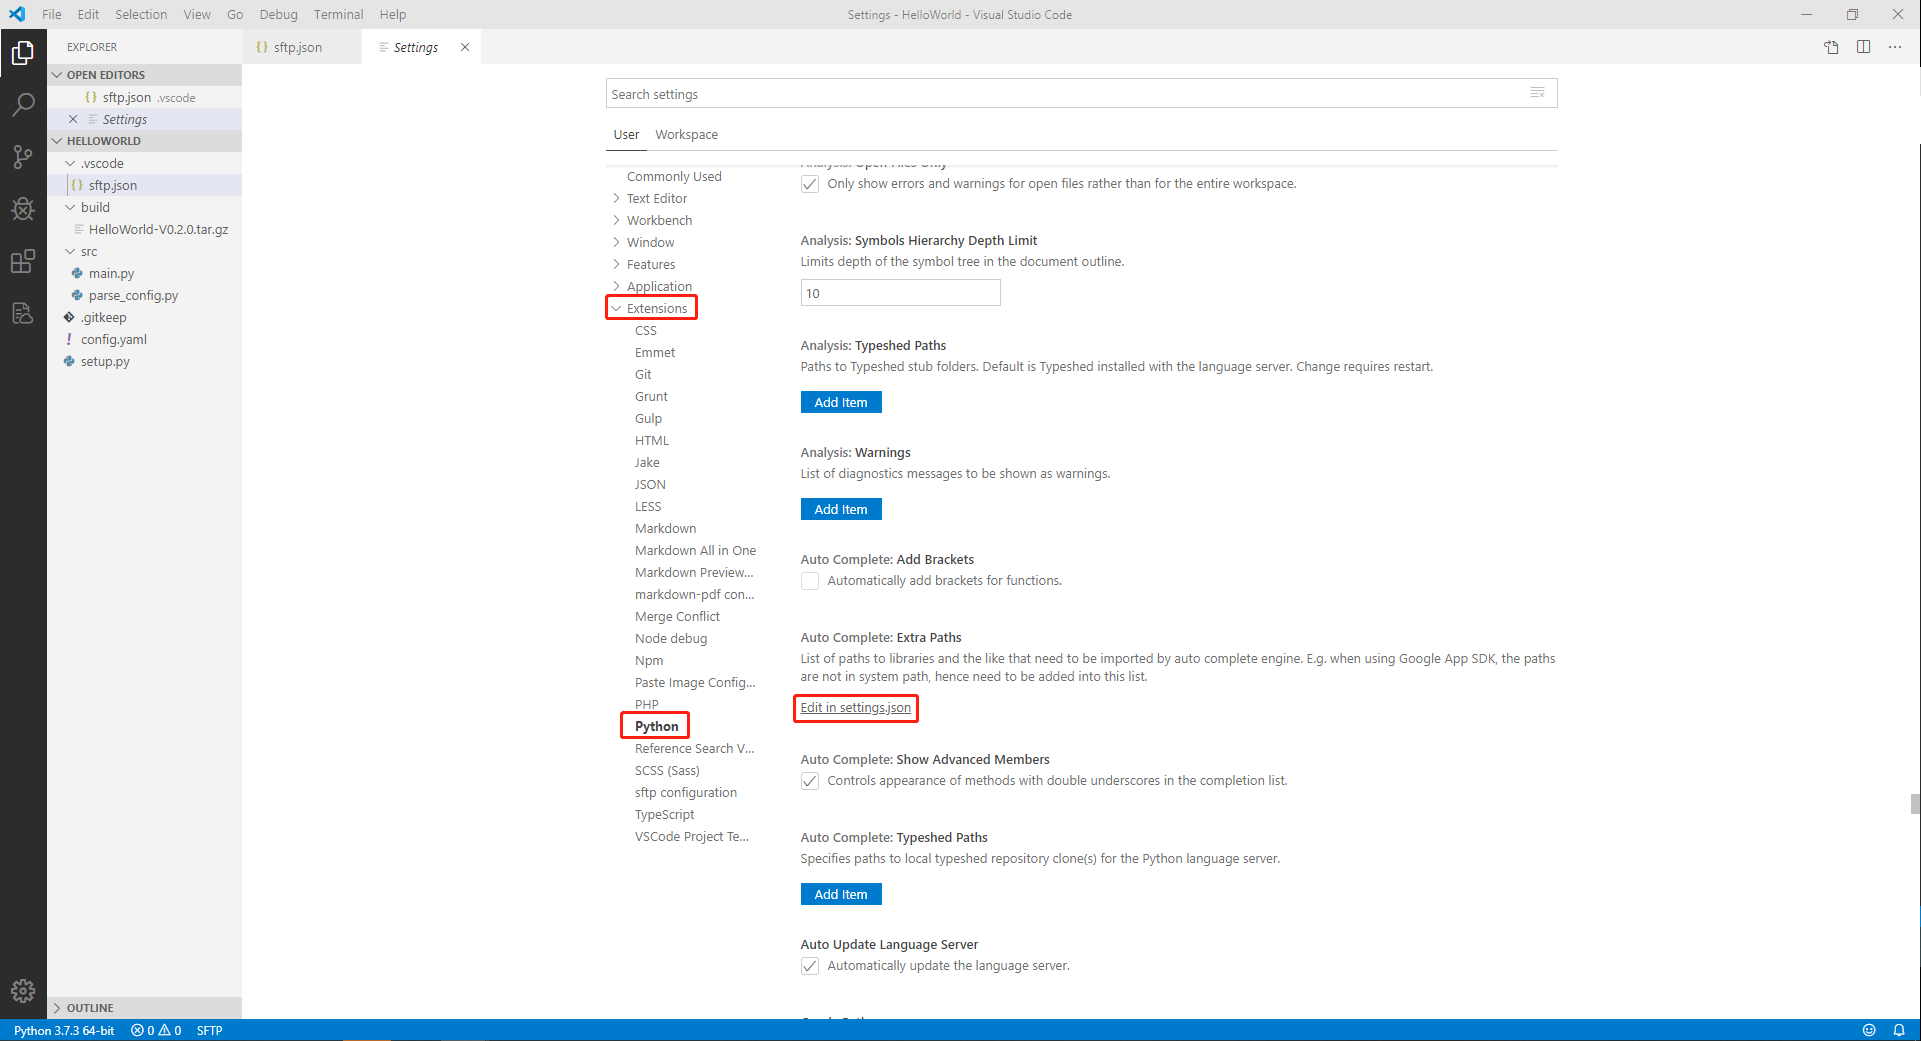
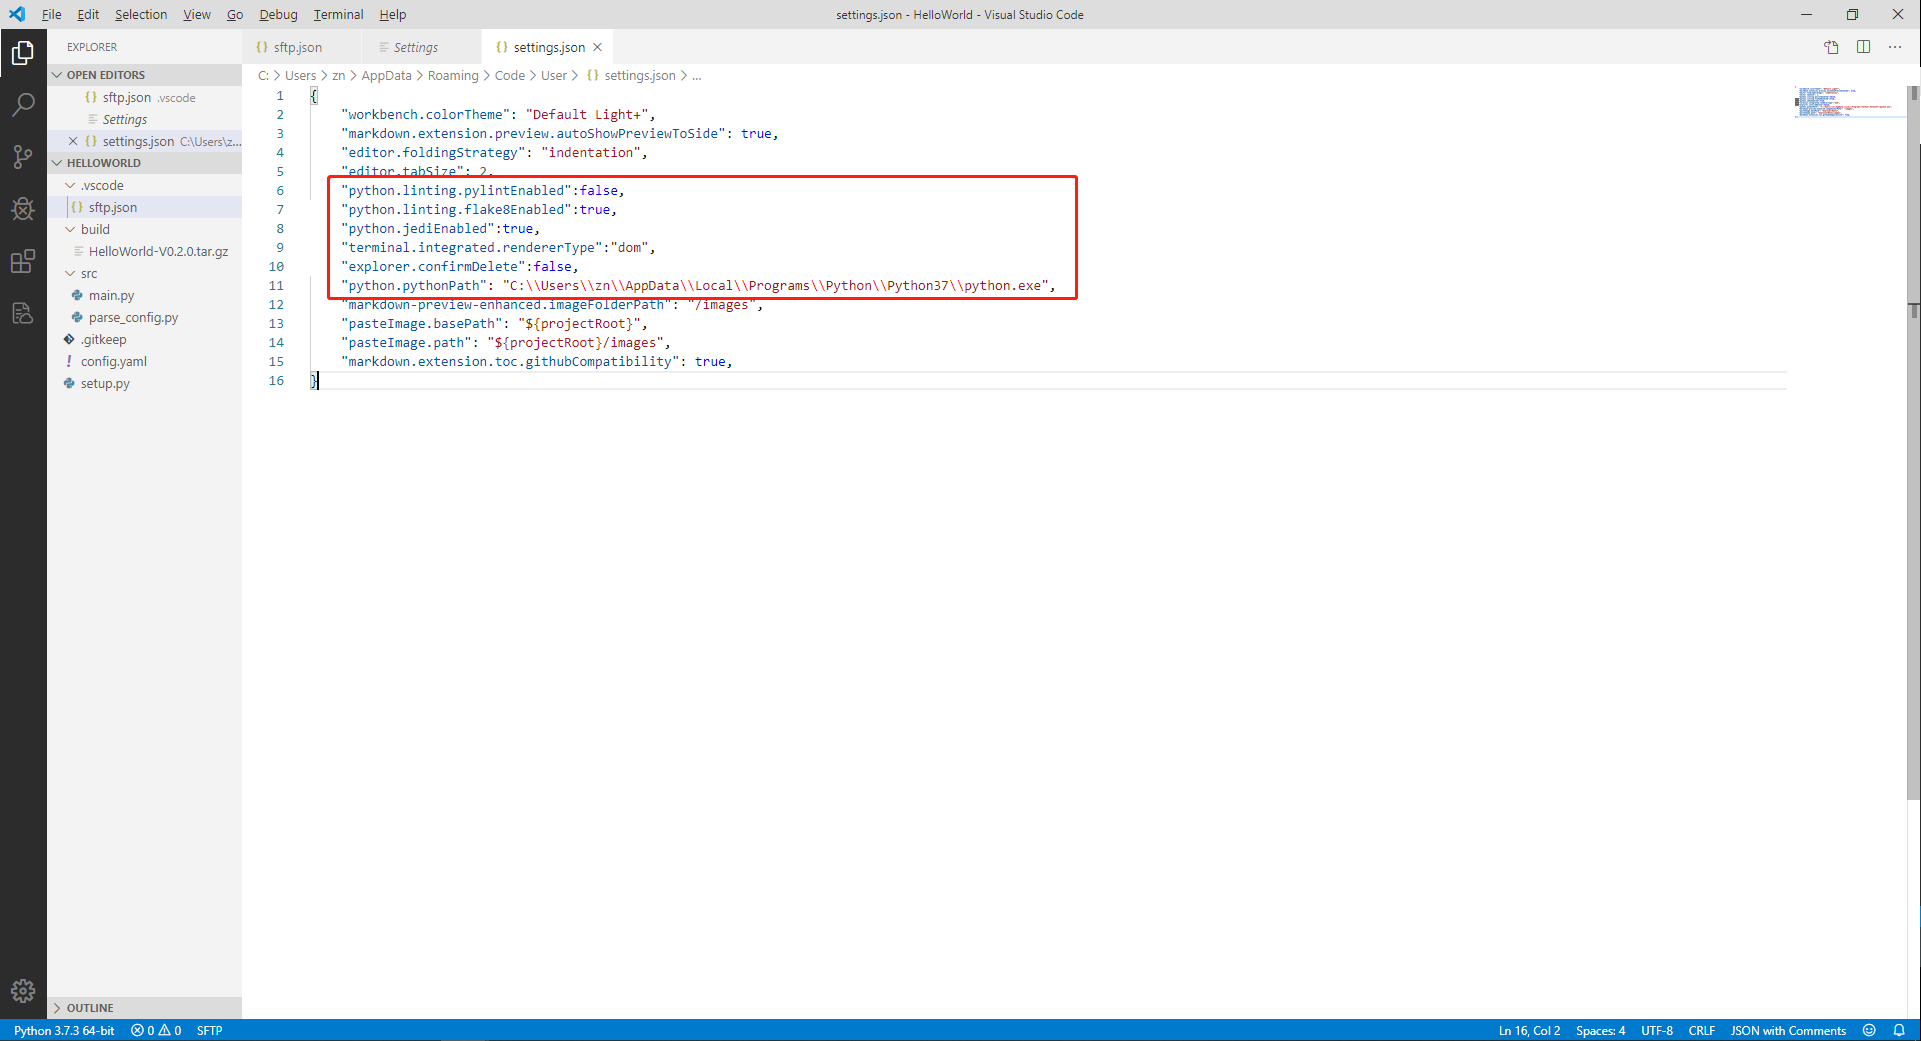
Add the following configuration items to settings.json and save the configuration (
python.pythonPathis the installation path of the Python interpreter)."python.linting.pylintEnabled":false, "python.linting.flake8Enabled":true, "python.jediEnabled":true, "terminal.integrated.rendererType":"dom", "explorer.confirmDelete":false, "python.pythonPath":"C:/Users/zn/AppData/Local/Programs/Python/Python37",
FAQ
- During SFTP connection building, it prompts “REMOTE HOST IDENTIFICATION HAS CHANGED and Host key verification failed”
- When synchronizing the code to the remote server, it prompts “All configured authentication methods failed”
- How to call the serial port and network port of MobiusPi
- When creating an SFTP connection with MobiusPi, it prompts “SSH error”
Q1: During SFTP connection building, it prompts “REMOTE HOST IDENTIFICATION HAS CHANGED and Host key verification failed”. What should I do?
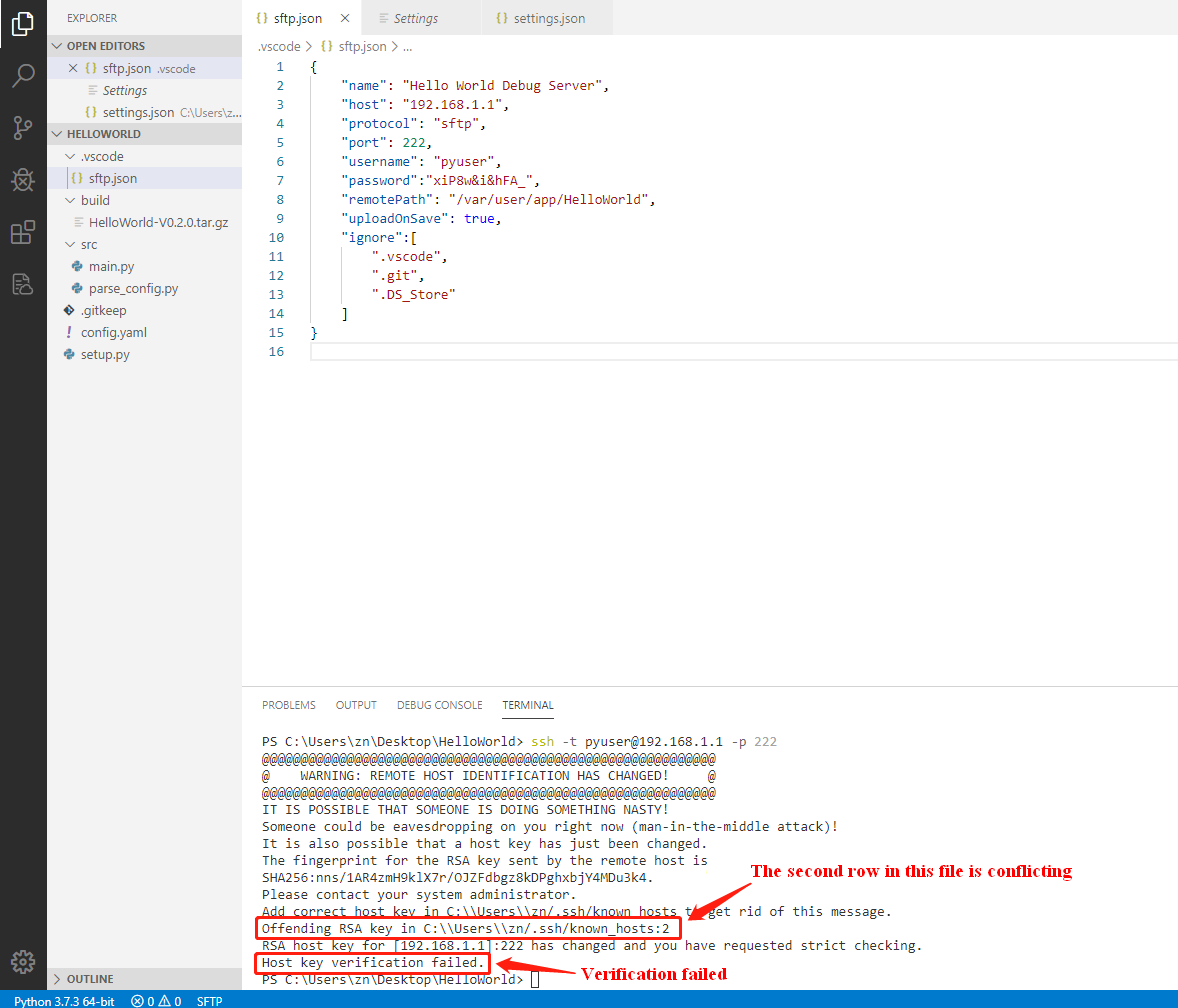
A1: The reason is that the MobiusPi key has been updated but the PC key does not, resulting in authentication failure. To solve the problem, just delete the row with key conflict from the key file. Press Ctrl and click the conflicting item to quickly access the link.

After deletion, run the >SFTP:Open SSH in Terminal command. Then, an SFTP connection is created.

Q2: After the SFTP connection is created, right-click on a blank area and choose Sync Local > Remote to synchronize the code to the remote server. It prompts “All configured authentication methods failed”. What should I do?
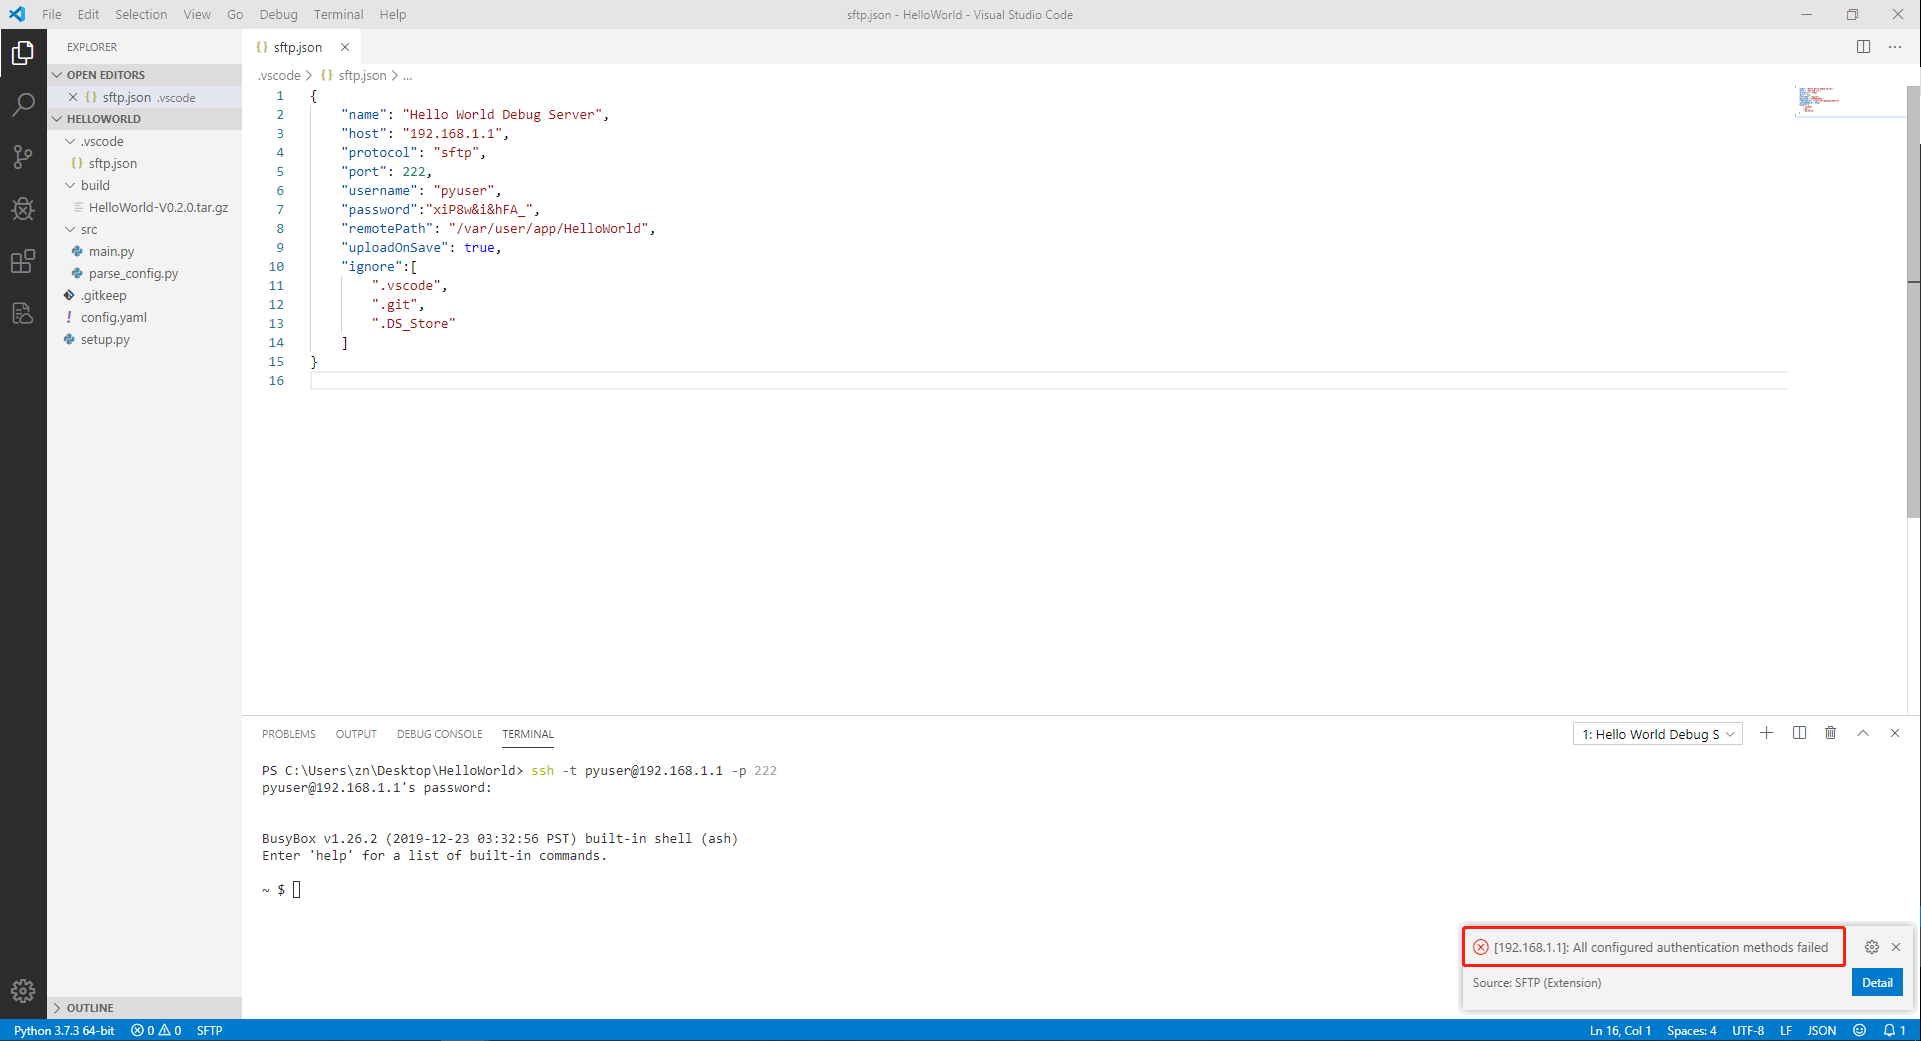
A2: Ensure that the password in the sftp.json file is same to that on MobiusPi. After the passwords are the same, synchronize the code again.
Q3: How to call the serial port and network port of MobiusPi?
A3: The RS485 serial port name of IG902 is /dev/ttyO3 and the RS232 serial port name is /dev/ttyO1; The RS485 serial port name of IG502 is /dev/ttyO3 and the RS232 serial port name is /dev/ttyO1; The RS485 serial port name of IG501 is /dev/ttyO1 and the RS232 serial port name is /dev/ttyO5. The serial port and network port can be called with the standard Python serial port/network port usage. For example, use the pyserial library to call the serial port.
Q4: When creating an SFTP connection with MobiusPi, it prompts “SSH error”, as shown in the following figure. What should I do?
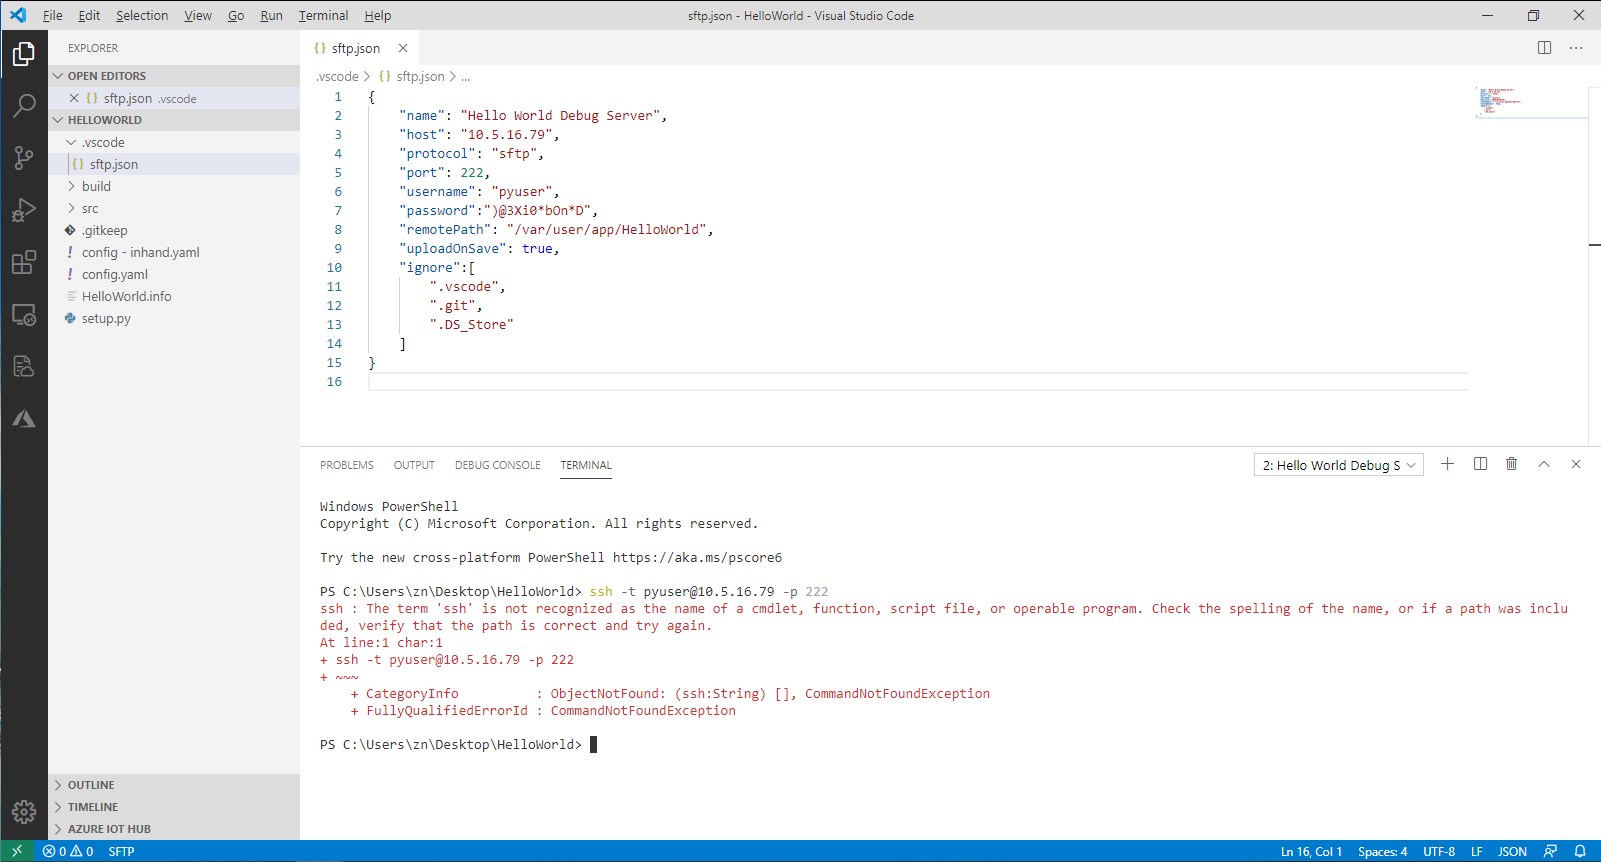
A4: Install OpenSSH to support the SSH protocol. Download OpenSSH from https://www.openssh.com.